本文最后更新于:June 3, 2022 pm
Spring 是目前主流的 Java Web 开发框架,是 Java 世界最为成功的框架。Spring框架是由于软件开发的复杂性而创建的。Spring使用的是基本的JavaBean来完成以前只可能由EJB完成的事情。然而,Spring的用途不仅仅限于服务器端的开发。从简单性、可测试性和松耦合性角度而言,绝大部分Java应用都可以从Spring中受益。该框架是一个轻量级的开源框架,具有很高的凝聚力和吸引力。Spring 框架不局限于服务器端的开发。从简单性、可测试性和松耦合的角度而言,任何 Java 应用都可以从 Spring 中受益。Spring 框架还是一个超级粘合平台,除了自己提供功能外,还提供粘合其他技术和框架的能力。
目录 本文以手动实现AOP效果为例。主要分为静态代理和动态代理实现。
场景描述:以购买业务为背景,通过AOP实现事务、日志等。
环境搭建
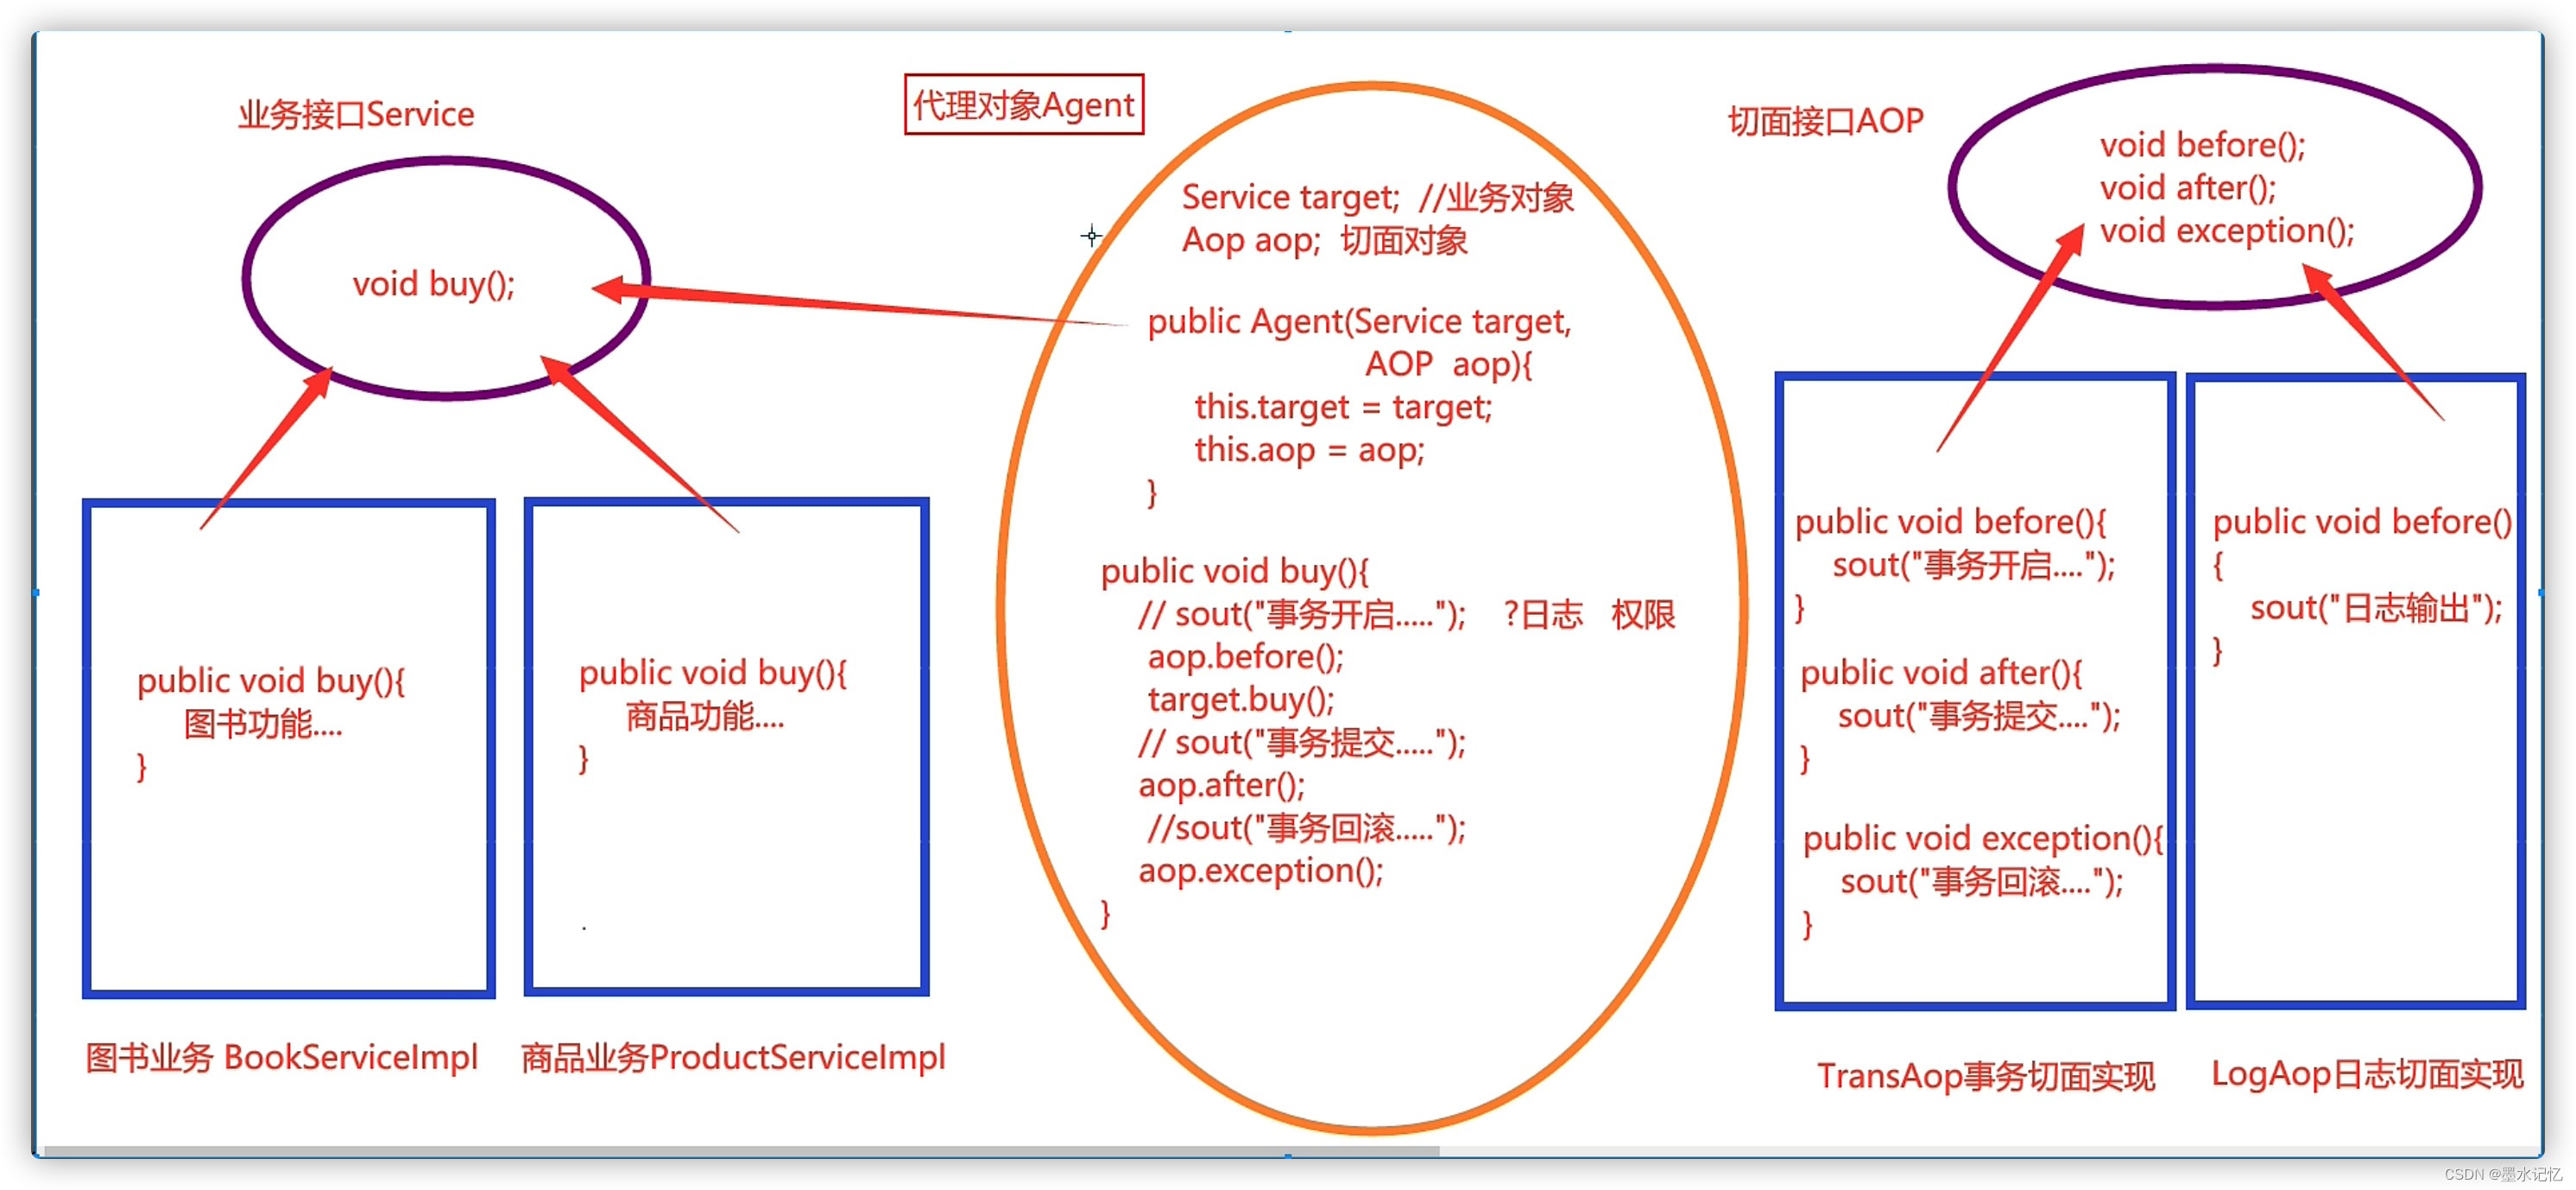
两个接口:一个是购买业务的接口、另一个是AOP的接口。
四个实现类:
整体实现结构图:
代码实现 接口 购买业务接口:Buy
package com.tothefor.OurAOP;public interface Buy void buy ()
切面接口:AOP
package com.tothefor.OurAOP;public interface AOP default void before () default void after () default void excetion ()
实现类 book的实现类:BookImpl.java
package com.tothefor.OurAOP;public class BookImpl implements Buy @Override public void buy () "这里是book的实现类...." );
phone的实现类:PhoneImpl.java
package com.tothefor.OurAOP;public class PhoneImpl implements Buy @Override public void buy () "这里是phone的实现类...." );
trans的实现类:TransAopImpl.java
1 2 3 4 5 6 7 8 9 10 11 12 13 14 15 16 17 18 19 20 21 22 23 24 package com.tothefor.OurAOP;public class TransAopImpl implements AOP @Override public void before () "事务开启...." );@Override public void after () "事务提交...." );@Override public void excetion () "事务回滚...." );
log的实现类:LogAopImpl.java
1 2 3 4 5 6 7 8 9 10 11 12 13 14 15 16 17 18 19 20 21 22 23 24 package com.tothefor.OurAOP;public class LogAopImpl implements AOP @Override public void before () "前置日志打印...." );@Override public void after () "后置日志打印...." );@Override public void excetion () "异常日志打印...." );
静态代理实现 代理类 1 2 3 4 5 6 7 8 9 10 11 12 13 14 15 16 17 18 19 20 21 22 23 24 25 26 27 28 29 package com.tothefor.OurAOP;public class MyProxy implements Buy private Buy buy;private AOP aop;public MyProxy (Buy buy,AOP aop) this .buy = buy;this .aop = aop;@Override public void buy () try {catch (Exception e){
测试 测试一:
1 2 3 4 5 6 7 8 9 10 11 12 13 14 15 16 17 18 19 20 21 package com.tothefor.OurAOP;import org.junit.jupiter.api.Test;public class MyTestAOP @Test public void testAop () new MyProxy(new BookImpl(),new TransAopImpl());
测试二:
1 2 3 4 5 6 7 8 9 10 11 12 13 14 15 16 17 18 19 20 21 package com.tothefor.OurAOP;import org.junit.jupiter.api.Test;public class MyTestAOP @Test public void testAop () new MyProxy(new PhoneImpl(),new LogAopImpl());
实现切入多个切面 实现一次性切入多个切面。
1
2
3
4
5
6
7
8
9
10
11
12
13
14
15
16
17
18
19
20
21
22
23
24
package com.tothefor.OurAOP;import org.junit.jupiter.api.Test;public class MyTestAOP @Test public void testAop () new MyProxy(new BookImpl(),new TransAopImpl());new MyProxy(proxy,new LogAopImpl());
因为在MyProxy类中是继承了Buy接口的,所以这里是可以直接传进去。这种切入多个切面,类似于多层的套壳,一层套着一层,把前一个整体当成是一次业务。
静态代理的缺点是:一旦添加方法,那么修改的地方非常多,比较麻烦。所以就需要使用动态代理的方式来实现。
动态代理实现 动态代理实现其实就是在静态代理上进行修改,因为在MyProxy代理类中是将代码写死了。我们将通过Proxy 类中的方法:newProxyInstance() ,来生成一个代理对象。
1 2 3 4 5 6 7 8 9 10 11 12 13 14 15 16 17 18 19 20 21 22 23 24 25 26 27 28 29 30 31 32 33 34 35 36 37 38 39 40 41 42 43 44 package com.tothefor.OurAOP;import java.lang.reflect.InvocationHandler;import java.lang.reflect.Method;import java.lang.reflect.Proxy;public class ProxyFactory public static Object getProxy (Buy target,AOP aop) return Proxy.newProxyInstance(new InvocationHandler() {@Override public Object invoke ( //生成的代理对象 Object proxy, //被调用的方法 Method method, //调用的方法的参数 Object[] args) throws Throwable null ;try {catch (Exception e){return obj;
其中,第三个参数(InvocationHandler)可以另外用一个类来单独实现。具体可见《JAVA知识点-Java代理模式 》
测试 1 2 3 4 5 6 7 8 9 10 11 12 13 14 15 16 17 18 19 20 21 package com.tothefor.OurAOP;import org.junit.jupiter.api.Test;public class MyTestAOP @Test public void testAop () new BookImpl(),new TransAopImpl());
新增业务 在Buy接口中新增展示业务(show()方法)。如果是静态代理,那么还需要在代理类中进行添加,比较麻烦;而动态代理则只需要在Buy接口中添加,然后在实现类中实现具体的逻辑就可以了,简单。
静态代理 接口:Buy
package com.tothefor.OurAOP;public interface Buy void buy () void show ()
具体的实现类中也得重写show()方法,这里就不再写了。
代理类:
1 2 3 4 5 6 7 8 9 10 11 12 13 14 15 16 17 18 19 20 21 22 23 24 25 26 27 28 29 30 31 32 33 34 35 36 37 38 39 40 package com.tothefor.OurAOP;public class MyProxy implements Buy private Buy buy;private AOP aop;public MyProxy (Buy buy,AOP aop) this .buy = buy;this .aop = aop;@Override public void buy () try {catch (Exception e){@Override public void show () try {catch (Exception e){
测试 1 2 3 4 5 6 7 8 9 10 11 12 13 14 15 16 17 18 19 20 21 package com.tothefor.OurAOP;import org.junit.jupiter.api.Test;public class MyTestAOP @Test public void testAop () new MyProxy(new BookImpl(),new TransAopImpl());
可以看见,在静态代理中,一旦进行添加业务(方法),那么需要修改的地方是比较多的,也是比较麻烦的。而且这里的例子只是一个方法,在实际的开发中一定是成百上千或者更多的。
动态搭理 接口:Buy
package com.tothefor.OurAOP;public interface Buy void buy () void show ()
具体的实现类中也得重写show()方法,这里就不再写了。
测试 1 2 3 4 5 6 7 8 9 10 11 12 13 14 15 16 17 18 19 20 21 package com.tothefor.OurAOP;import org.junit.jupiter.api.Test;public class MyTestAOP @Test public void testAop () new BookImpl(),new TransAopImpl());
总结 手动实现AOP的步骤:
两个接口:一个是业务的接口,另一个是切入的接口。
具体实现类:实现上述接口的实现类。
创建代理类。