本文最后更新于:May 13, 2023 pm
SpringBoot框架中有两个非常重要的策略:开箱即用和约定优于配置。其设计目的是用来简化新Spring应用的初始搭建以及开发过程。该框架使用了特定的方式来进行配置,从而使开发人员不再需要定义样板化的配置。
目录 📢注意:各个模块中的打包插件可保留。
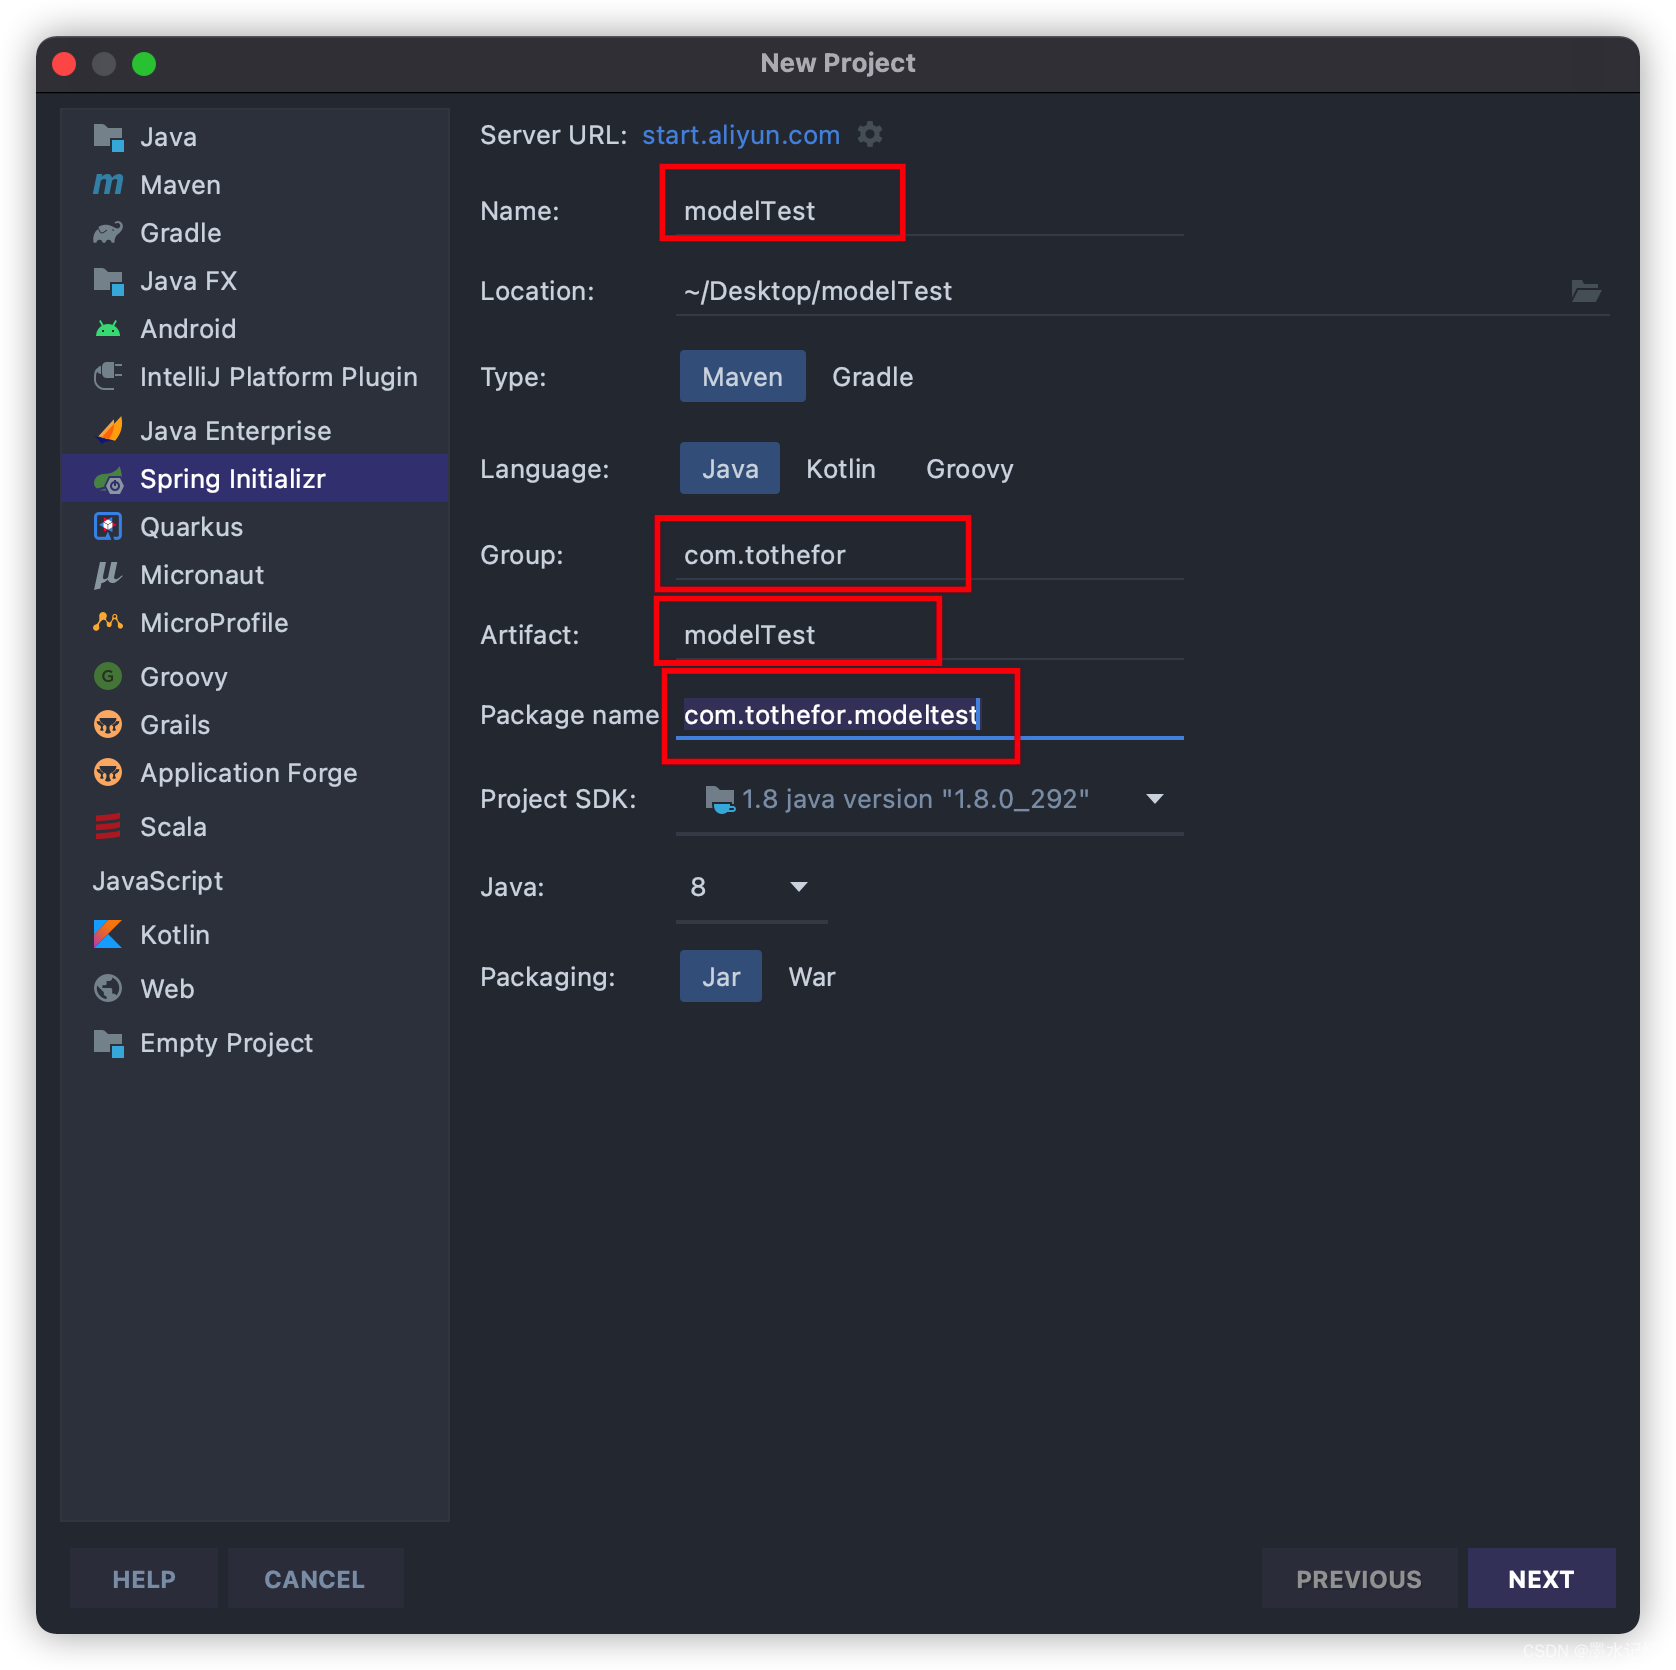
首先创建项目
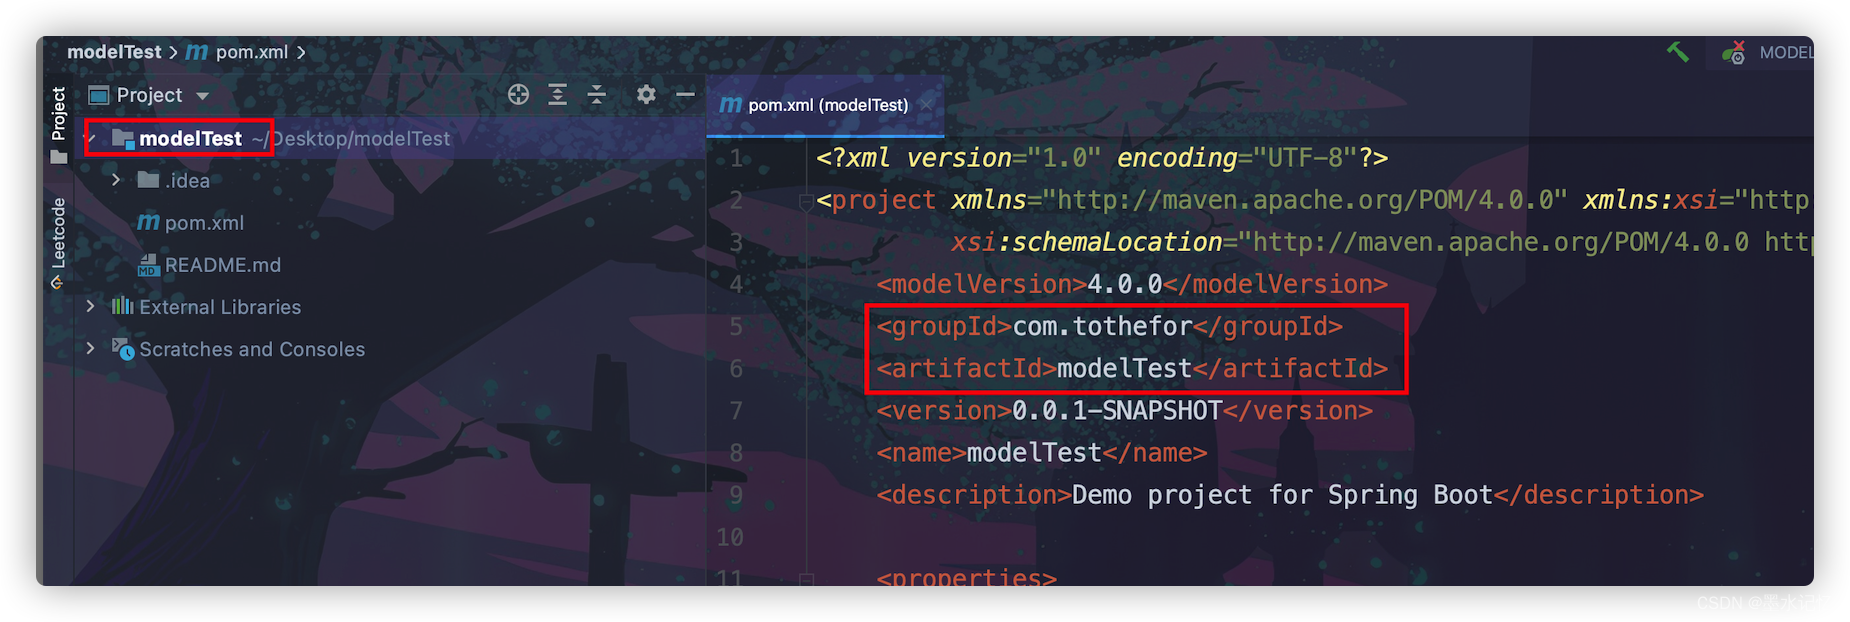
创建好的项目,删除多余无用文件:
再修改父项目的pom文件内容:
1
2
3
4
5
6
7
8
9
10
11
12
13
14
15
16
17
18
19
20
21
22
23
24
25
26
27
28
29
30
31
32
33
34
35
36
37
38
39
40
41
42
43
44
45
46
47
48
49
50
51
52
53
54
55
56
57
58
59
60
61
62
63
64
65
66
67
68
69
70
71
72
73
74
75
76
77
78
79
80
81
82
<?xml version="1.0" encoding="UTF-8"?> <project xmlns ="http://maven.apache.org/POM/4.0.0" xmlns:xsi ="http://www.w3.org/2001/XMLSchema-instance" xsi:schemaLocation ="http://maven.apache.org/POM/4.0.0 https://maven.apache.org/xsd/maven-4.0.0.xsd" > <modelVersion > 4.0.0</modelVersion > <groupId > com.tothefor</groupId > <artifactId > modelTest</artifactId > <version > 0.0.1-SNAPSHOT</version > <packaging > pom</packaging > <parent > <groupId > org.springframework.boot</groupId > <artifactId > spring-boot-starter-parent</artifactId > <version > 2.3.7.RELEASE</version > <relativePath /> </parent > <modules > </modules > <properties > <java.version > 1.8</java.version > <project.build.sourceEncoding > UTF-8</project.build.sourceEncoding > <project.reporting.outputEncoding > UTF-8</project.reporting.outputEncoding > <spring-boot.version > 2.3.7.RELEASE</spring-boot.version > </properties > <dependencies > <dependency > <groupId > org.springframework.boot</groupId > <artifactId > spring-boot-starter</artifactId > </dependency > <dependency > <groupId > org.springframework.boot</groupId > <artifactId > spring-boot-starter-web</artifactId > </dependency > <dependency > <groupId > org.springframework.boot</groupId > <artifactId > spring-boot-starter-test</artifactId > <scope > test</scope > </dependency > </dependencies > <build > <plugins > <plugin > <groupId > org.apache.maven.plugins</groupId > <artifactId > maven-compiler-plugin</artifactId > <version > 3.8.1</version > <configuration > <source > 1.8</source > <target > 1.8</target > <encoding > UTF-8</encoding > </configuration > </plugin > <plugin > <groupId > org.springframework.boot</groupId > <artifactId > spring-boot-maven-plugin</artifactId > <version > 2.3.7.RELEASE</version > <configuration > <mainClass > com.tothefor.modeltest.ModelTestApplication</mainClass > </configuration > <executions > <execution > <id > repackage</id > <goals > <goal > repackage</goal > </goals > </execution > </executions > </plugin > </plugins > </build > </project >
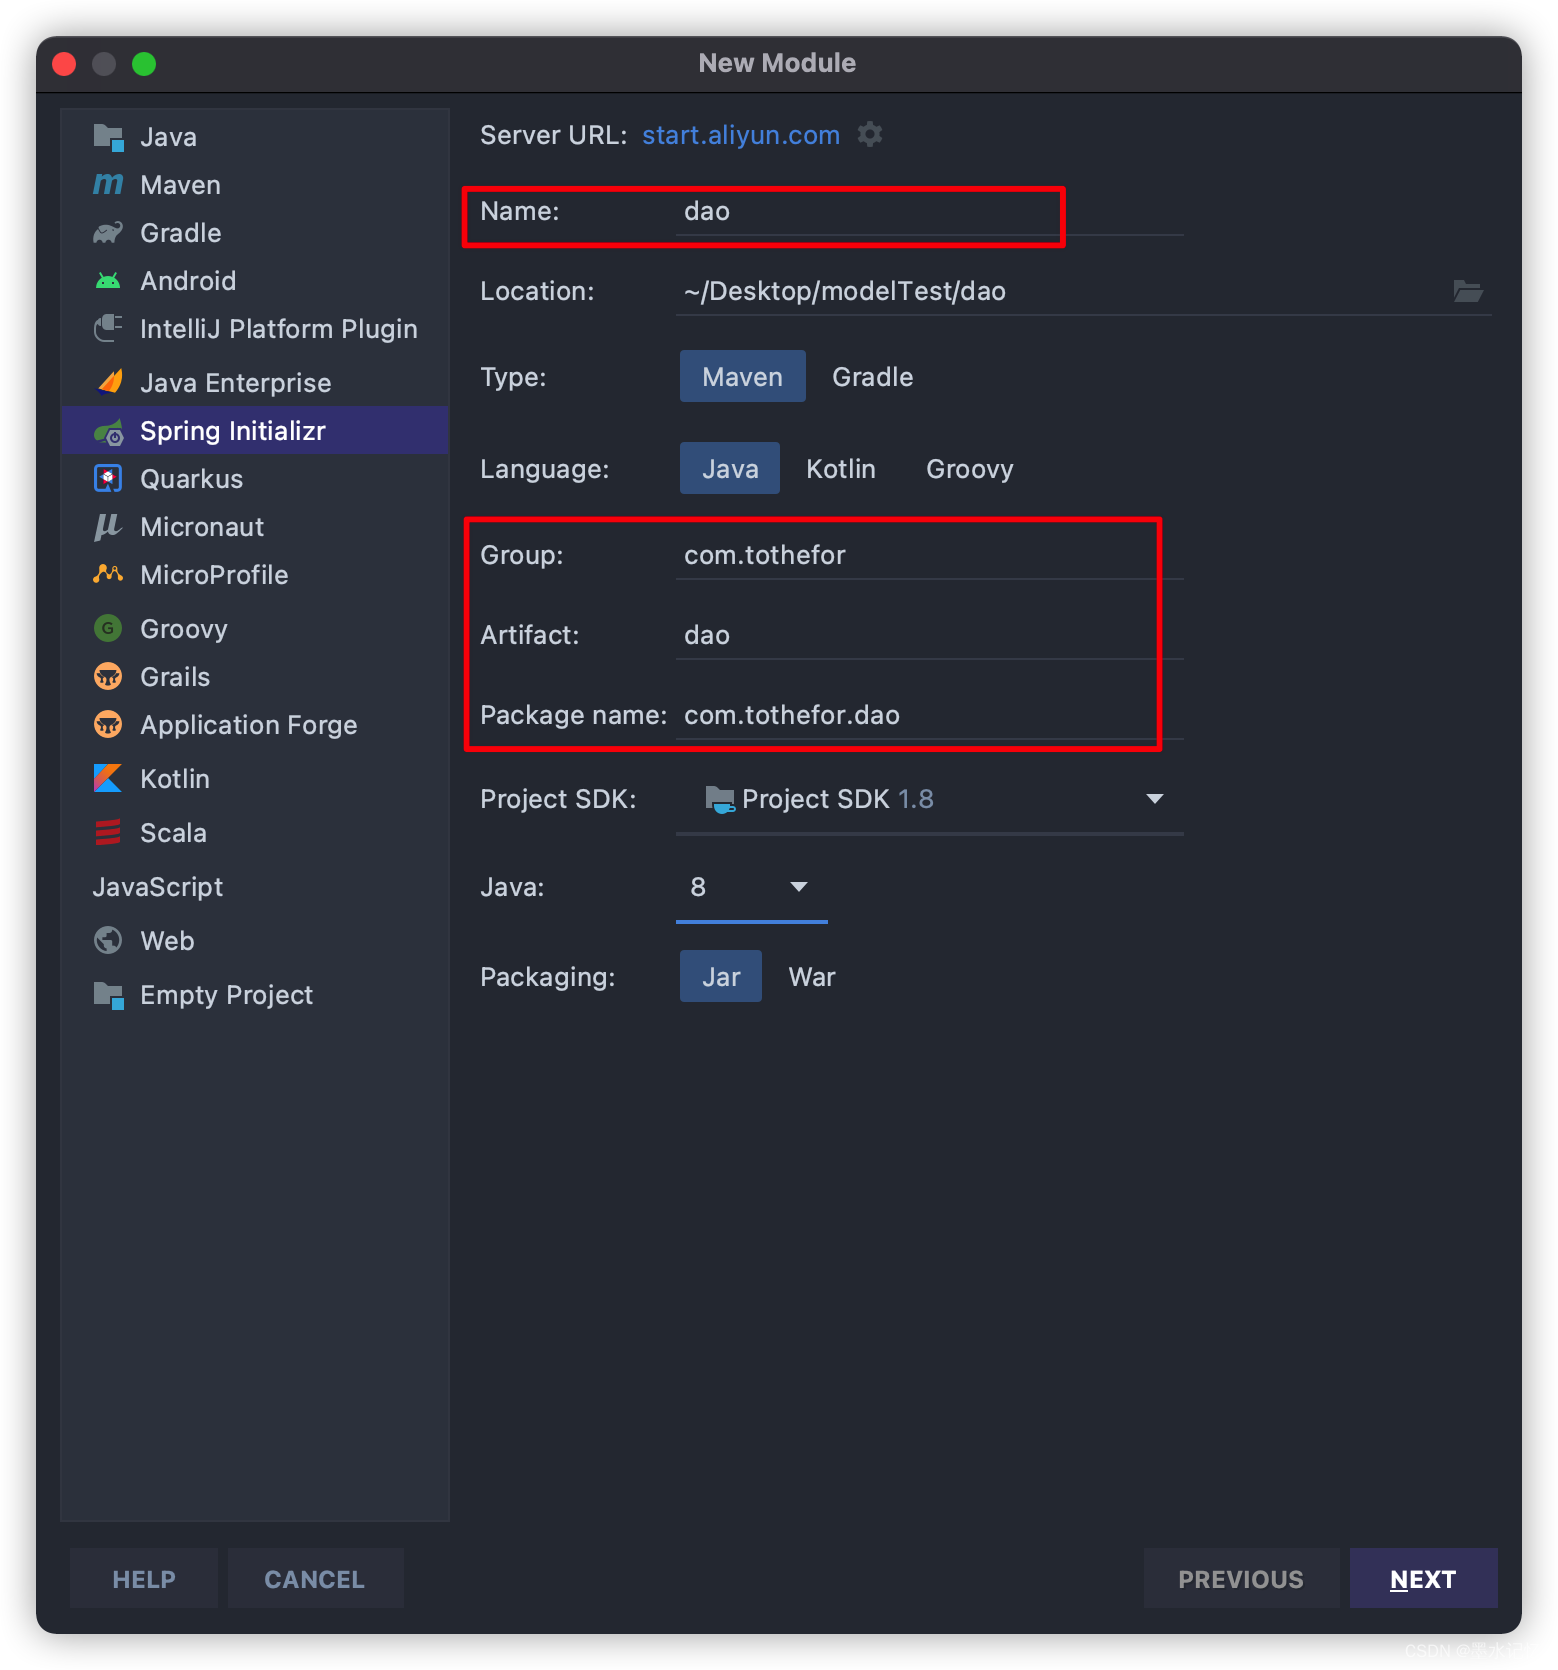
📢注意:模块的包名的前缀最好保持一样,如:com.tothefor.xxx。因为在后面配置启动类扫描包时,就只需要配置一个通用的扫描路径即可,否则将配置多条扫描路径。
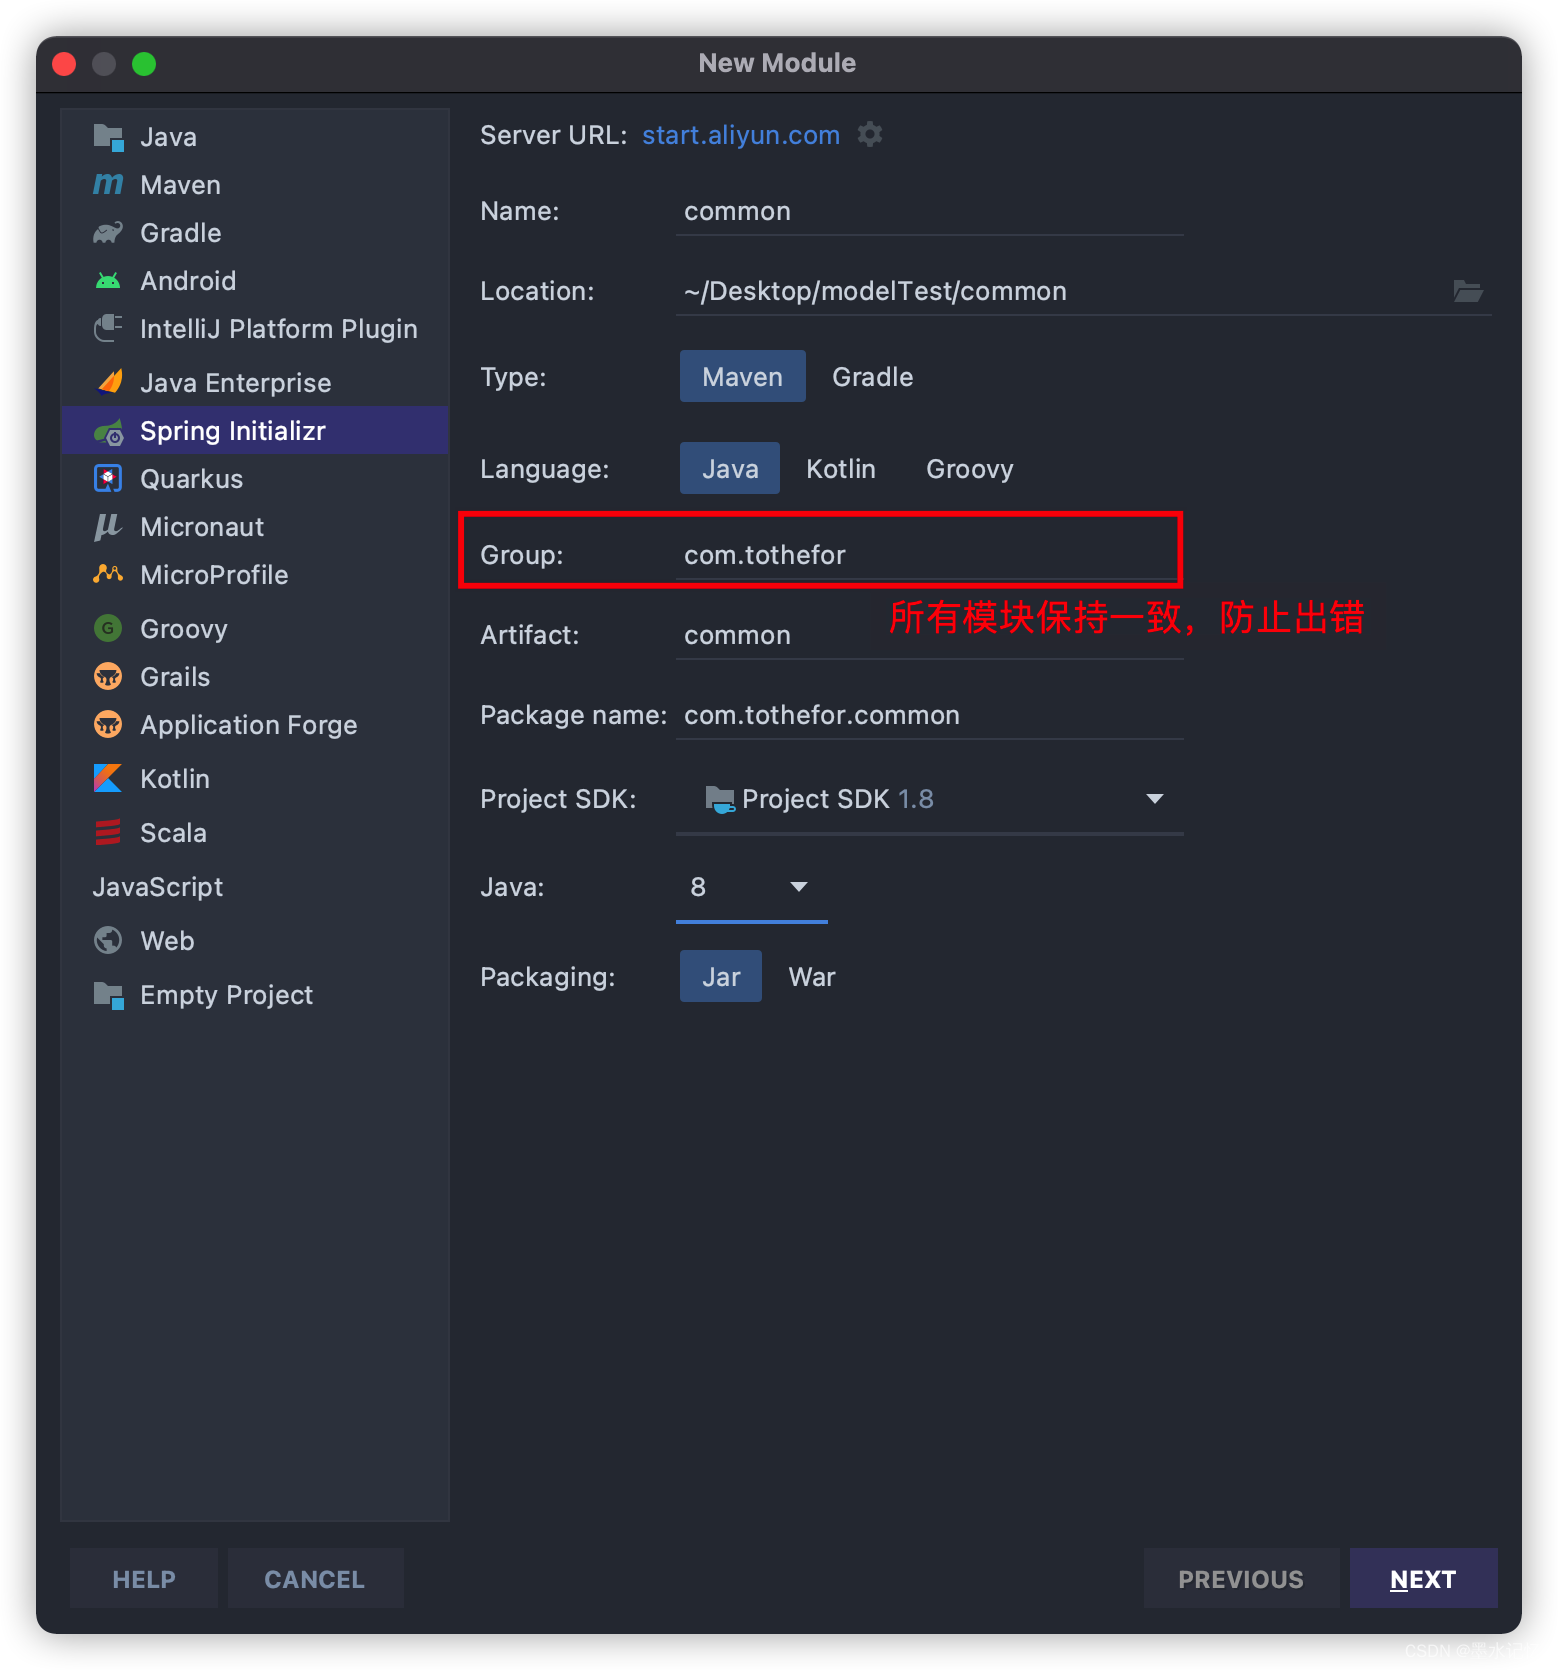
创建第一个模块 创建一个通用的工具模块common。
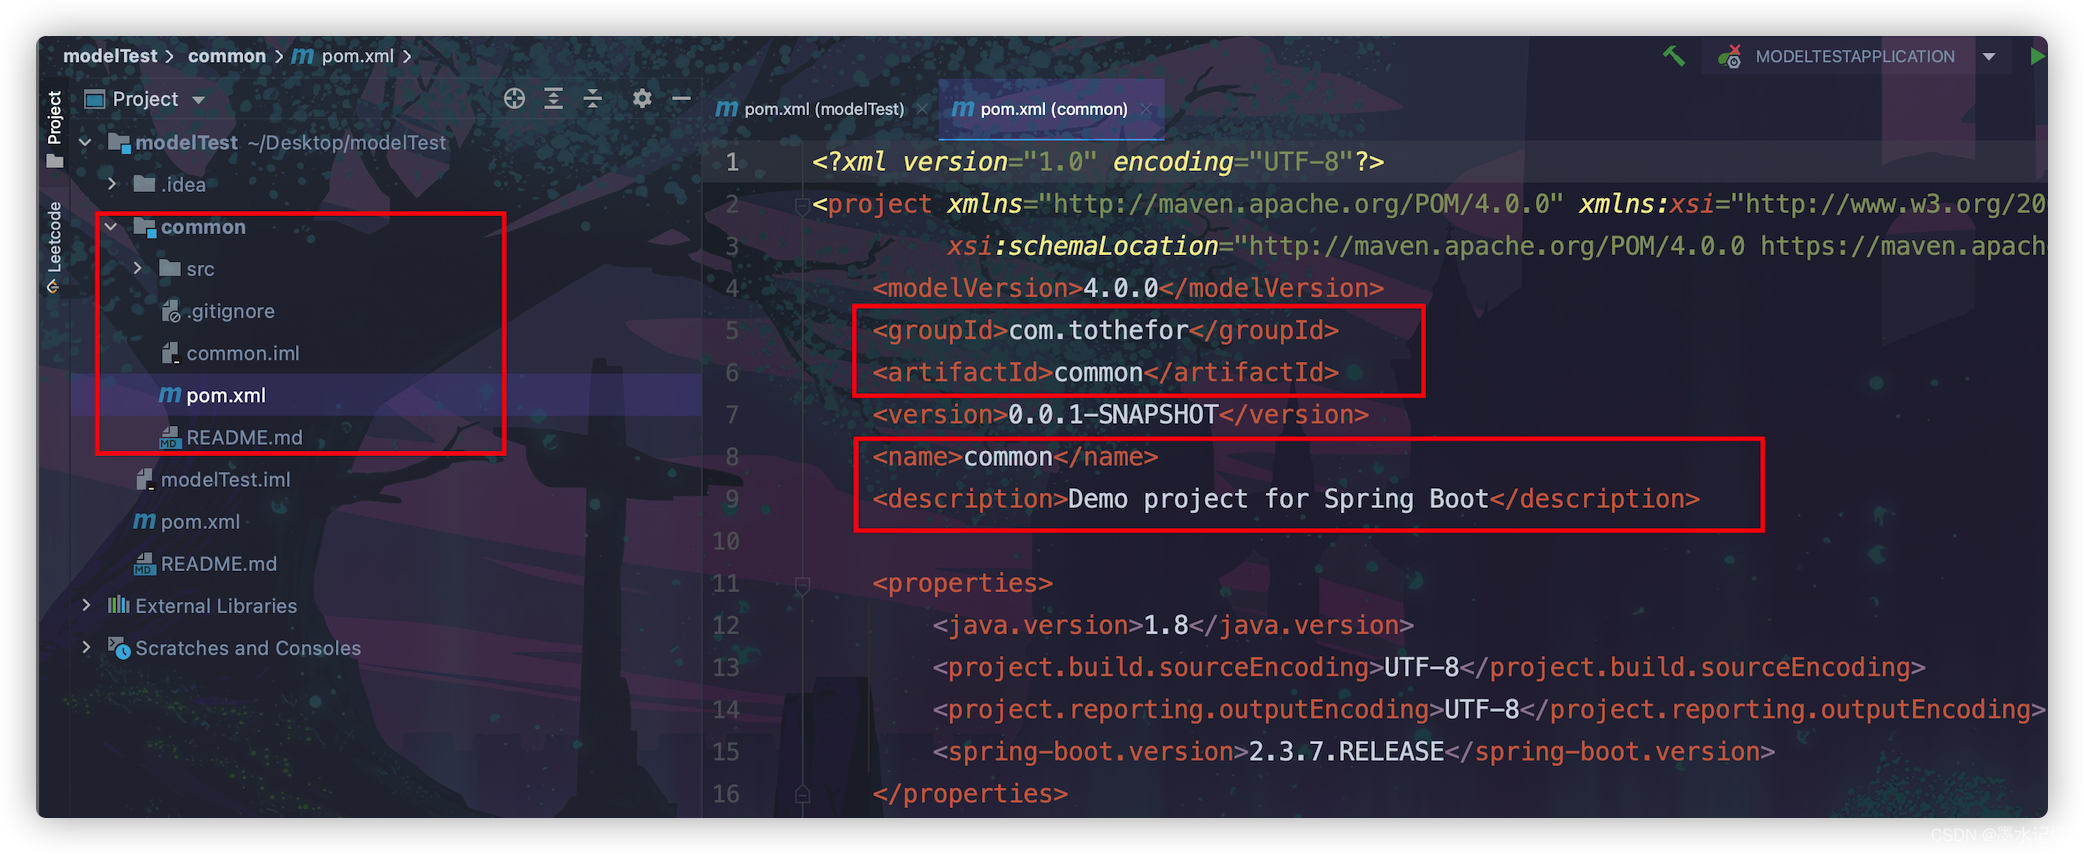
新创建好模块后:
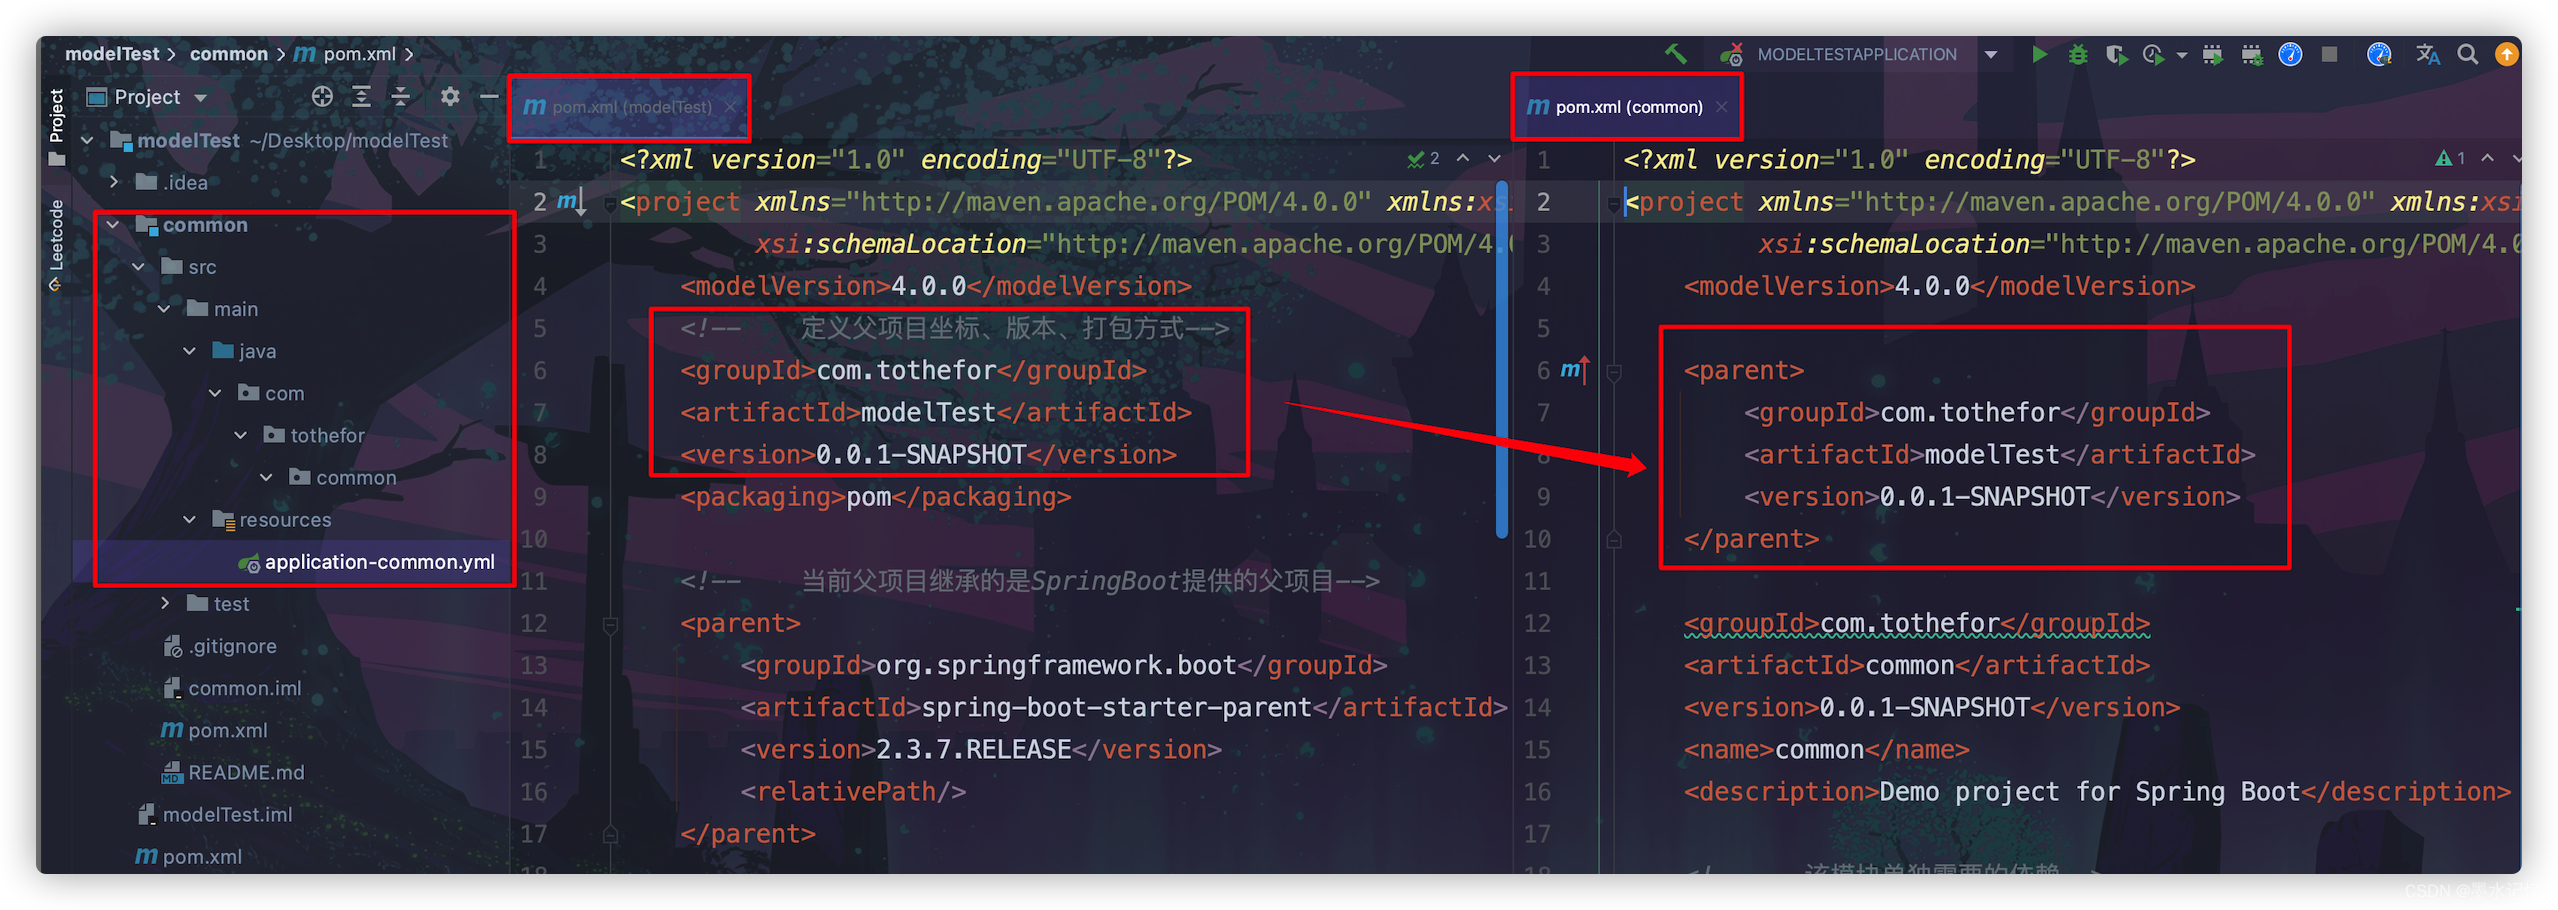
修改common模块中的pom文件内容:
1
2
3
4
5
6
7
8
9
10
11
12
13
14
15
16
17
18
19
20
21
22
23
24
25
<?xml version="1.0" encoding="UTF-8"?> <project xmlns ="http://maven.apache.org/POM/4.0.0" xmlns:xsi ="http://www.w3.org/2001/XMLSchema-instance" xsi:schemaLocation ="http://maven.apache.org/POM/4.0.0 https://maven.apache.org/xsd/maven-4.0.0.xsd" > <modelVersion > 4.0.0</modelVersion > <parent > <groupId > com.tothefor</groupId > <artifactId > modelTest</artifactId > <version > 0.0.1-SNAPSHOT</version > </parent > <groupId > com.tothefor</groupId > <artifactId > common</artifactId > <version > 0.0.1-SNAPSHOT</version > <name > common</name > <description > Demo project for Spring Boot</description > <dependencies > </dependencies > </project >
📢注意:还需要把非启动模块的启动类给删掉!!!并且,对应的resource文件夹中的配置文件修改为application-common.yml格式,其他模块同理。
判断 查看模块间是否成功关联,可以点击左侧图标,查看跳转效果。
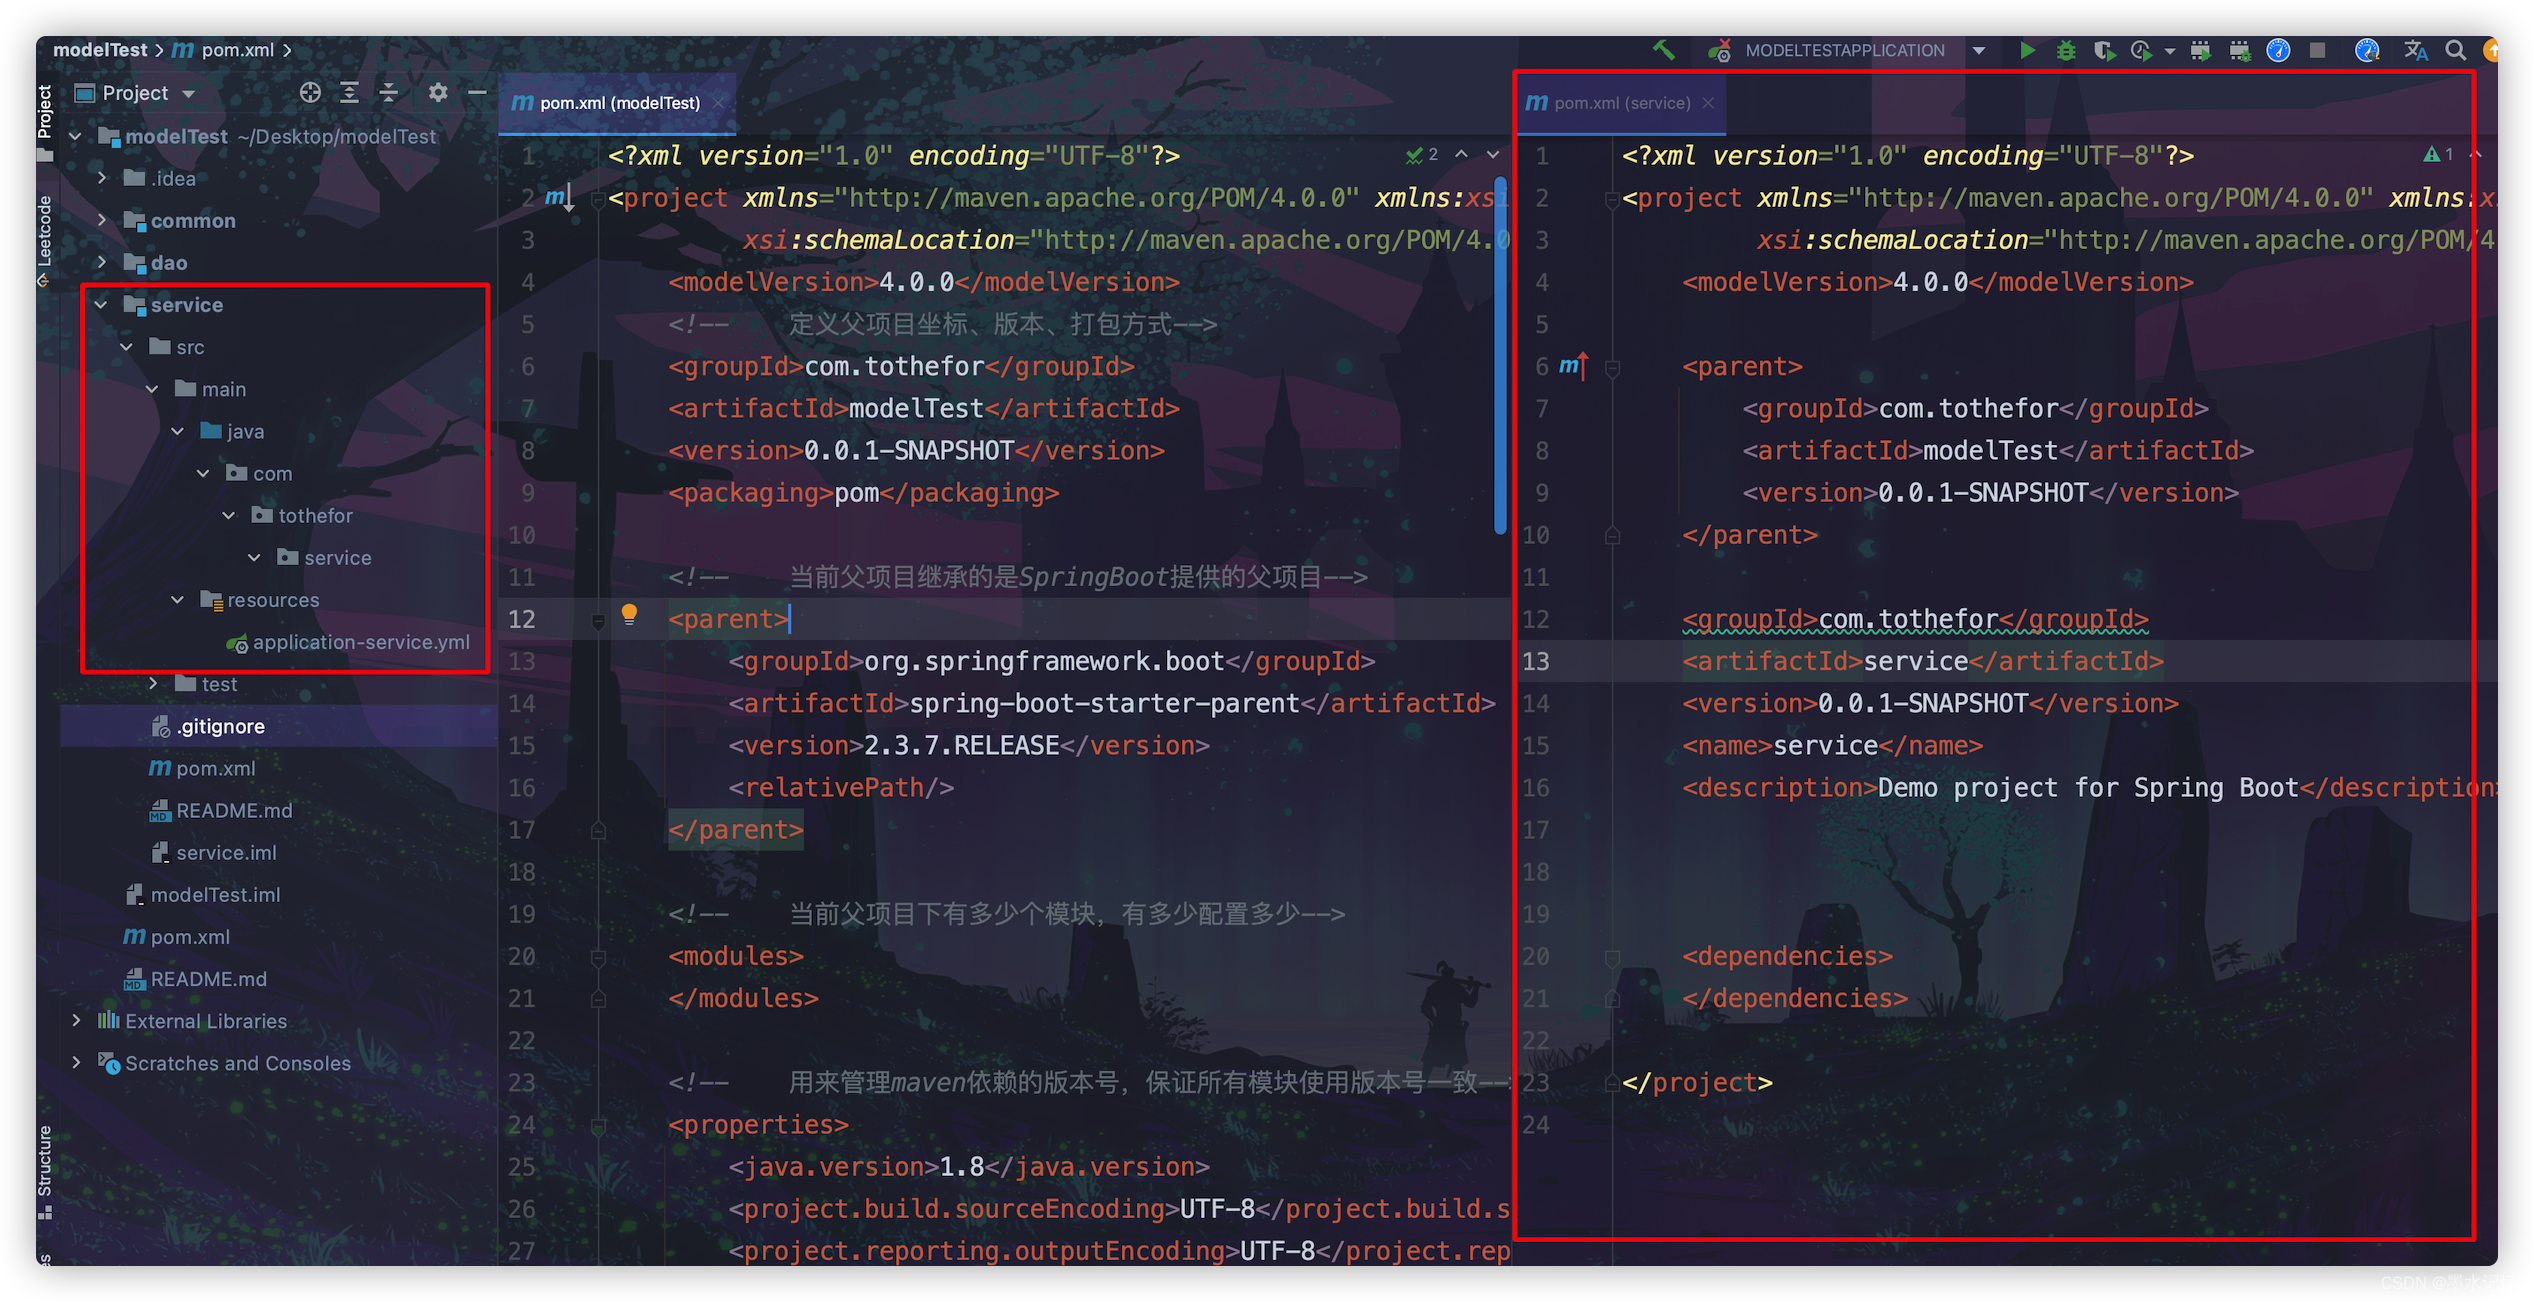
创建第二个模块
创建好后,按照第一个模块的方式,进行修改pom文件。这里就不再重复记录了。
创建第三个模块 进行同样的操作。
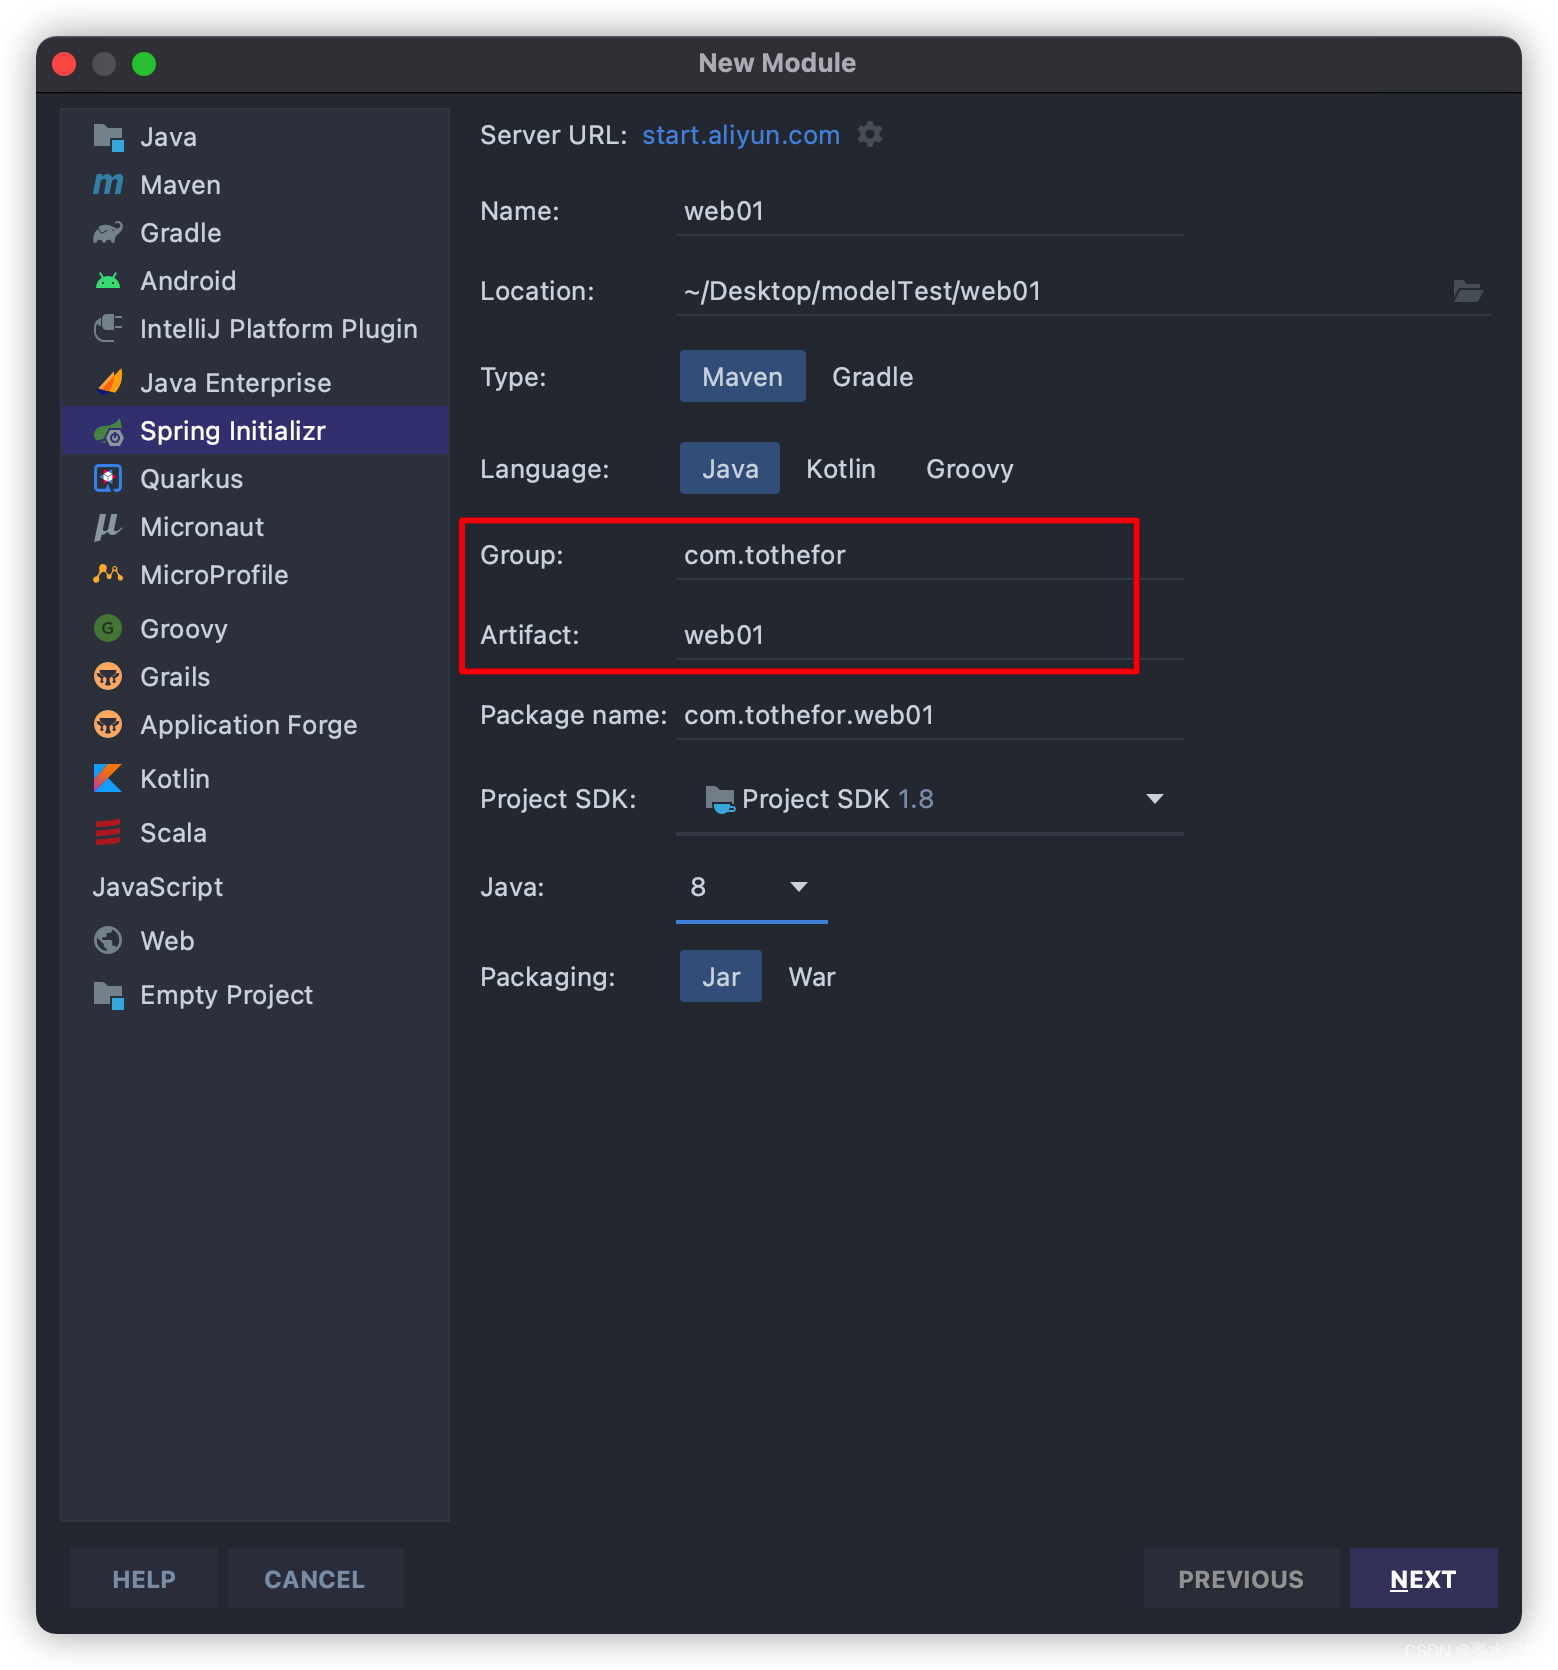
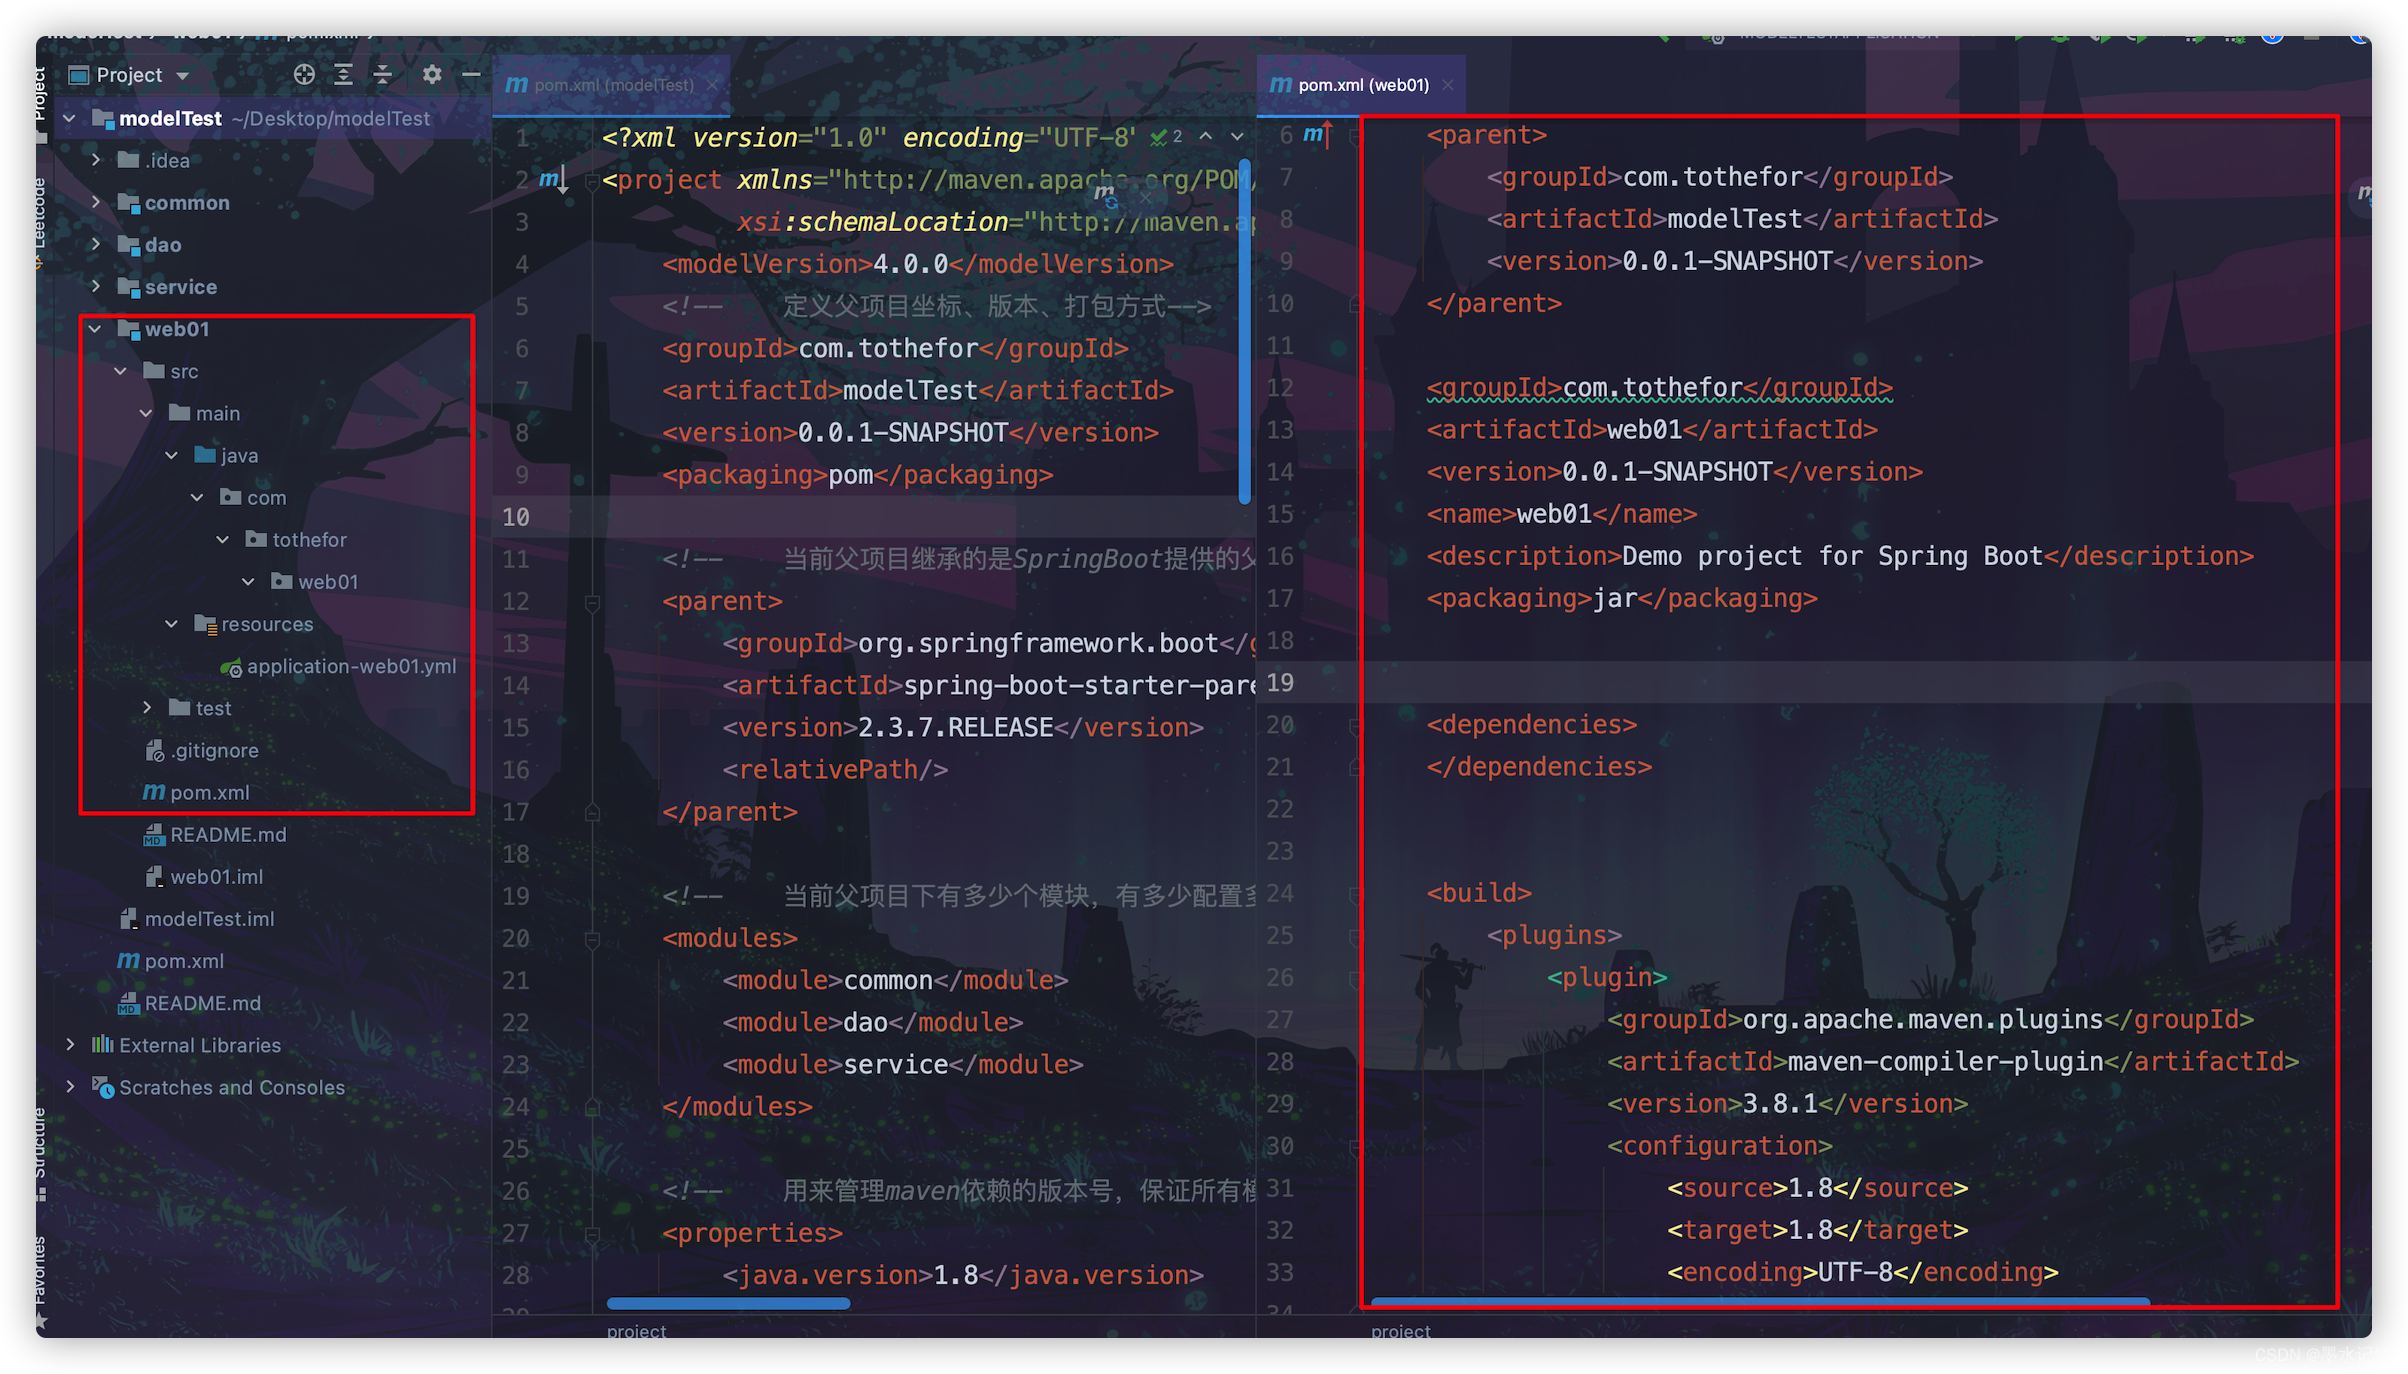
创建Web模块 这里创建两个web模块。
修改对应pom文件内容:
打包:
1
2
3
4
5
6
7
8
9
10
11
12
13
14
15
16
17
18
19
20
21
22
23
24
25
26
27
28
29
30
31
32
33
34
35
36
37
38
39
40
<?xml version="1.0" encoding="UTF-8"?> <project xmlns ="http://maven.apache.org/POM/4.0.0" xmlns:xsi ="http://www.w3.org/2001/XMLSchema-instance" xsi:schemaLocation ="http://maven.apache.org/POM/4.0.0 https://maven.apache.org/xsd/maven-4.0.0.xsd" > <modelVersion > 4.0.0</modelVersion > <parent > <groupId > com.tothefor</groupId > <artifactId > modelTest</artifactId > <version > 0.0.1-SNAPSHOT</version > </parent > <groupId > com.tothefor</groupId > <artifactId > web01</artifactId > <version > 0.0.1-SNAPSHOT</version > <name > web01</name > <description > Demo project for Spring Boot</description > <packaging > jar</packaging > <dependencies > </dependencies > <build > <plugins > <plugin > <groupId > org.apache.maven.plugins</groupId > <artifactId > maven-compiler-plugin</artifactId > <version > 3.8.1</version > <configuration > <source > 1.8</source > <target > 1.8</target > <encoding > UTF-8</encoding > </configuration > </plugin > </plugins > </build > </project >
同理创建web02。
创建入口模块(启动类) 同样的方式进行创建模块,只是不删除启动类,只是在pom文件中增加一些东西。
另外,此模块的配置文件名称必须为application.yml!!!
1
2
3
4
5
6
7
8
9
10
11
12
13
14
15
16
17
18
19
20
21
22
23
24
25
26
27
28
29
30
31
32
33
34
35
36
37
38
39
40
41
42
43
44
45
46
47
48
49
50
51
52
53
54
55
56
57
58
59
60
61
62
63
64
65
66
<?xml version="1.0" encoding="UTF-8"?> <project xmlns ="http://maven.apache.org/POM/4.0.0" xmlns:xsi ="http://www.w3.org/2001/XMLSchema-instance" xsi:schemaLocation ="http://maven.apache.org/POM/4.0.0 https://maven.apache.org/xsd/maven-4.0.0.xsd" > <modelVersion > 4.0.0</modelVersion > <parent > <groupId > com.tothefor</groupId > <artifactId > modelTest</artifactId > <version > 0.0.1-SNAPSHOT</version > </parent > <groupId > com.tothefor</groupId > <artifactId > start</artifactId > <version > 0.0.1-SNAPSHOT</version > <name > start</name > <description > Demo project for Spring Boot</description > <packaging > jar</packaging > <dependencies > <dependency > <groupId > com.tothefor</groupId > <artifactId > web01</artifactId > <version > ${project.parent.version}</version > </dependency > <dependency > <groupId > com.tothefor</groupId > <artifactId > web02</artifactId > <version > ${project.parent.version}</version > </dependency > </dependencies > <build > <plugins > <plugin > <groupId > org.apache.maven.plugins</groupId > <artifactId > maven-compiler-plugin</artifactId > <version > 3.8.1</version > <configuration > <source > 1.8</source > <target > 1.8</target > <encoding > UTF-8</encoding > </configuration > </plugin > <plugin > <groupId > org.springframework.boot</groupId > <artifactId > spring-boot-maven-plugin</artifactId > <version > 2.3.7.RELEASE</version > <configuration > <mainClass > com.tothefor.start.StartApplication</mainClass > </configuration > <executions > <execution > <id > repackage</id > <goals > <goal > repackage</goal > </goals > </execution > </executions > </plugin > </plugins > </build > </project >
指定扫描路径 默认建好的启动类只会扫描本模块中的,所以需要指定整个项目的扫描路径。
package com.tothefor.start;import org.springframework.boot.SpringApplication;import org.springframework.boot.autoconfigure.SpringBootApplication;import org.springframework.context.annotation.ComponentScan;@SpringBootApplication @ComponentScan(value = "com.tothefor") public class StartApplication public static void main (String[] args)
📢注意:如果您的包名不是统一的前缀,如:com.tothefor.xxx,那么在配置扫描路径时,需要配置成数组形式。
@ComponentScan(value = {"com.tothefor","com.to"})
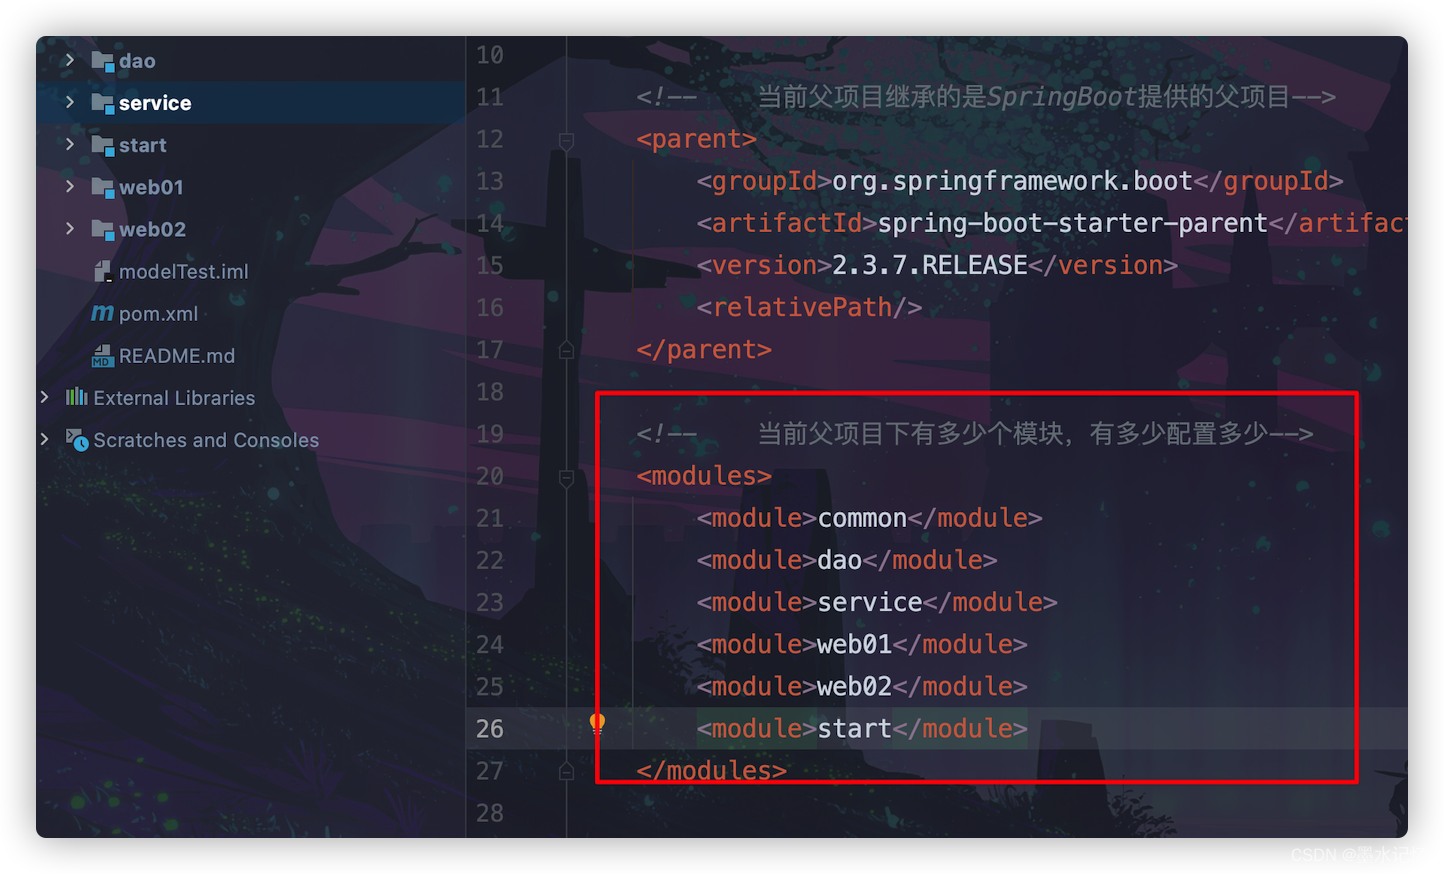
父项目添加模块 在主项目的pom文件中,进行模块的添加:
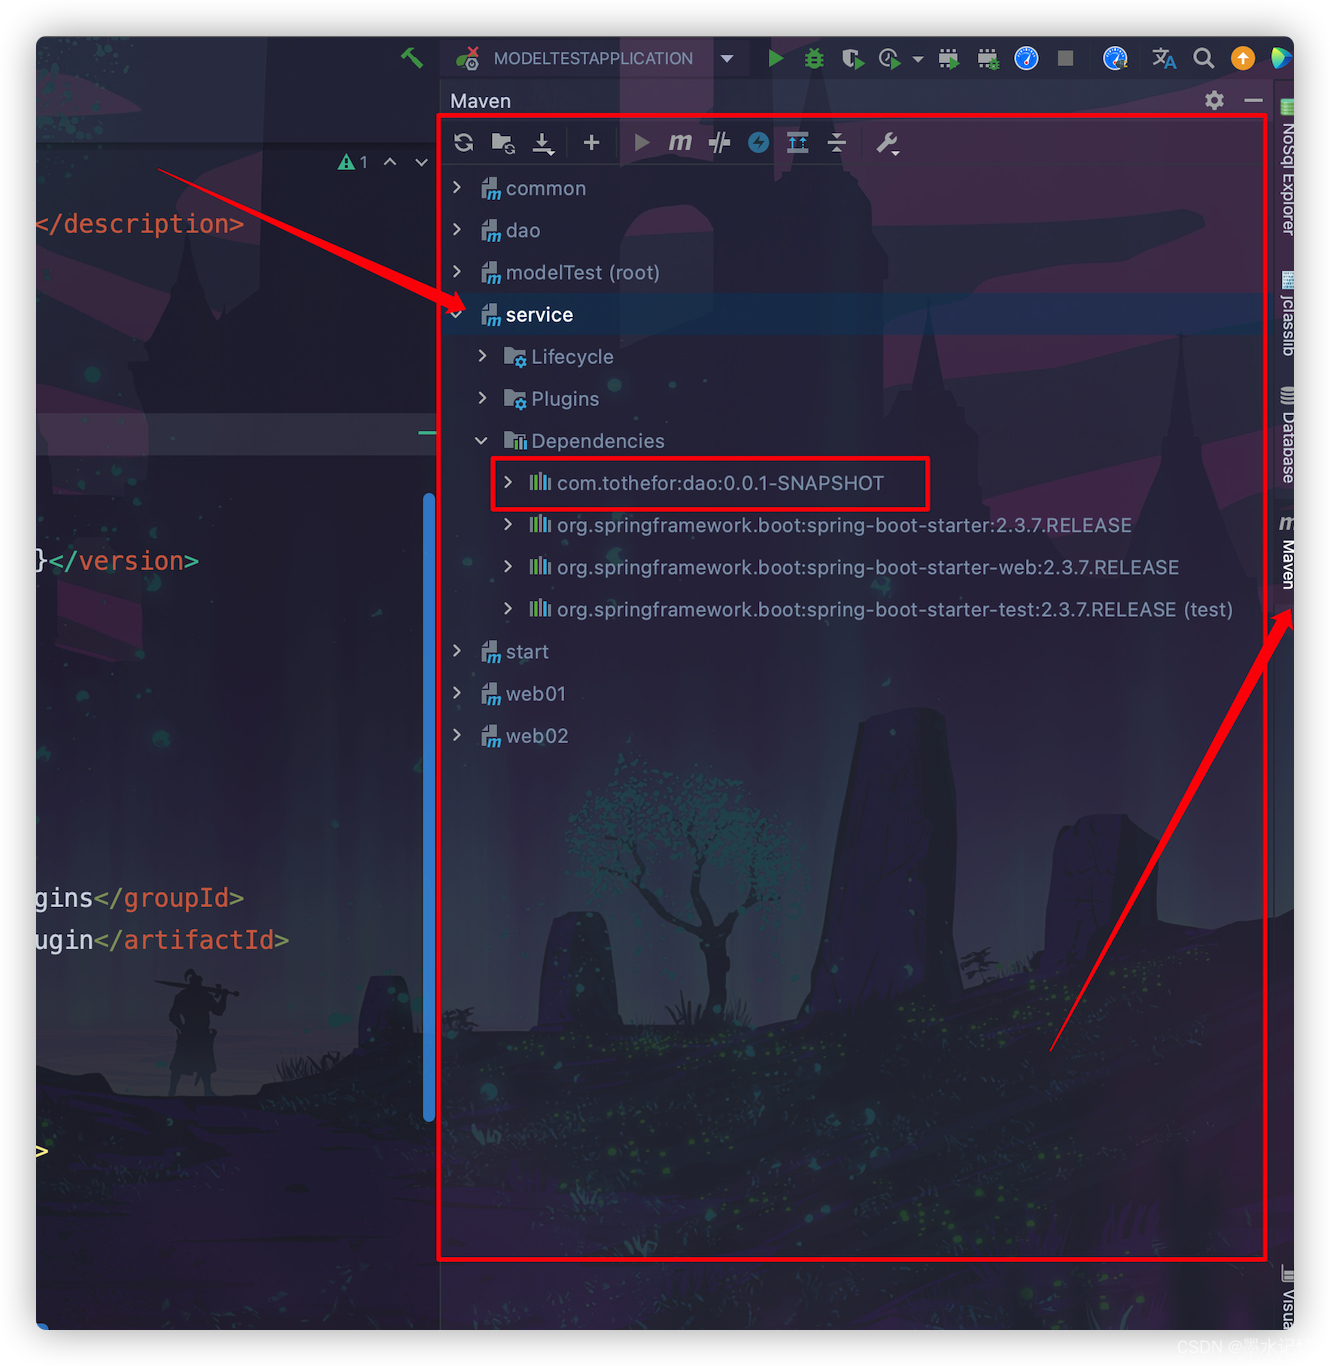
完善相互依赖 原理都是一样,这里以service需要dao为例:
service模块中需要用到dao模块中的方法,那么就需要在service模块中引入dao模块,引入方式如下:
在maven中也可以查看是否引入成功:
测试 在web01、web02中各写一个Controller接口进行测试。内容大同小异,这里就只写一个。
1 2 3 4 5 6 7 8 9 10 11 12 13 14 15 16 17 18 19 20 package com.tothefor.web01.controller;import org.springframework.web.bind.annotation.RequestMapping;import org.springframework.web.bind.annotation.RestController;@RestController public class web01 @RequestMapping("/web01") public String get01 () "web01" );return "web01" ;
修改启动配置 server: port: 8082 servlet: context-path: /tothefor spring: profiles: active: common,dao,service,start,web01,web02
打包 添加打包依赖 在上面的步骤中,我们将打包插件删了,现在要做的就是将其还原即可。
非启动类的打包插件配置:
<build > <plugins > <plugin > <groupId > org.apache.maven.plugins</groupId > <artifactId > maven-compiler-plugin</artifactId > <version > 3.8.1</version > <configuration > <source > 1.8</source > <target > 1.8</target > <encoding > UTF-8</encoding > <skip > true</skip > </configuration > </plugin > </plugins > </build >
启动类的打包插件配置:
1 2 3 4 5 6 7 8 9 10 11 12 13 14 15 16 17 18 19 20 21 22 23 24 25 26 27 28 29 30 31 <build > <plugins > <plugin > <groupId > org.apache.maven.plugins</groupId > <artifactId > maven-compiler-plugin</artifactId > <version > 3.8.1</version > <configuration > <source > 1.8</source > <target > 1.8</target > <encoding > UTF-8</encoding > </configuration > </plugin > <plugin > <groupId > org.springframework.boot</groupId > <artifactId > spring-boot-maven-plugin</artifactId > <version > 2.3.7.RELEASE</version > <configuration > <mainClass > com.tothefor.start.StartApplication</mainClass > </configuration > <executions > <execution > <id > repackage</id > <goals > <goal > repackage</goal > </goals > </execution > </executions > </plugin > </plugins > </build >
打包顺序遵循一个原则:
先让父项目install。
逆依赖打包。即:A中有依赖B,那么需要先打包B,再打包A。否则在打包A时找不到包B。
最后入口模块。
最后的入口模块包即该项目的包。
其他框架整合 添加框架依赖 在父项目中引入。
1 2 3 4 5 6 7 8 9 10 11 12 13 14 15 16 17 18 19 20 21 22 23 24 25 26 27 28 29 30 31 32 33 34 35 36 37 38 39 40 41 42 43 44 45 46 47 48 49 50 51 52 53 54 55 56 57 58 59 60 61 62 63 64 65 66 67 68 69 70 71 72 73 74 75 76 77 78 79 80 81 82 83 84 85 86 87 88 89 90 91 92 93 94 95 96 97 98 99 100 101 102 103 104 105 106 107 108 109 110 <?xml version="1.0" encoding="UTF-8"?> <project xmlns ="http://maven.apache.org/POM/4.0.0" xmlns:xsi ="http://www.w3.org/2001/XMLSchema-instance" xsi:schemaLocation ="http://maven.apache.org/POM/4.0.0 https://maven.apache.org/xsd/maven-4.0.0.xsd" > <modelVersion > 4.0.0</modelVersion > <groupId > com.tothefor</groupId > <artifactId > modelTest</artifactId > <version > 0.0.1-SNAPSHOT</version > <packaging > pom</packaging > <parent > <groupId > org.springframework.boot</groupId > <artifactId > spring-boot-starter-parent</artifactId > <version > 2.3.7.RELEASE</version > <relativePath /> </parent > <modules > <module > common</module > <module > dao</module > <module > service</module > <module > web01</module > <module > web02</module > <module > start</module > </modules > <properties > <java.version > 1.8</java.version > <project.build.sourceEncoding > UTF-8</project.build.sourceEncoding > <project.reporting.outputEncoding > UTF-8</project.reporting.outputEncoding > <spring-boot.version > 2.3.7.RELEASE</spring-boot.version > <mysql.version > 8.0.29</mysql.version > <mybatis-plus.version > 3.5.1</mybatis-plus.version > <druid.version > 1.2.8</druid.version > </properties > <dependencies > <dependency > <groupId > mysql</groupId > <artifactId > mysql-connector-java</artifactId > <version > ${mysql.version}</version > </dependency > <dependency > <groupId > com.baomidou</groupId > <artifactId > mybatis-plus-boot-starter</artifactId > <version > ${mybatis-plus.version}</version > </dependency > <dependency > <groupId > com.alibaba</groupId > <artifactId > druid-spring-boot-starter</artifactId > <version > ${druid.version}</version > </dependency > <dependency > <groupId > org.springframework.boot</groupId > <artifactId > spring-boot-starter</artifactId > </dependency > <dependency > <groupId > org.springframework.boot</groupId > <artifactId > spring-boot-starter-web</artifactId > </dependency > <dependency > <groupId > org.springframework.boot</groupId > <artifactId > spring-boot-starter-test</artifactId > <scope > test</scope > </dependency > </dependencies > <build > <plugins > <plugin > <groupId > org.apache.maven.plugins</groupId > <artifactId > maven-compiler-plugin</artifactId > <version > 3.8.1</version > <configuration > <source > 1.8</source > <target > 1.8</target > <encoding > UTF-8</encoding > </configuration > </plugin > <plugin > <groupId > org.springframework.boot</groupId > <artifactId > spring-boot-maven-plugin</artifactId > <version > 2.3.7.RELEASE</version > <configuration > <mainClass > com.tothefor.modeltest.ModelTestApplication</mainClass > </configuration > <executions > <execution > <id > repackage</id > <goals > <goal > repackage</goal > </goals > </execution > </executions > </plugin > </plugins > </build > </project >
添加数据库配置 在入口配置文件中:
1 2 3 4 5 6 7 8 9 10 11 12 13 14 15 16 17 18 19 server: port: 8082 servlet: context-path: /tothefor spring: profiles: active: common,dao,service,start,web01,web02 datasource: druid: username: root password: loong461 url: jdbc:mysql://127.0.0.1:3306/tothefor?serverTimezone=Asia/Shanghai&useUnicode=true&characterEncoding=UTF-8 driver-class-name: com.mysql.cj.jdbc.Driver type: com.alibaba.druid.pool.DruidDataSource
配置完成后,就可以进行测试了。
注意点
添加MyBatis配置 自定义mapper文件。入口配置文件中进行添加。
1 2 3 4 5 6 7 8 9 10 11 12 13 14 15 16 17 18 19 20 21 22 23 24 server: port: 8082 servlet: context-path: /tothefor spring: profiles: active: common,dao,service,start,web01,web02 datasource: druid: username: root password: loong461 url: jdbc:mysql://127.0.0.1:3306/tothefor?serverTimezone=Asia/Shanghai&useUnicode=true&characterEncoding=UTF-8 driver-class-name: com.mysql.cj.jdbc.Driver type: com.alibaba.druid.pool.DruidDataSource mybatis-plus: mapper-locations: classpath:mapper/*/*.xml
📢注意:创建的mapper文件位置在dao模块中,而不是入口模块中。
总结
建模块:所有的包名一定要有相同的前缀,如:com.tothefor。
入口模块的配置文件必须为application.yml(后缀不一定为yml)。
打包顺序为引用的逆序。
引入Spring,在Dao类中使用@Mapper注解。而且需要在启动类中配置扫描Mapper文件的路径。
自定义mapper文件,在入口模块中配置,在dao模块中创建mapper文件。
多模块引用问题
2023-02-13:解决多模块依赖时bean无法注入的问题。
比如:A模块(com.tothefor.core)是一个公用核心模块,现在B模块(com.tothefor.admin)需要引入A模块,只是简单的在B模块的pom中增加A模块的依赖不行,因为A模块中的bean在B模块中使用时,会提示找不到bean。
解决办法 所以如果不做任何配置的话,只会扫描启动类当前包路径(com.tothefor.admin)及其子路径下的文件,并将符合条件的对象注入到Spring容器中,
@SpringBootApplication(scanBasePackages = {"com.tothefor"})
