本文最后更新于:December 3, 2021 pm
JAVA基础知识复习(十二)- JDBC(Java DataBase Connectivity)使用。
目录 0.前提工作 先从官网下载对应的驱动 jar 包。
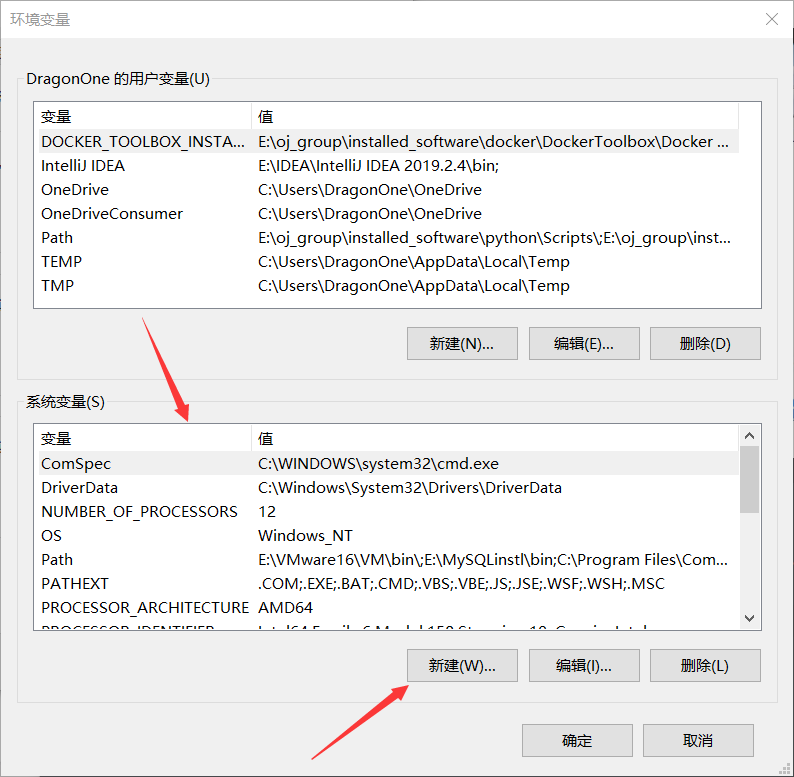
0.1 文本编辑器配置驱动jar包 如果是使用的文本编辑器实现的,则需要手动配置环境变量。
在 系统变量 中,找到 classpath ,如果没有就新建一个名为 classpath 的。如图。
在变量值中加上你下载的驱动 jar 包的位置。这里是以 E 盘为例。
注意:点号(.)和分号(;)一定不能忘了!!!且要是英文状态的。否则配置好之后仍然不能实现。
0.2 IDEA配置驱动jar包
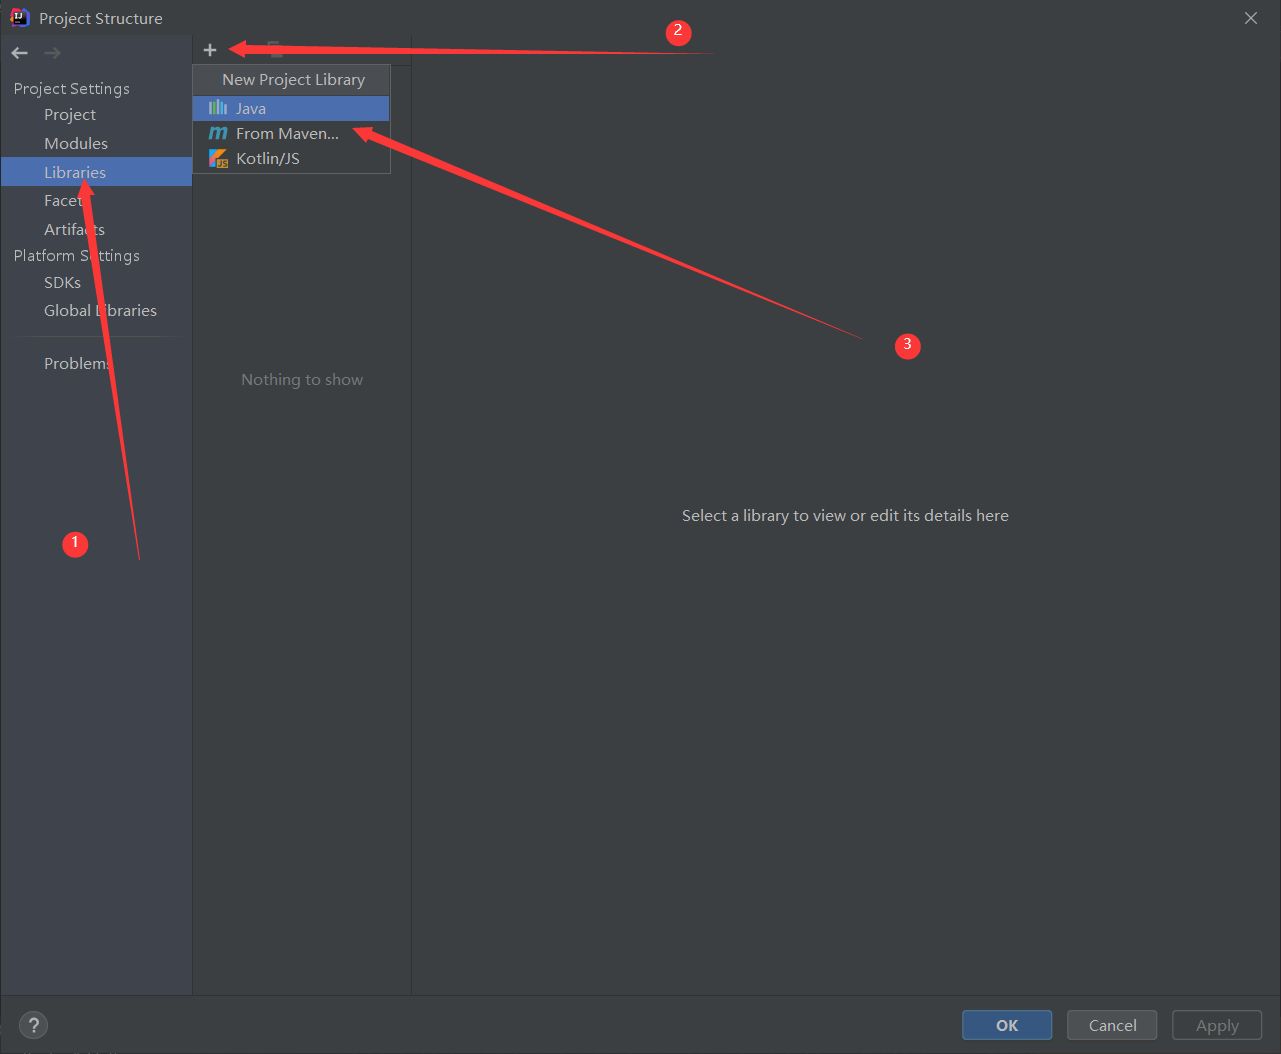
在建好的项目中,选中 src 再右键,选择 Open Module Settings 点击。 如图。
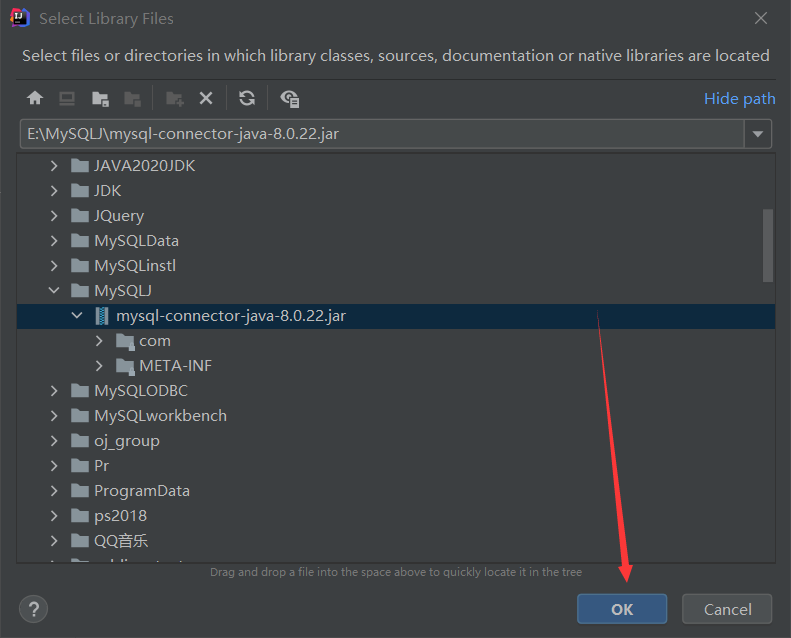
在弹出的窗口中 ,选择 Libraries ,再点击加号(+)并选择 java ,再去选择找到驱动 jar 包即可。如图。
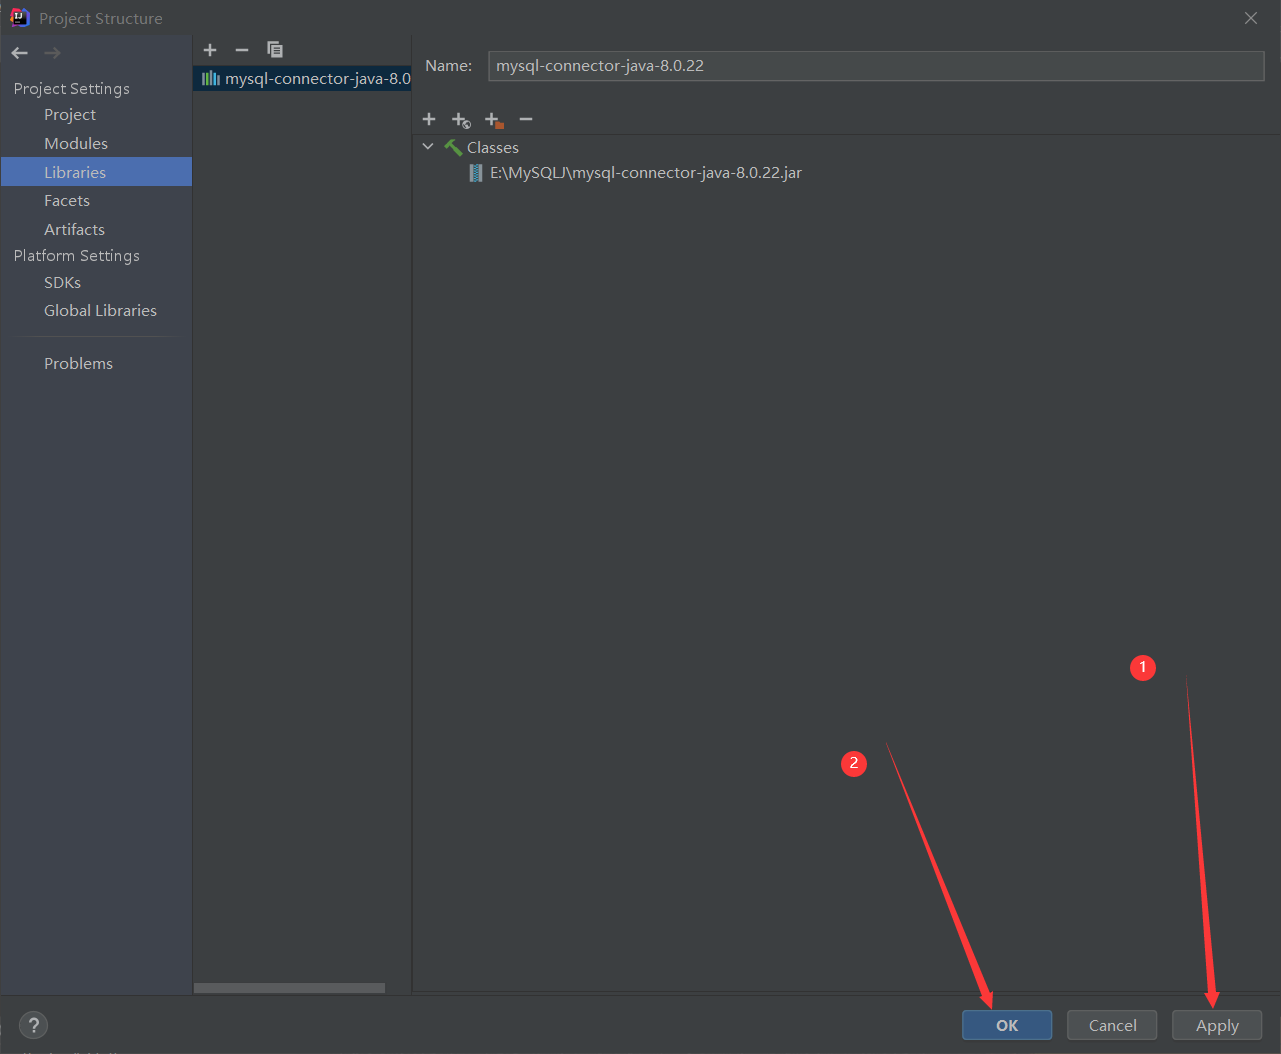
选择完毕后,一步步点击 ok 即可。如图。
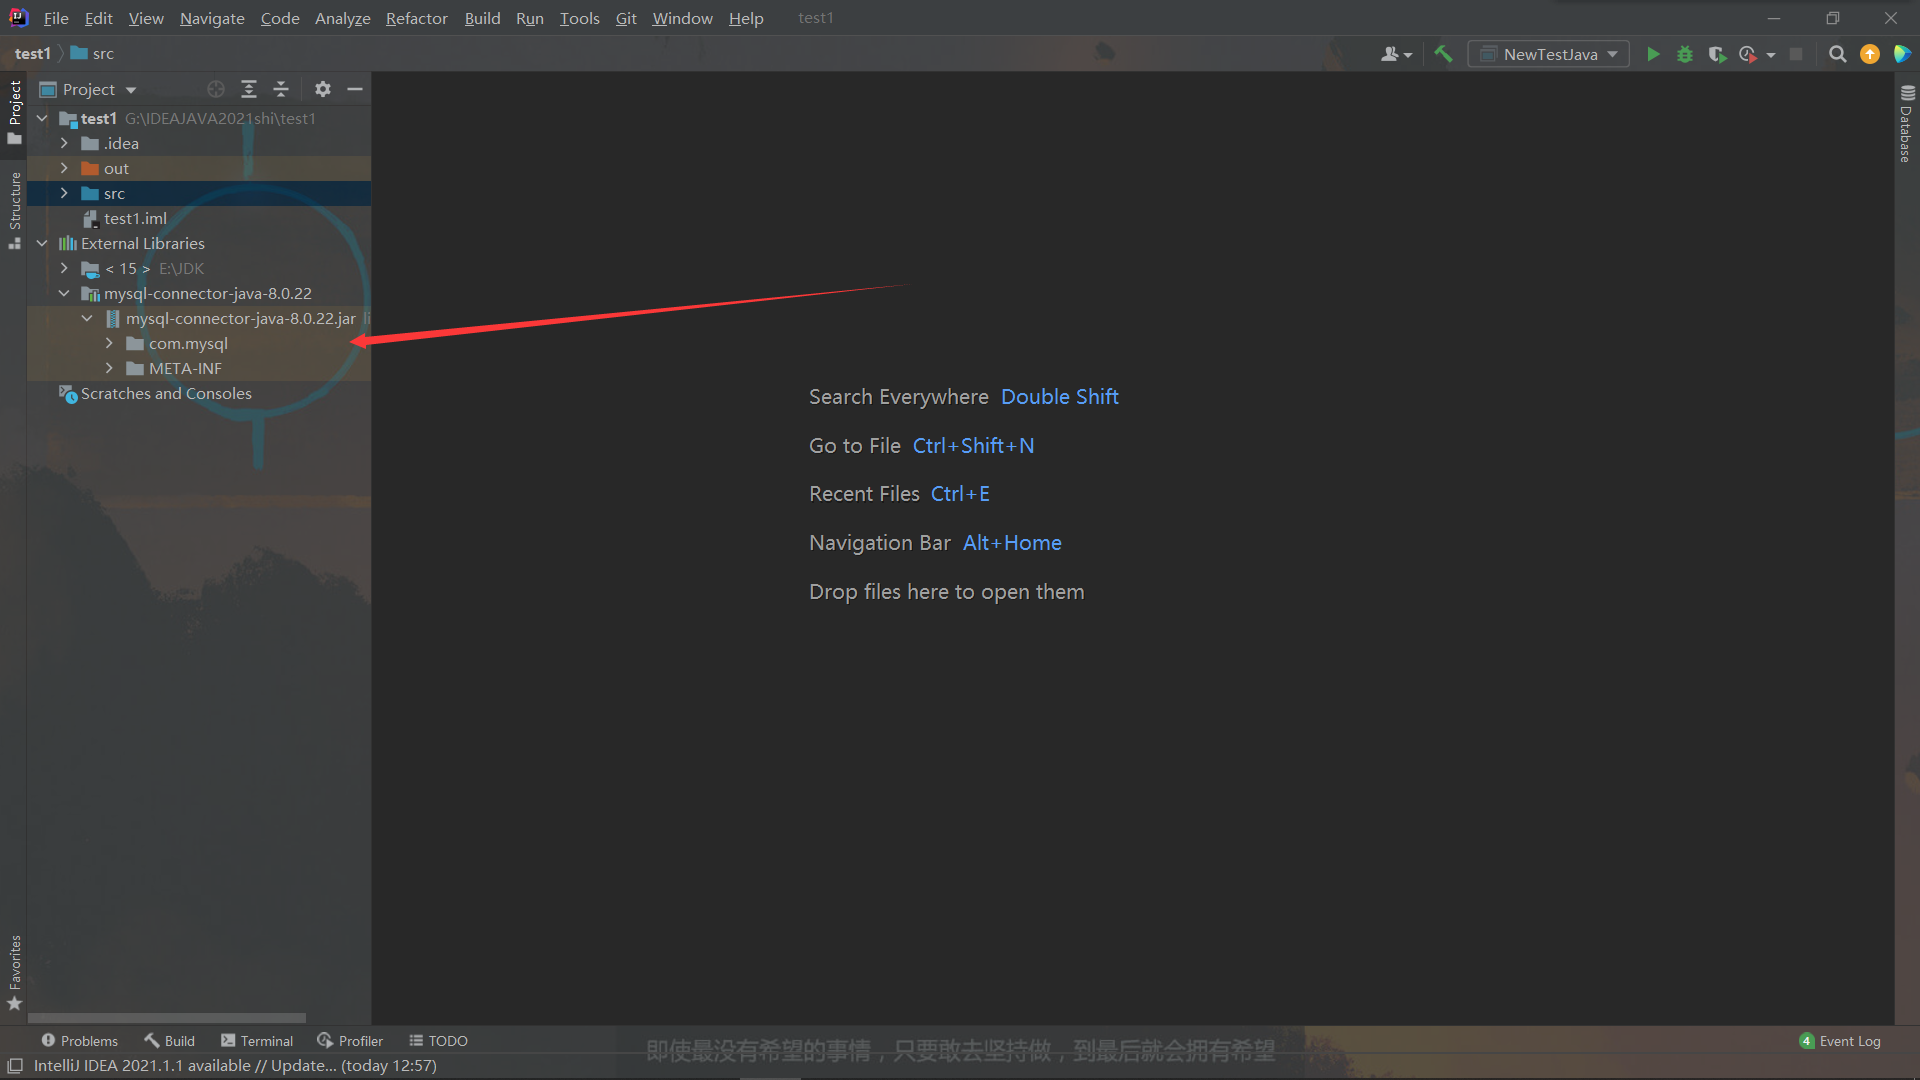
最后,可以在目录处看见已经加进来的驱动 jar 包。
1.JDBC编程(六步) 实际具体需要几步,需要根据第四步来确认。
可以先把包导进去,后面过程中不再说导包问题。
import java.sql.DriverManager;import java.sql.SQLException;import java.sql.Driver;import java.sql.Connection;import java.sql.Statement;
也可以一键导入所有与之相关的包:
1.1 注册驱动 让 java 程序知道即将要连接的是哪个类型的数据库。
写法一:
DriverManager.registerDriver(new com.mysql.jdbc.Driver());
写法二:
Driver dr = new com.mysql.jdbc.Driver();
以上两种方式实现效果一样。
try {new com.mysql.jdbc.Driver());catch (SQLException e){
小知识: 在 DriverManager.registerDriver(new com.mysql.jdbc.Driver()); 代码中为什么是 com.mysql.jdbc.Driver() ?
原因(方便理解):自行将下载的驱动 jar 包进行解压后可以发现,其中有两个文件夹(com、META-INF);打开 com 文件夹;再打开 mysql 文件夹;再打开 jdbc 文件夹;发现有一个 Driver.class 的文件。 而代码中出现的顺序刚好是打开文件夹的顺序。
1.1.1 驱动加载常用写法 Class.forName("com.mysql.jdbc.Driver()" );
实例:
1 2 3 4 5 6 7 8 9 10 11 12 13 14 15 16 17 18 try {"com.mysql.jdbc.Driver()" );"jdbc:mysql://127.0.0.1:3306/dr" ;"" ;"" ;catch (SQLException e){catch (ClassNotFoundException e){
1.2 获取连接 表示 JVM 的进程和数据库进程之间的通道打开了,属于进程之间的通信,重量级的,使用完之后一定要关闭通道。
代码:
String url = "jdbc:mysql://localhost:3306" ;"root" ;"loong" ;
注意:代码仍然需要放在try catch 中,否则会报错。
实现代码:
try {new com.mysql.jdbc.Driver());"jdbc:mysql://127.0.0.1:3306/dr" ;"" ; "" ; catch (SQLException e){
其中,url是统一资源定位符(网络中某个资源的绝对路径)。它包括了:协议、IP、port(端口)、资源名。http://110.242.68.4:80/index.html 和访问:www.baidu.com 的效果是一样的。其中,
http:// : 是通信协议;
111.110.242.68.4 :服务器IP地址;
80 :服务器上软件的端口;
index.html :服务器上某个资源名(这里是百度的首页)
其中url:jdbc:mysql://127.0.0.1:3306/dr;
jdbc:mysql:// :协议;
128.127.0.0.1 :IP地址 (使用 localhost 效果一样);
3306 :mysql数据库端口号;
dr :具体的数据库实例名
1.3 获取数据库操作对象 专门执行 SQL 语句的对象。注意:代码仍然需要放在try catch 中,否则会报错。
1 2 3 4 5 6 7 8 9 10 11 12 13 14 15 16 17 try {new com.mysql.jdbc.Driver());"jdbc:mysql://127.0.0.1:3306/dr" ;"" ;"" ;catch (SQLException e){
1.4 执行SQL语句 主要执行 DQL(数据查询语言)、DML(数据操纵语言)。还有 DDL(数据定义语言)、DCL(数据控制语言)。
1.4.1 不使用 select 实例:
1 2 3 4 5 6 7 8 9 10 11 12 13 14 15 16 17 18 19 20 21 try {new com.mysql.jdbc.Driver());"jdbc:mysql://127.0.0.1:3306/dr" ;"" ;"" ;"" ;int count = stmt.executeUpdate(sql);catch (SQLException e){
不使用 select 语句,则第五步就没有了。
1.4.2 使用 select 1 2 3 4 5 6 7 8 9 10 11 12 13 14 15 16 17 18 19 20 21 22 import java.lang.*;import java.sql.*;null ;null ;null ;try {"com.mysql.jdbc.Driver()" );"jdbc:mysql://127.0.0.1:3306/dr" ;"" ;"" ;" " ;catch (Exception e){
其中,在得到数据的时候不一定都用 getString 去接收;如果本身是 int 型的,则也可以用 getInt 的方式去得到,double 型的也可以用 getDouble 方式得到。
并且 rs.getString(1); 中的数字1可以换成列名。如:rs.getString(“username”); 但需要注意的是,列名称不是表中的列名称,而是查询结果集中的列名称。
1.5 处理查询结果集 只有当第四步执行的是 select 语句的时候,才有这一步。
1 2 3 4 5 6 7 8 9 10 11 12 13 14 15 16 17 18 19 20 21 22 23 24 25 26 27 28 29 import java.lang.*;import java.sql.*;null ;null ;null ;try {"com.mysql.jdbc.Driver()" );"jdbc:mysql://127.0.0.1:3306/dr" ;"" ;"" ;" " ;while (rs.next()){1 );2 );3 );"," +name+"," +sal);catch (Exception e){
1.6 释放资源 使用完资源之后一定要关闭资源。java 和数据库属于进程间的通信,开启之后一定要关闭。通常写在 finally 中,因为为了保证资源一定释放。并且遵循从小到大依次关闭。分别对其try catch。
1.6.1 不使用 select 1 2 3 4 5 6 7 8 9 10 11 12 13 14 15 16 17 18 19 20 21 22 23 24 25 26 27 28 29 30 31 32 33 34 35 36 37 38 39 Connection conn = null ;null ; try {new com.mysql.jdbc.Driver());"jdbc:mysql://127.0.0.1:3306/dr" ;"" ;"" ;"" ;int count = stmt.executeUpdate(sql);catch (SQLException e){finally {try {if (stmt != null ) {catch (SQLException e){try {if (conn != null ) {catch (SQLException e){
1.6.2 使用 select 1 2 3 4 5 6 7 8 9 10 11 12 13 14 15 16 17 18 19 20 21 22 23 24 25 26 27 28 29 30 31 32 33 34 35 36 37 38 39 40 41 42 43 44 45 46 47 48 49 50 51 import java.lang.*;import java.sql.*;null ;null ;null ;try {"com.mysql.jdbc.Driver()" );"jdbc:mysql://127.0.0.1:3306/dr" ;"" ;"" ;" " ;while (rs.next()){1 );2 );3 );"," +name+"," +sal);catch (Exception e){finally {if (rs != null ){try {catch (Exception e){if (stmt != null ){try {catch (Exception e){if (conn != null ){try {catch (Exception e){
报错解决(2021/06/12):
Loading class com.mysql.jdbc.Driver'. This is deprecated. The new driver class is com.mysql.cj.jdbc.Driver’. The driver is automatically registered via the SPI and manual loading of the driver class is generally unnecessary.
根据官网最新更改,需要将原来的
Exception in thread “main” java.sql.SQLException: The server time zone value ‘�й���ʱ��’ is unrecognized or represents more than one time zone. You must configure either the server or JDBC driver (via the ‘serverTimezone’ configuration property) to use a more specific time zone value if you want to utilize time zone support.
需要在原来的
2.从属性资源文件(配置文件)中读取连接数据库数据
首先,新建一个 jdbc.properties 文件,里面写上以下内容。注意文件位置需要放到同一目录下。
配置文件内容:jdbc.properties
driver =com.mysql.jdbc.Driverurl =jdbc:mysql://localhost:3306 /druser =rootpassword =333
java 代码:
1 2 3 4 5 6 7 8 9 10 11 12 13 14 15 16 17 18 19 20 21 22 23 24 25 26 27 28 29 30 31 32 33 34 35 36 37 38 39 40 import java.lang.*;import java.sql.*;import java.util.*;"driver" );"url" );"user" );"password" );null ;null ;try {" " ; int count = stmt.executeUpdate(sql);catch (Exception e){finally {if (stmt != null ){try {catch (SQLException e){if (conn != null ){try {catch (SQLException e){
3.PreparedStatement的应用
作用:
预编译SQL语句,效率高。
避免SQL注入。
可以动态填充数据,执行多个同构的SQL语句。
3.1 参数标记 PreparedStatement pstmt = conn.prepareStatement(select * from user where username = ? and password = ?);
JDBC中所有参数都是由 ? 符号占位,称为参数标记,在执行SQL语句前,必须要为每一个参数提供值。
3.2 动态参数绑定
方法:pstmt.setXxxx(下标,值) //参数下标从1开始,为指定参数下标绑定值
1. 预编译 SQL 语句= conn.prepareStatement(select * from user where username = ? and password = ?);2. 为参数下标赋值1 ,username); # 不是所有地方都是String2 ,password);
3.3 数据操作 使用PreparedStatement时,还需要执行的操作。
示例:
1 2 3 4 5 6 7 8 9 10 11 12 13 14 15 16 17 18 19 20 21 22 23 "jdbc:mysql://localhost:3306/WeekDay?serverTimezone=GMT%2B8" ;"root" ;"loong461" ;"com.mysql.cj.jdbc.Driver" );"insert into Te(id,name,money) values (?,'qqewr',34)" ;1 ,908 );int cnt = ps.executeUpdate(); int cnt = ps.executeUpdate();
