本文最后更新于:April 11, 2022 pm
本文介绍的 HashedWheelTimer 是来自于 Netty 的工具类,在 netty-common 包中。它用于实现延时任务。另外,下面介绍的内容和 Netty 无关。
如果你看过 Dubbo 的源码,一定会在很多地方看到它。在需要失败重试的场景中,它是一个非常方便好用的工具。
本文将会介绍 HashedWheelTimer 的使用,以及在后半部分分析它的源码实现。
目录 接口概览 在介绍它的使用前,先了解一下它的接口定义,以及和它相关的类。
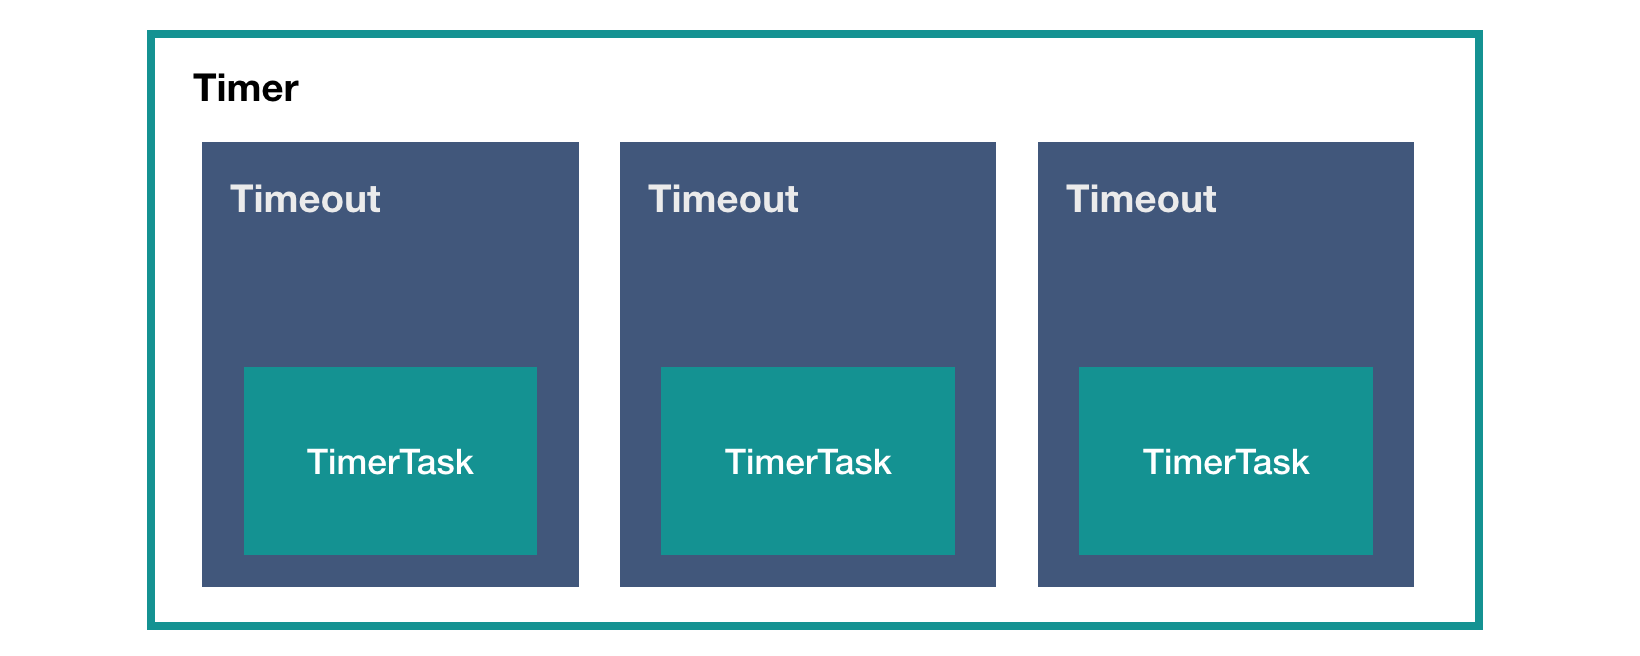
HashedWheelTimer 是接口 io.netty.util.Timer 的实现,从面向接口编程的角度,我们其实不需要关心 HashedWheelTimer,只需要关心接口类 Timer 就可以了。这个 Timer 接口只有两个方法:
public interface Timer Timeout newTimeout (TimerTask task, long delay, TimeUnit unit) ;Set<Timeout> stop () ;
Timer 是我们要使用的任务调度器,我们可以从方法上看出,它提交一个任务 TimerTask,返回的是一个 Timeout 实例。所以这三个类之间的关系大概是下面这样的:
TimerTask 非常简单,就一个 run() 方法:
public interface TimerTask void run (Timeout timeout) throws Exception
当然这里有点意思的是,它把 Timeout 的实例也传进来了,我们平时的代码习惯,都是单向依赖。
这样做也有好处,那就是在任务执行过程中,可以通过 timeout 实例来做点其他的事情。
Timeout 也是一个接口类:
public interface Timeout Timer timer () ;TimerTask task () ;boolean isExpired () boolean isCancelled () boolean cancel ()
它持有上层的 Timer 实例,和下层的 TimerTask 实例,然后取消任务的操作也在这里面。
HashedWheelTimer 使用 有了第一节介绍的接口信息,其实我们很容易就可以使用它了。我们先来随意写几行:
1 2 3 4 5 6 7 8 9 10 11 12 13 14 15 16 17 18 19 20 21 22 23 24 25 26 27 new HashedWheelTimer();new TimerTask() {@Override public void run (Timeout timeout) "5s 后执行该任务" );5 , TimeUnit.SECONDS);new TimerTask() {@Override public void run (Timeout timeout) "10s 后执行该任务" );10 , TimeUnit.SECONDS);if (!timeout1.isExpired()) {3 , TimeUnit.SECONDS);
通过这几行代码,大家就可以非常熟悉这几个类的使用了,因为它们真的很简单。
我们来看一下 Dubbo 中的一个例子。
下面这个代码修改自 Dubbo 的集群调用策略 FailbackClusterInvoker 中:
它在调用 provider 失败以后,返回空结果给消费端,然后由后台线程执行定时任务重试,多用于消息通知这种场景。
1 2 3 4 5 6 7 8 9 10 11 12 13 14 15 16 17 18 19 20 21 22 23 24 25 26 27 28 29 30 31 32 33 34 35 36 37 38 39 40 41 42 43 44 public class Application public static void main (String[] args) new Application();private static final Logger log = LoggerFactory.getLogger(Application.class);private volatile Timer failTimer = null ;public void invoke () try {catch (Throwable e) {"调用 doInvoke 方法失败,5s 后将进入后台的自动重试,异常信息: " , e);private void doInvoke () throw new RuntimeException("故意抛出异常" );private void addFailed (Runnable task) if (failTimer == null ) {synchronized (this ) {if (failTimer == null ) {new HashedWheelTimer();new RetryTimerTask(task, 3 , 5 );try {5 , TimeUnit.SECONDS);catch (Throwable e) {"提交定时任务失败,exception: " , e);
下面是里面使用到的 RetryTimerTask 类,当然,你也可以选择写成内部类:
1 2 3 4 5 6 7 8 9 10 11 12 13 14 15 16 17 18 19 20 21 22 23 24 25 26 27 28 29 30 31 32 33 34 35 36 37 38 39 40 41 42 43 44 45 46 47 public class RetryTimerTask implements TimerTask private static final Logger log = LoggerFactory.getLogger(RetryTimerTask.class);private final long tick;private final int retries;private int retryTimes = 0 ;private Runnable task;public RetryTimerTask (Runnable task, long tick, int retries) this .tick = tick;this .retries = retries;this .task = task;@Override public void run (Timeout timeout) try {catch (Throwable e) {if ((++retryTimes) >= retries) {"失败重试次数超过阈值: {},不再重试" , retries);else {"重试失败,继续重试" );private void rePut (Timeout timeout) if (timeout == null ) {return ;if (timeout.isCancelled()) {return ;
上面的代码也非常简单,在调用 doInvoke() 方法失败以后,提交一个定时任务在 5s 后执行重试,如果还是失败,之后每 3s 重试一次,最多重试 5 次,如果重试 5 次都失败,记录错误日志,不再重试。
打印的日志如下:
15 :47 :36.232 [main] ERROR c.j .n .timer .Application - 调用 doInvoke 方法失败,5s 后将进入后台的自动重试,异常信息: .lang .RuntimeException : 故意抛出异常.javadoop .nettylearning .timer .Application .doInvoke (Application.java :36 ).javadoop .nettylearning .timer .Application .invoke (Application.java :28 ).javadoop .nettylearning .timer .Application .main (Application.java :19 )15 :47 :41.793 [pool-1-thread-1] ERROR c.j .n .timer .RetryTimerTask - 重试失败,继续重试15 :47 :44.887 [pool-1-thread-1] ERROR c.j .n .timer .RetryTimerTask - 重试失败,继续重试15 :47 :47.986 [pool-1-thread-1] ERROR c.j .n .timer .RetryTimerTask - 重试失败,继续重试15 :47 :51.084 [pool-1-thread-1] ERROR c.j .n .timer .RetryTimerTask - 重试失败,继续重试15 :47 :54.186 [pool-1-thread-1] ERROR c.j .n .timer .RetryTimerTask - 失败重试次数超过阈值: 5 ,不再重试
HashedWheelTimer 的使用确实非常简单,如果你是来学习怎么使用它的,那么看到这里就可以了。
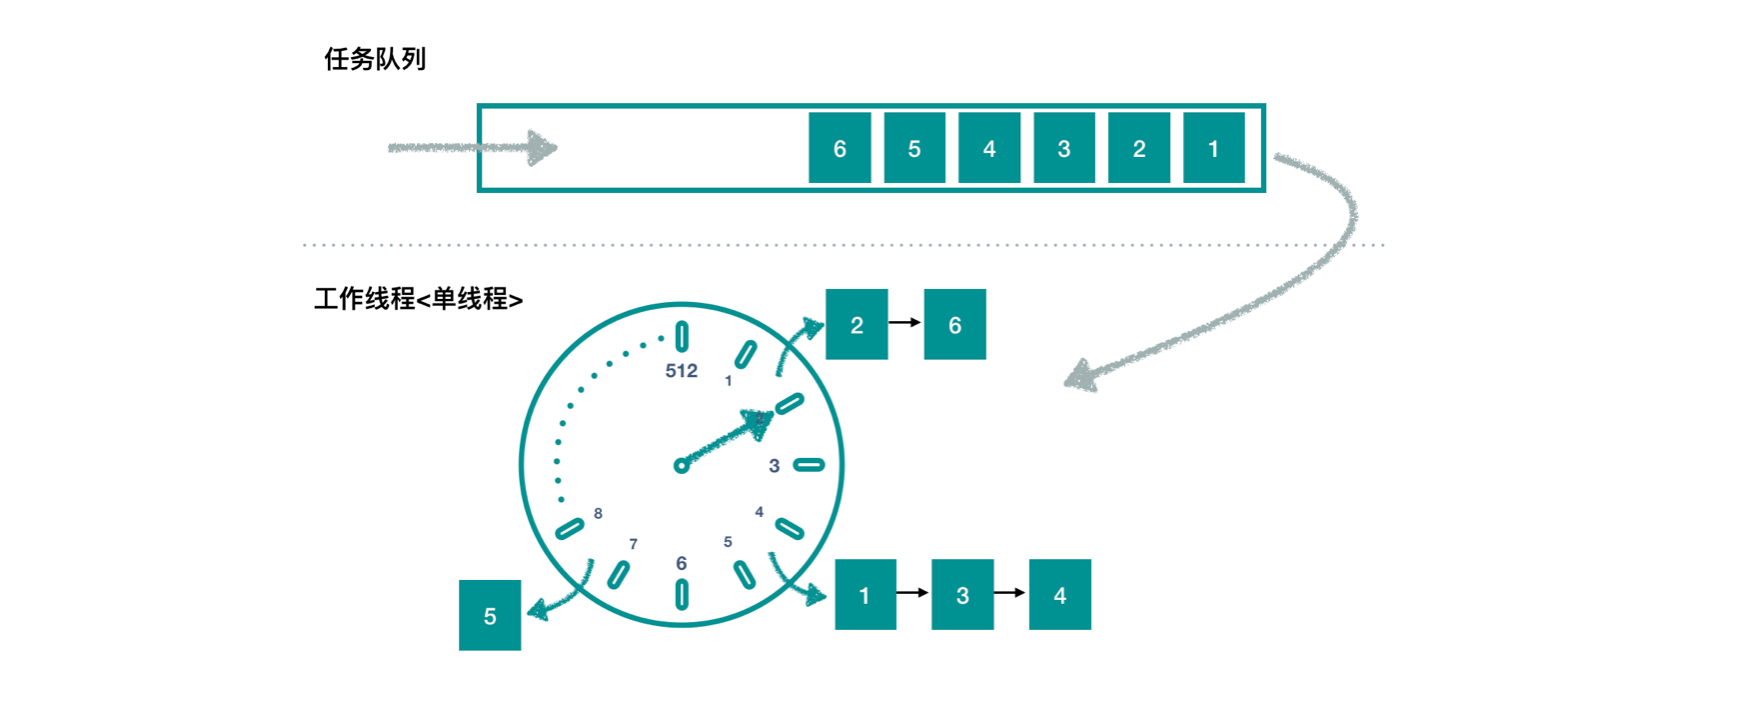
HashedWheelTimer 源码分析 大家肯定都知道或听说过,它用的是一个叫做时间轮(下载算法介绍PPT )的算法,看下面我画的图:
我这里先说说大致的执行流程,之后再进行细致的源码分析。
默认地,时钟每 100ms 滴答一下(tick),往前走一格,共 512 格,走完一圈以后继续下一圈。把它想象成生活中的钟表就可以了。
内部使用一个长度为 512 的数组存储,数组元素(bucket)的数据结构是链表,链表每个元素代表一个任务,也就是我们前面介绍的 Timeout 的实例。
提交任务的线程,只要把任务往虚线上面的任务队列 中存放即可返回。工作线程是单线程 ,一旦开启,不停地在时钟上绕圈圈。
仔细看下面的介绍:
工作线程到达每个时间整点 的时候,开始工作。在 HashedWheelTimer 中,时间都是相对时间,工作线程的启动时间,定义为时间的 0 值。因为一次 tick 是 100ms(默认值),所以 100ms、200ms、300ms… 就是我说的这些整点。
如上图,当时间到 200ms 的时候,发现任务队列有任务,取出所有的任务 。
按照任务指定的执行时间,将其分配到相应的 bucket 中。如上图中,任务2 和任务6指定的时间为 100ms~200ms 这个区间,就被分配到第二个 bucket 中,形成链表,其他任务同理。
这里还有轮次的概念,不过不用着急,比如任务 6 指定的时间可能是 150ms + (512*100ms),它也会落在这个 bucket 中,但是它是下一个轮次才能被执行的。
任务分配到 bucket 完成后,执行该次 tick 的真正 的任务,也就是落在第二个 bucket 中的任务 2 和任务 6。
假设执行这两个任务共消耗了 50ms,到达 250ms 的时间点,那么工作线程会休眠 50ms,等待进入到 300ms 这个整点。
如果这两个任务执行的时间超过 100ms 怎么办?这个问题就要看源码来解答了。
开始源码分析。我们从它的默认构造器开始,一步步到达最后一个最复杂的构造器:
public HashedWheelTimer ( ThreadFactory threadFactory, long tickDuration, TimeUnit unit, int ticksPerWheel, boolean leakDetection, long maxPendingTimeouts)
简单说一下各个参数:
threadFactory:定时任务都是后台任务,需要开启线程,我们通常会通过自定义 threadFactory 来命名线程,嫌麻烦就使用 Executors.defaultThreadFactory()。
tickDuration 和 timeUnit 定义了一格的时间长度,默认的就是 100ms。
ticksPerWheel 定义了一圈有多少格,默认的就是 512;
leakDetection:用于追踪内存泄漏,本文不会介绍它,感兴趣的读者请自行去了解它。
maxPendingTimeouts:最大允许等待的 Timeout 实例数,也就是我们可以设置不允许太多的任务等待。如果未执行任务数 达到阈值,那么再次提交任务会抛出 RejectedExecutionException 异常。默认不限制。
初始化 HashedWheelTimer 1 2 3 4 5 6 7 8 9 10 11 12 13 14 15 16 17 18 19 20 21 22 23 24 25 26 27 28 29 30 31 32 33 34 35 36 public HashedWheelTimer ( ThreadFactory threadFactory, long tickDuration, TimeUnit unit, int ticksPerWheel, boolean leakDetection, long maxPendingTimeouts) 1 ;this .tickDuration = unit.toNanos(tickDuration);if (this .tickDuration >= Long.MAX_VALUE / wheel.length) {throw new IllegalArgumentException(String.format("tickDuration: %d (expected: 0 < tickDuration in nanos < %d" ,this ) : null ;this .maxPendingTimeouts = maxPendingTimeouts;if (INSTANCE_COUNTER.incrementAndGet() > INSTANCE_COUNT_LIMIT &&false , true )) {
上面,HashedWheelTimer 完成了初始化,初始化了时间轮数组 HashedWheelBucket[],稍微看一下内部类 HashedWheelBucket,可以看到它是一个链表的结构。这个很好理解,因为每一格可能有多个任务。
提交第一个任务 1 2 3 4 5 6 7 8 9 10 11 12 13 14 15 16 17 18 19 20 21 22 23 24 25 26 27 28 29 30 31 32 33 34 35 36 @Override public Timeout newTimeout (TimerTask task, long delay, TimeUnit unit) if (task == null ) {throw new NullPointerException("task" );if (unit == null ) {throw new NullPointerException("unit" );long pendingTimeoutsCount = pendingTimeouts.incrementAndGet();if (maxPendingTimeouts > 0 && pendingTimeoutsCount > maxPendingTimeouts) {throw new RejectedExecutionException("Number of pending timeouts (" ") is greater than or equal to maximum allowed pending " "timeouts (" + maxPendingTimeouts + ")" );long deadline = System.nanoTime() + unit.toNanos(delay) - startTime;if (delay > 0 && deadline < 0 ) {new HashedWheelTimeout(this , task, deadline);return timeout;
提交任务的操作非常简单,实例化 Timeout,然后放到任务队列中。
我们可以看到,这里使用的优先级队列是一个 MPSC(Multiple Producer Single Consumer)的队列,刚好适用于这里的多生产线程,单消费线程的场景。而在 Dubbo 中,使用的队列是 LinkedBlockingQueue,它是一个以链表方式组织的线程安全的队列。
另外就是注意这里调用的 start() 方法,如果该任务是第一个提交的任务,它会负责工作线程的启动。
工作线程开始工作 其实只要看懂下面的几行代码,HashedWheelTimer 的源码就非常简单了。
1 2 3 4 5 6 7 8 9 10 11 12 13 14 15 16 17 18 19 20 21 22 23 24 25 26 27 28 29 30 31 32 33 34 35 36 37 38 39 40 41 42 43 44 45 46 47 48 49 50 51 52 53 54 55 56 57 58 59 60 61 62 63 64 65 66 67 68 69 70 71 72 73 74 75 76 77 78 79 80 81 82 83 84 85 86 87 88 89 90 91 92 93 94 95 96 97 98 99 100 101 102 103 104 105 106 107 108 109 110 111 112 113 114 115 116 117 118 119 120 121 122 123 124 125 126 127 128 129 130 131 132 133 134 135 136 137 138 139 140 141 142 143 144 145 146 147 private final class Worker implements Runnable private final Set<Timeout> unprocessedTimeouts = new HashSet<Timeout>();private long tick;@Override public void run () if (startTime == 0 ) {1 ;do {final long deadline = waitForNextTick();if (deadline > 0 ) {int idx = (int ) (tick & mask);while (WORKER_STATE_UPDATER.get(HashedWheelTimer.this ) == WORKER_STATE_STARTED);for (HashedWheelBucket bucket: wheel) {for (;;) {if (timeout == null ) {break ;if (!timeout.isCancelled()) {private void transferTimeoutsToBuckets () for (int i = 0 ; i < 100000 ; i++) {if (timeout == null ) {break ;if (timeout.state() == HashedWheelTimeout.ST_CANCELLED) {continue ;long calculated = timeout.deadline / tickDuration;final long ticks = Math.max(calculated, tick); int stopIndex = (int ) (ticks & mask);private void processCancelledTasks () private long waitForNextTick () long deadline = tickDuration * (tick + 1 );for (;;) {final long currentTime = System.nanoTime() - startTime;long sleepTimeMs = (deadline - currentTime + 999999 ) / 1000000 ;if (sleepTimeMs <= 0 ) {if (currentTime == Long.MIN_VALUE) {return -Long.MAX_VALUE;else {return currentTime;if (PlatformDependent.isWindows()) {10 * 10 ;try {catch (InterruptedException ignored) {if (WORKER_STATE_UPDATER.get(HashedWheelTimer.this ) == WORKER_STATE_SHUTDOWN) {return Long.MIN_VALUE;public Set<Timeout> unprocessedTimeouts () return Collections.unmodifiableSet(unprocessedTimeouts);
接下来应该看看怎么执行 bucket 中的任务:
1 2 3 4 5 6 7 8 9 10 11 12 13 14 15 16 17 18 19 20 21 22 23 24 25 26 27 28 29 30 public void expireTimeouts (long deadline) while (timeout != null ) {if (timeout.remainingRounds <= 0 ) {if (timeout.deadline <= deadline) {else {throw new IllegalStateException(String.format("timeout.deadline (%d) > deadline (%d)" , timeout.deadline, deadline));else if (timeout.isCancelled()) {else {
源码分析部分已经说完了,有一些简单的分支,这里就不花篇幅介绍了。
Worker 线程是一个 bucket 一个 bucket 顺次处理的,所以,即使有些任务执行时间超过了 100ms,“霸占”了之后好几个 bucket 的处理时间,也没关系,这些任务并不会被漏掉 。但是有可能被延迟执行,毕竟工作线程是单线程。
说个有意思的点 在提交任务的 newTimeout 方法中,调用了启动线程的 start() 方法,它会保证线程真的启动以后并且赋值完了 startTime 以后,start() 方法再返回。因为在 newTimeout 方法的后半段中需要一个正确的 startTime。
看下面两个代码片段。提交任务的线程:
public void start () while (startTime == 0 ) {try {catch (InterruptedException ignore) {
工作线程 Worker:
public void run () if (startTime == 0 ) {1 ;
这里 startTime 是 volatile 修饰的属性,为了保证它的可见性。
可是大家有没有发现,其实有 startTimeInitialized 这个 CountDownLatch 实例,就能保证这里的并发先后问题。
这里简单讨论两个点:
1、第一个代码片段中的 while 换成 if 行不行?
不行。
Object 中的 wait/notify 存在操作系统的假唤醒,所以一般都在 while 循环里,但是这里的 CountDownLatch 不会,所以看上去这里的 while 是没必要的。但是 CountDownLatch 没有提供 awaitUninterruptibly() 方法,所以这里其实在处理线程中断的情况。
2、这里 startTime 属性不用 volatile 修饰行不行?
个人认为是可以的。
因为 CountDownLatch 提供了语义:在 countDown() 之前的操作 happens-before await() 后的操作。
如果是我理解错误,欢迎大家指正。
小结 HashedWheelTimer 的源码相对简单,它的算法设计比较有意思。
我再把这个图放到这里,大家可以仔细回顾一下它的工作流程是怎样的。
当然,本文的重点是分析主干部分,而对于一些分支并没有进行分析,因为它们相对比较简单。