本文最后更新于:May 13, 2023 pm
积土成山,风雨兴焉;积水成渊,蛟龙生焉;积善成德,而神明自得,圣心备焉。故不积跬步,无以至千里,不积小流无以成江海。齐骥一跃,不能十步,驽马十驾,功不在舍。面对悬崖峭壁,一百年也看不出一条裂缝来,但用斧凿,能进一寸进一寸,能进一尺进一尺,不断积累,飞跃必来,突破随之。
目录
自动装配的方式
基于xml配置文件中的autowire属性来实现的spring自动装配,如:
| <bean id="book" class="com.tothefor.springAOP.BookImpl" autowire=""></bean>
|
有五种方式:
- no:这是 Spring 框架的默认设置,在该设置下自动装配是关闭的,开发者需要自行在 bean 定义中用标签明确的设置依赖关系。
- byName:该选项可以根据 bean 名称设置依赖关系。当向一个 bean 中自动装配一个属 性时,容器将根 据 bean 的名称自动在在配置文件中查询一个匹配的 bean。如果找到的 话,就装配这个属性,如果没找到的话 就报错。
- byType:该选项可以根据 bean 类型设置依赖关系。当向一个 bean 中自动装配一个属性时,容器将根据 bean 的类型自动在在配置文件中查询一个匹配的 bean。如果找到的话,就装配这个属性,如果没找到的话就报 错。
- constructor:造器的自动装配和 byType 模式类似,但是仅仅适用于与有构造器相同参数 的 bean,如果在 容器中没有找到与构造器参数类型一致的 bean,那么将会抛出异常。
- autodetect:在Spring3中
已经弃用。该模式自动探测使用构造器自动装配或者 byType 自动装配。首先,首先会 尝试找合适的带 参数的构造器,如果找到的话就是用构造器自动装配,如果在 bean 内部没有找到相应的构造器或者是无参构造 器,容器就会自动选择 byTpe 的自动装配方式。
Bean的生命周期回调方法及其实现方式
生命周期的回调方法主要分为两种:一种是在Bean初始化的时候进行调用;另一种是在Bean销毁的时候调用。这两种又分别有三种实现方式:注解、接口、配置文件。
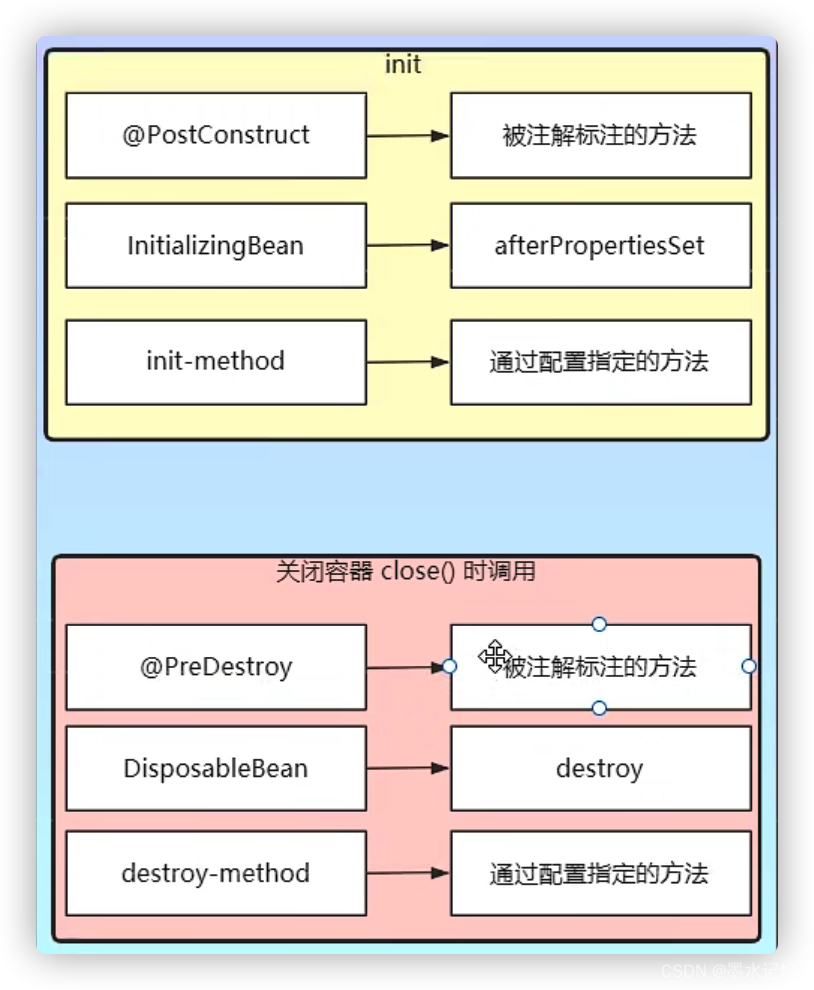
首先需要在启动类中加入销毁的调用:
1
2
3
4
5
6
7
8
9
10
11
12
13
14
15
16
17
18
19
20
| package com.tothefor.sprbean;
import org.springframework.context.ApplicationContext;
import org.springframework.context.annotation.AnnotationConfigApplicationContext;
public class TestSpbean {
public static void main(String[] args) {
AnnotationConfigApplicationContext annotationConfigApplicationContext = new AnnotationConfigApplicationContext("com.tothefor.sprbean");
UserService bean = annotationConfigApplicationContext.getBean(UserService.class);
annotationConfigApplicationContext.close();
}
}
|
注解
1
2
3
4
5
6
7
8
9
10
11
12
13
14
15
16
17
18
19
20
21
22
23
| package com.tothefor.sprbean;
import javax.annotation.PostConstruct;
import javax.annotation.PreDestroy;
public class UserService {
@PostConstruct
public void init(){
System.out.println("初始化");
}
@PreDestroy
public void destory(){
System.out.println("销毁");
}
}
|
输出:
接口
1
2
3
4
5
6
7
8
9
10
11
12
13
14
15
16
17
18
19
20
21
22
23
24
25
26
27
| package com.tothefor.sprbean;
import org.springframework.beans.factory.DisposableBean;
import org.springframework.beans.factory.InitializingBean;
import javax.annotation.PostConstruct;
import javax.annotation.PreDestroy;
public class UserService implements InitializingBean, DisposableBean {
@Override
public void afterPropertiesSet() throws Exception {
System.out.println("初始化1");
}
@Override
public void destroy() throws Exception {
System.out.println("销毁1");
}
}
|
输出:
再看这个:
1
2
3
4
5
6
7
8
9
10
11
12
13
14
15
16
17
18
19
20
21
22
23
24
25
26
27
28
29
30
31
32
33
34
35
36
37
38
39
40
41
42
| package com.tothefor.sprbean;
import org.springframework.beans.factory.DisposableBean;
import org.springframework.beans.factory.InitializingBean;
import javax.annotation.PostConstruct;
import javax.annotation.PreDestroy;
public class UserService implements InitializingBean, DisposableBean {
@PostConstruct
public void init(){
System.out.println("初始化");
}
@PreDestroy
public void destory(){
System.out.println("销毁");
}
@Override
public void afterPropertiesSet() throws Exception {
System.out.println("初始化1");
}
@Override
public void destroy() throws Exception {
System.out.println("销毁1");
}
}
初始化
初始化1
销毁
销毁1
|
可以看见,通过注解实现的会先执行,通过接口的后执行。
配置文件
这里就不用配置文件了,而是用注解@Bean来实现。在配置文件中就是在bean标签中进行设置。
1
2
3
4
5
6
7
8
9
10
11
12
13
14
15
16
17
18
19
| package com.tothefor.sprbean;
import org.springframework.context.annotation.Bean;
import org.springframework.context.annotation.Configuration;
@Configuration
public class config {
@Bean(initMethod = "init2",destroyMethod = "destory2")
public UserService userService(){
return new UserService();
}
}
|
1
2
3
4
5
6
7
8
9
10
11
12
13
14
15
16
17
18
19
20
21
22
23
24
25
26
27
| package com.tothefor.sprbean;
import org.springframework.beans.factory.DisposableBean;
import org.springframework.beans.factory.InitializingBean;
import org.springframework.context.annotation.Bean;
import javax.annotation.PostConstruct;
import javax.annotation.PreDestroy;
public class UserService {
public void init2(){
System.out.println("初始化2");
}
public void destory2(){
System.out.println("销毁2");
}
}
|
输出:
再看一下:
1
2
3
4
5
6
7
8
9
10
11
12
13
14
15
16
17
18
19
20
21
22
23
24
25
26
27
28
29
30
31
32
33
34
35
36
37
38
39
40
41
42
43
44
45
46
47
48
49
50
51
52
53
54
| package com.tothefor.sprbean;
import org.springframework.beans.factory.DisposableBean;
import org.springframework.beans.factory.InitializingBean;
import org.springframework.context.annotation.Bean;
import javax.annotation.PostConstruct;
import javax.annotation.PreDestroy;
public class UserService implements InitializingBean, DisposableBean {
@PostConstruct
public void init(){
System.out.println("初始化");
}
@PreDestroy
public void destory(){
System.out.println("销毁");
}
@Override
public void afterPropertiesSet() throws Exception {
System.out.println("初始化1");
}
@Override
public void destroy() throws Exception {
System.out.println("销毁1");
}
public void init2(){
System.out.println("初始化2");
}
public void destory2(){
System.out.println("销毁2");
}
}
初始化
初始化1
初始化2
销毁
销毁1
销毁2
|
总结
执行顺序:先注解的,再接口,最后配置文件。
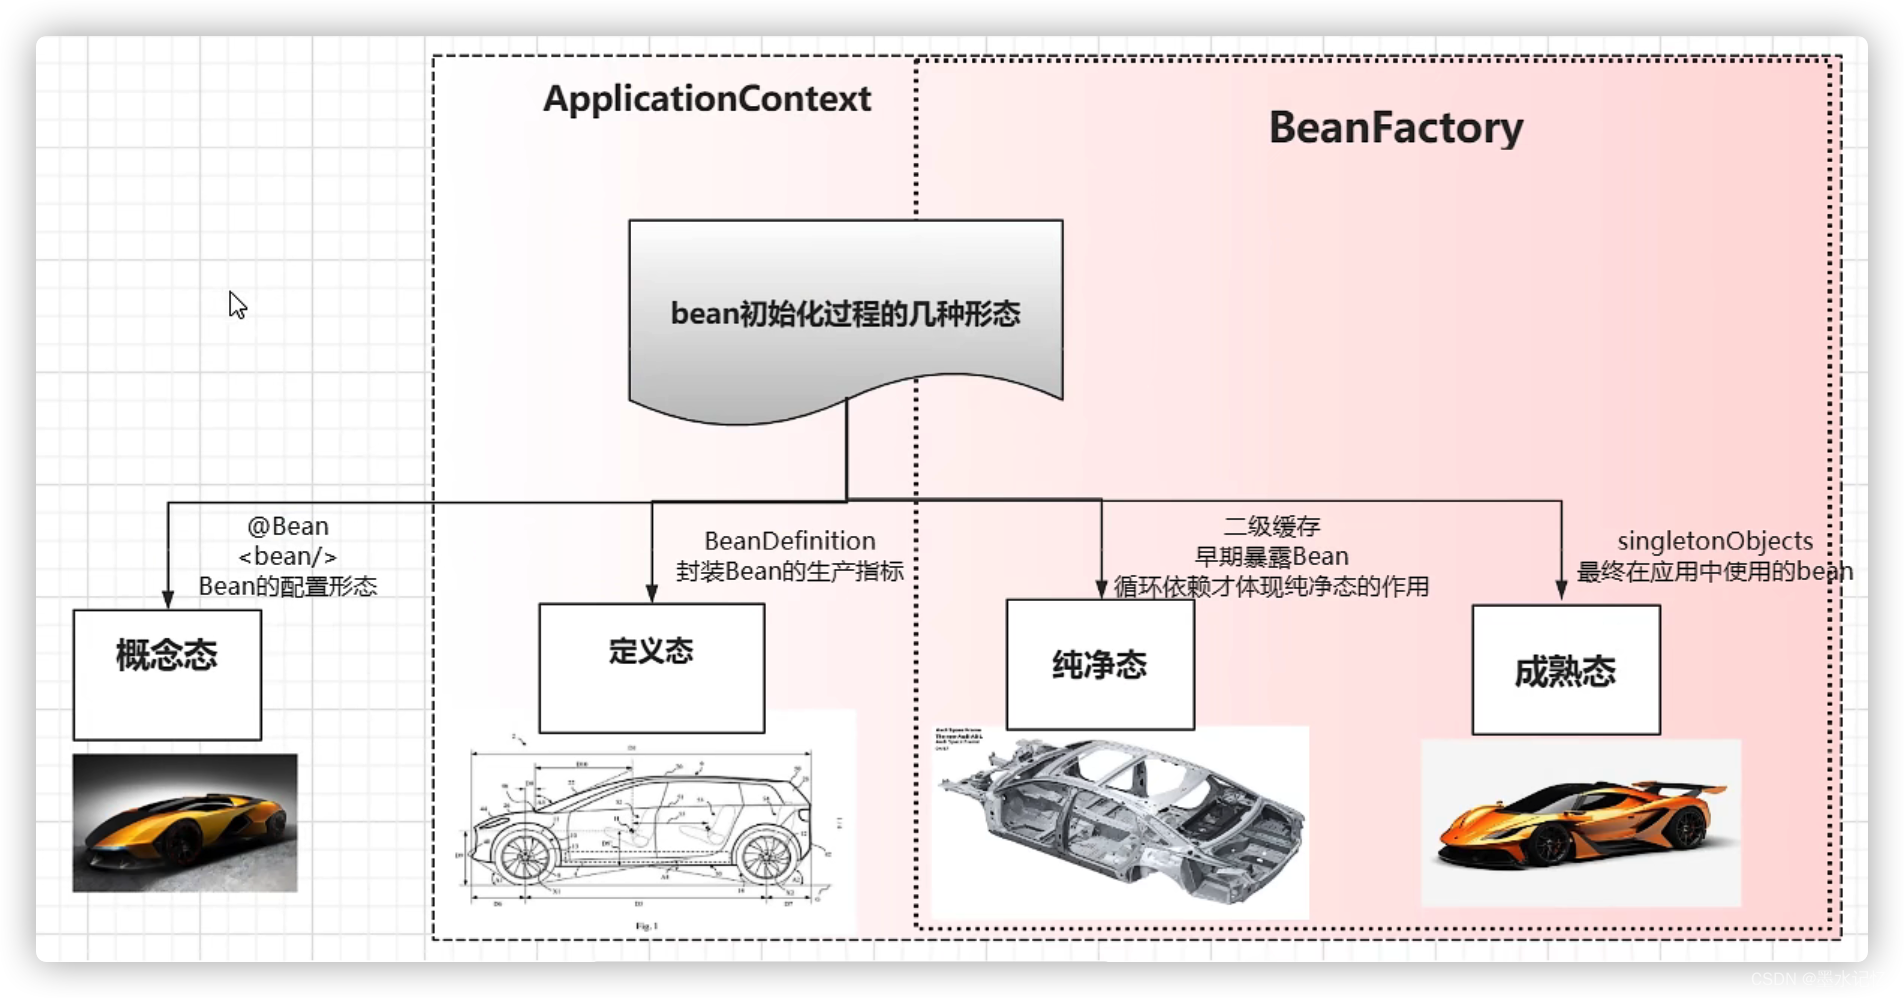
Spring在加载过程中Bean的形态
可以类比创建一辆车的步骤。
Import的用法
有四种方式。
- 直接指定类。
- 实现接口
ImportSelector,可以一次性注册多个。
- 实现接口
ImportBeanDefinitionRegistrar 可以一次性注册多个。通过BeanDefinitionRegistry来动态注册BeanDefinition。
启动类:
1
2
3
4
5
6
7
8
9
10
11
12
13
14
15
16
17
18
19
| package com.tothefor.sprbean;
import org.springframework.context.ApplicationContext;
import org.springframework.context.annotation.AnnotationConfigApplicationContext;
public class TestSpbean {
public static void main(String[] args) {
AnnotationConfigApplicationContext annotationConfigApplicationContext = new AnnotationConfigApplicationContext("com.tothefor.sprbean");
UserService bean = annotationConfigApplicationContext.getBean(UserService.class);
System.out.println(bean);
}
}
|
直接指定类。如果是配置类会按照配置类正常解析,如果是普通类就会解析成Bean。
配置类:
1
2
3
4
5
6
7
8
9
10
11
12
13
14
15
16
17
18
19
| package com.tothefor.sprbean;
import org.springframework.context.annotation.Bean;
import org.springframework.context.annotation.ComponentScan;
import org.springframework.context.annotation.Configuration;
import org.springframework.context.annotation.Import;
@Configuration
@ComponentScan
@Import(UserService.class)
public class config {
}
|
实体类:
| package com.tothefor.sprbean;
public class UserService {
}
|
配置类:
1
2
3
4
5
6
7
8
9
10
11
12
13
14
15
16
17
18
19
| package com.tothefor.sprbean;
import org.springframework.context.annotation.Bean;
import org.springframework.context.annotation.ComponentScan;
import org.springframework.context.annotation.Configuration;
import org.springframework.context.annotation.Import;
@Configuration
@ComponentScan
@Import(configii.class)
public class config {
}
|
另加实体类的配置类:
1
2
3
4
5
6
7
8
9
10
11
12
13
14
15
16
17
18
19
20
21
22
23
| package com.tothefor.sprbean;
import org.springframework.context.annotation.Bean;
import org.springframework.context.annotation.ComponentScan;
import org.springframework.context.annotation.Configuration;
import org.springframework.context.annotation.Import;
@Configuration
@ComponentScan
public class configii {
@Bean
public UserService userService(){
return new UserService();
}
}
|
实现接口ImportSelector
通过实现接口ImportSelector可以一次性注册多个,返回一个String[] ,每一个值就是类的完整类路径(全限定名称)。
1
2
3
4
5
6
7
8
9
10
11
12
13
14
15
16
17
18
19
| package com.tothefor.sprbean;
import org.springframework.context.annotation.Bean;
import org.springframework.context.annotation.ComponentScan;
import org.springframework.context.annotation.Configuration;
import org.springframework.context.annotation.Import;
@Configuration
@ComponentScan
@Import(myImportSelector.class)
public class config {
}
|
实现接口:
1
2
3
4
5
6
7
8
9
10
11
12
13
14
15
16
17
| package com.tothefor.sprbean;
import org.springframework.context.annotation.ImportSelector;
import org.springframework.core.type.AnnotationMetadata;
public class myImportSelector implements ImportSelector {
@Override
public String[] selectImports(AnnotationMetadata importingClassMetadata) {
return new String[]{"com.tothefor.sprbean.UserService"};
}
}
|
配置类:
1
2
3
4
5
6
7
8
9
10
11
12
13
14
15
16
17
18
19
| package com.tothefor.sprbean;
import org.springframework.context.annotation.Bean;
import org.springframework.context.annotation.ComponentScan;
import org.springframework.context.annotation.Configuration;
import org.springframework.context.annotation.Import;
@Configuration
@ComponentScan
@Import(myImportSelector.class)
public class config {
}
|
实现接口ImportBeanDefinitionRegistrar
1
2
3
4
5
6
7
8
9
10
11
12
13
14
15
16
17
18
19
| package com.tothefor.sprbean;
import org.springframework.context.annotation.Bean;
import org.springframework.context.annotation.ComponentScan;
import org.springframework.context.annotation.Configuration;
import org.springframework.context.annotation.Import;
@Configuration
@ComponentScan
@Import(myImportBeanDefinition.class)
public class config {
}
|
实现接口类:
1
2
3
4
5
6
7
8
9
10
11
12
13
14
15
16
17
18
19
20
21
22
| package com.tothefor.sprbean;
import org.springframework.beans.factory.support.BeanDefinitionRegistry;
import org.springframework.beans.factory.support.GenericBeanDefinition;
import org.springframework.context.annotation.ImportBeanDefinitionRegistrar;
import org.springframework.context.annotation.ImportSelector;
import org.springframework.core.type.AnnotationMetadata;
public class myImportBeanDefinition implements ImportBeanDefinitionRegistrar {
@Override
public void registerBeanDefinitions(AnnotationMetadata importingClassMetadata, BeanDefinitionRegistry registry) {
GenericBeanDefinition beanDefinition = new GenericBeanDefinition();
beanDefinition.setBeanClass(UserService.class);
registry.registerBeanDefinition("userService",beanDefinition);
}
}
|
如何让自动注入没有找到依赖Bean时不报错
| @Autowired(required = false)
private UserService userService;
|
如何让自动注入找到多个依赖Bean时不报错
当一个接口有两个实现类时,可以通过注解@Primary将某一个类设置为主要的类。
| package com.tothefor.sprbean;
import org.springframework.context.annotation.Primary;
@Primary
public class UserService implements Service{
}
|
为什么@ComponentScan不设置basePackage也会扫描
因为Spring在解析@ComponentScan的时候,如果发现basePackage没有进行设置,那么会将注解所在的类的包地址作为扫描包的地址。
示例:
| package com.tothefor.sprbean;
import org.springframework.context.annotation.ComponentScan;
import org.springframework.context.annotation.Configuration;
@Configuration
@ComponentScan
public class config {
}
|
使用注解时没有设置basePackage,那么会将 com.tothefor.sprbean 作为扫描包的地址。
源码:
| class ComponentScanAnnotationParser {
....
if (basePackages.isEmpty()) {
basePackages.add(ClassUtils.getPackageName(declaringClass));
}
}
|
AOP中常见的名词
- 切面(Aspect):在AOP中切面指的是”切面类”,切面类中管理着增强的公共行为代码(通知)和切入方式(切点)。
- 连接点(Join point):一个连接点总是代表一个方法的执行,即被增强的业务方法。
- 通知(Advice):即需要增加到业务方法中的公共代码,通知有很多种类型,分别可以在需要增加的业务方法的不同位置进行执行。如:前置通知、后置通知、异常通知、返回通知、环绕通知(自定义控制位置)。
- 切点(Pointcut):决定哪些方法需要增强、哪些不需要增强,结合切点表达式进行实现。
- 目标对象(Target Object):指将要被增强的对象。即包含主业务逻辑的类的对象。
- 织入(Weaving):AspectJ里面的。
通知有哪些类型
- 前置通知(Before):在目标方法被调用之前调用通知功能。
- 后置通知(After):在目标方法完成之后调用通知,此时不会关心方法的输出是什么。
- 返回通知(After-Returning):在目标方法成功执行之后调用通知。
- 异常通知(After-Throwing):在目标方法抛出异常后调用通知。
- 环绕通知(Around):通知包裹了被通知的方法,在被通知的方法调用之前和调用之后执行自定义的行为。
执行顺序
- 正常运行:前置、目标方法、后置、返回。
- 异常运行:前置、目标方法、后置、异常。
📢注意:Spring在5.2.7之后就改变了Advice的执行顺序。
- 正常执行:@Before、目标方法、@AfterReturning、@After。
- 异常执行:@Before、目标方法、@AfterThrowing、@After。
JavaConfig方式开启AOP以及强制使用CGlib
| @EnableAspectJAutoProxy
@EnableAspectJAutoProxy(proxyTargetClass = true)
|
AOP的实现方式
有三种方式实现:使用原生Spring API接口、自定义切面类、注解方式。
详情可见《Spring-(八)AOP的实现 》
Autowired注解自动装配的过程
Autowired通过Bean的后置处理器进行解析的。待补充。
Configuration的作用及解析原理
待补充。
Spring中Bean的生命周期
生命周期,指Bean从创建到销毁的整个过程,分为4步:
具体待看源码后补充。
如何解决Bean的循环依赖
采用三级缓存解决。三级缓存即三个Map。
待看源码后补充。
BeanDefinition的加载过程
待看源码后补充。
