本文最后更新于:May 13, 2023 pm
Spring Cloud是一系列框架的有序集合。它利用Spring Boot的开发便利性巧妙地简化了分布式系统基础设施的开发,如服务发现注册、配置中心、消息总线、负载均衡、断路器、数据监控等,都可以用Spring Boot的开发风格做到一键启动和部署。
目录
项目搭建
具体可见:SpringBoot-(二十三)SpringBoot模块化步骤详解
⚠️提示:如果创建好的依赖中有以下依赖,可先将其注释掉,否则后续多项目启动时会出现问题。
|
<dependency>
<groupId>com.taobao.arthas</groupId>
<artifactId>arthas-spring-boot-starter</artifactId>
<version>3.4.8</version>
<scope>runtime</scope>
</dependency>
|
整合Nacos
安装和启动,具体可见:SpringCloud-(一)Nacos的安装与启动
注册服务
父项目的依赖管理中添加:
| <dependency>
<groupId>org.springframework.cloud</groupId>
<artifactId>spring-cloud-dependencies</artifactId>
<version>2021.0.1</version>
<type>pom</type>
<scope>import</scope>
</dependency>
<dependency>
<groupId>com.alibaba.cloud</groupId>
<artifactId>spring-cloud-alibaba-dependencies</artifactId>
<version>2021.0.1.0</version>
<type>pom</type>
<scope>import</scope>
</dependency>
|
在需要进行注册的服务模块中添加以下依赖:
| <dependency>
<groupId>com.alibaba.cloud</groupId>
<artifactId>spring-cloud-starter-alibaba-nacos-discovery</artifactId>
</dependency>
|
再在需要进行注册的服务模块的配置文件中添加配置如下:
1
2
3
4
5
6
7
8
9
10
11
12
13
14
15
16
17
18
19
20
21
22
23
24
25
26
27
28
29
30
31
| server:
port: 8081
servlet:
context-path: /adminT
spring:
application:
name: admin-api
profiles:
active: adminCore
cloud:
nacos:
discovery:
server-addr: localhost:8848
datasource:
druid:
username: root
password: 111
url: jdbc:mysql://localhost:3306/home?serverTimezone=Asia/Shanghai&useUnicode=true&characterEncoding=UTF-8
driver-class-name: com.mysql.cj.jdbc.Driver
type: com.alibaba.druid.pool.DruidDataSource
mybatis-plus:
mapper-locations: classpath:mapper/*/*.xml
configuration:
log-impl: org.apache.ibatis.logging.stdout.StdOutImpl
|
然后启动后,去nacos中查看是否成功注册。
⚠️提示:
- 如果拥有配置profiles.active的值,那么在nacos最后注册成功的就是profiles.active配置文件中的应用名称。
发送远程请求
推荐使用第二种方式。
RestTemplate
注册RestTemplate
1
2
3
4
5
6
7
8
9
10
11
12
13
14
15
16
17
18
19
20
21
| package com.tothefor.demo;
import org.springframework.boot.SpringApplication;
import org.springframework.boot.autoconfigure.SpringBootApplication;
import org.springframework.context.annotation.Bean;
import org.springframework.web.client.RestTemplate;
@SpringBootApplication
public class DemoApplication {
public static void main(String[] args) {
SpringApplication.run(DemoApplication.class, args);
}
@Bean
public RestTemplate restTemplate(){
return new RestTemplate();
}
}
|
发送请求
| @Test
void contextLoads() {
ResponseR r = restTemplate.getForObject("https://start.spring.io/actuator/info",ResponseR.class);
}
|
ResponseR为请求的结果实体类。
OpenFeign
前提是已经搭建好nacos注册中心,拥有至少两个服务应用,且必须成功注册到注册中心。这里有两个角色:提供者、消费者。A应用(消费者)需要调用B应用(提供者)的接口。
添加依赖(消费者)
| <dependency>
<groupId>org.springframework.cloud</groupId>
<artifactId>spring-cloud-starter-openfeign</artifactId>
</dependency>
<dependency>
<groupId>org.springframework.cloud</groupId>
<artifactId>spring-cloud-starter-loadbalancer</artifactId>
</dependency>
|
同时实现了负载均衡的效果。
配置
在消费者中创建一个发送请求的类。这里有坑,需要注意。先来看提供者的配置文件:
1
2
3
4
5
6
7
8
9
10
11
12
13
14
15
16
17
18
19
20
21
22
23
24
25
26
27
28
29
30
31
32
33
| server:
port: 8082
servlet:
context-path: /userT
spring:
application:
name: user-api
profiles:
active: userCore
cloud:
nacos:
discovery:
server-addr: localhost:8848
datasource:
druid:
username: root
password: 1111
url: jdbc:mysql://localhost:3306/home?serverTimezone=Asia/Shanghai&useUnicode=true&characterEncoding=UTF-8
driver-class-name: com.mysql.cj.jdbc.Driver
type: com.alibaba.druid.pool.DruidDataSource
mybatis-plus:
mapper-locations: classpath:mapper/*/*.xml
configuration:
log-impl: org.apache.ibatis.logging.stdout.StdOutImpl
|
需要注意的点:context-path的值,表示所有请求都需要加上此前缀进行访问。接下来是提供者提供的接口:
1
2
3
4
5
6
7
8
9
10
11
12
13
14
15
16
17
18
19
20
21
22
23
24
25
| package com.tothefor.userapi.T;
import com.alibaba.fastjson.JSONObject;
import com.tothefor.usercore.TscService.TSCService;
import org.springframework.beans.factory.annotation.Autowired;
import org.springframework.web.bind.annotation.RequestMapping;
import org.springframework.web.bind.annotation.RestController;
@RestController
@RequestMapping("/user")
public class UTcontroller {
@RequestMapping("/c")
public String getT() {
return "ok-user";
}
}
|
需要注意的点:类上的请求前缀,方法接口自己的请求地址。然后再来看在消费者中是如何使用配置的:
1
2
3
4
5
6
7
8
9
10
11
12
13
14
15
16
17
| package com.tothefor.adminapi.client;
import org.springframework.cloud.openfeign.FeignClient;
import org.springframework.web.bind.annotation.RequestMapping;
@FeignClient("userservice")
public interface UserApiClient {
@RequestMapping("/userT/user/c")
String getT();
}
|
提示:
- FeignClient:为提供者的服务应用名称。
- RequestMapping:请求路径。这里一定要⚠️注意,是所有前缀拼接在一起,然后再加方法自己的请求路径!!!
启动类配置
| package com.tothefor.adminapi;
import org.mybatis.spring.annotation.MapperScan;
import org.springframework.boot.SpringApplication;
import org.springframework.boot.autoconfigure.SpringBootApplication;
import org.springframework.cloud.openfeign.EnableFeignClients;
import org.springframework.context.annotation.ComponentScan;
@SpringBootApplication
@EnableFeignClients(basePackages = "com.tothefor.adminapi.client")
public class AdminApiApplication {
public static void main(String[] args) {
SpringApplication.run(AdminApiApplication.class, args);
}
}
|
@EnableFeignClients表示开启,后面是请求类的位置。
使用
1
2
3
4
5
6
7
8
9
10
11
12
13
14
15
16
17
18
19
20
21
22
23
24
25
26
27
28
29
30
31
32
33
| package com.tothefor.adminapi.T;
import com.alibaba.fastjson.JSONObject;
import com.tothefor.adminapi.client.UserApiClient;
import com.tothefor.admincore.service.AdminService;
import org.springframework.beans.factory.annotation.Autowired;
import org.springframework.web.bind.annotation.RequestMapping;
import org.springframework.web.bind.annotation.RestController;
import javax.annotation.Resource;
@RestController
@RequestMapping("/admin")
public class ATcontroller {
@Resource
private UserApiClient userApiClient;
@RequestMapping("/getU")
public Object getu() {
return new JSONObject()
.fluentPut("adminU", userApiClient.getT())
;
}
}
|
在消费者自己提供的接口中调用提供者的接口,只需要直接调用方法即可。
高级Nacos
修改临时实例
强烈推荐新手不要修改,因为一旦设置了不是临时实例,那么删除是有点麻烦的,,否则可能会造成后续无法启动。如果出现了这种情况,将nacos文件夹删除,重新下一个导入开启即可。
修改是否为临时实例,默认为true。(临时实例定义:实例下线后在nacos上不能看见):
| spring:
cloud:
nacos:
discovery:
server-addr: localhost:8848
ephemeral: false
|
集群分区
分区:即将集群进行划分,一个大集群划分成多个有联系的小集群,小集群也可单独完成大集群的所有功能。如下图所示。划分的目的在于优先匹配访问快的,如:就近访问。之所有说有联系,是因为当原本访问快的服务挂掉了,就可以去访问其他的服务了。
例如:你现在是在成都,那么访问时优先匹配安装在成都服务器上的服务,当成都服务器无法访问时,你也可以去访问重庆服务器。如果你在重庆,那么刚好相反。

现有一个消费者服务admin,两个提供者服务user01、user02。
设置提供者所在的分区名称,对应配置文件中修改分区设置:
| spring:
cloud:
nacos:
discovery:
server-addr: localhost:8848
cluster-name: chengdu
|
IDEA启动配置:
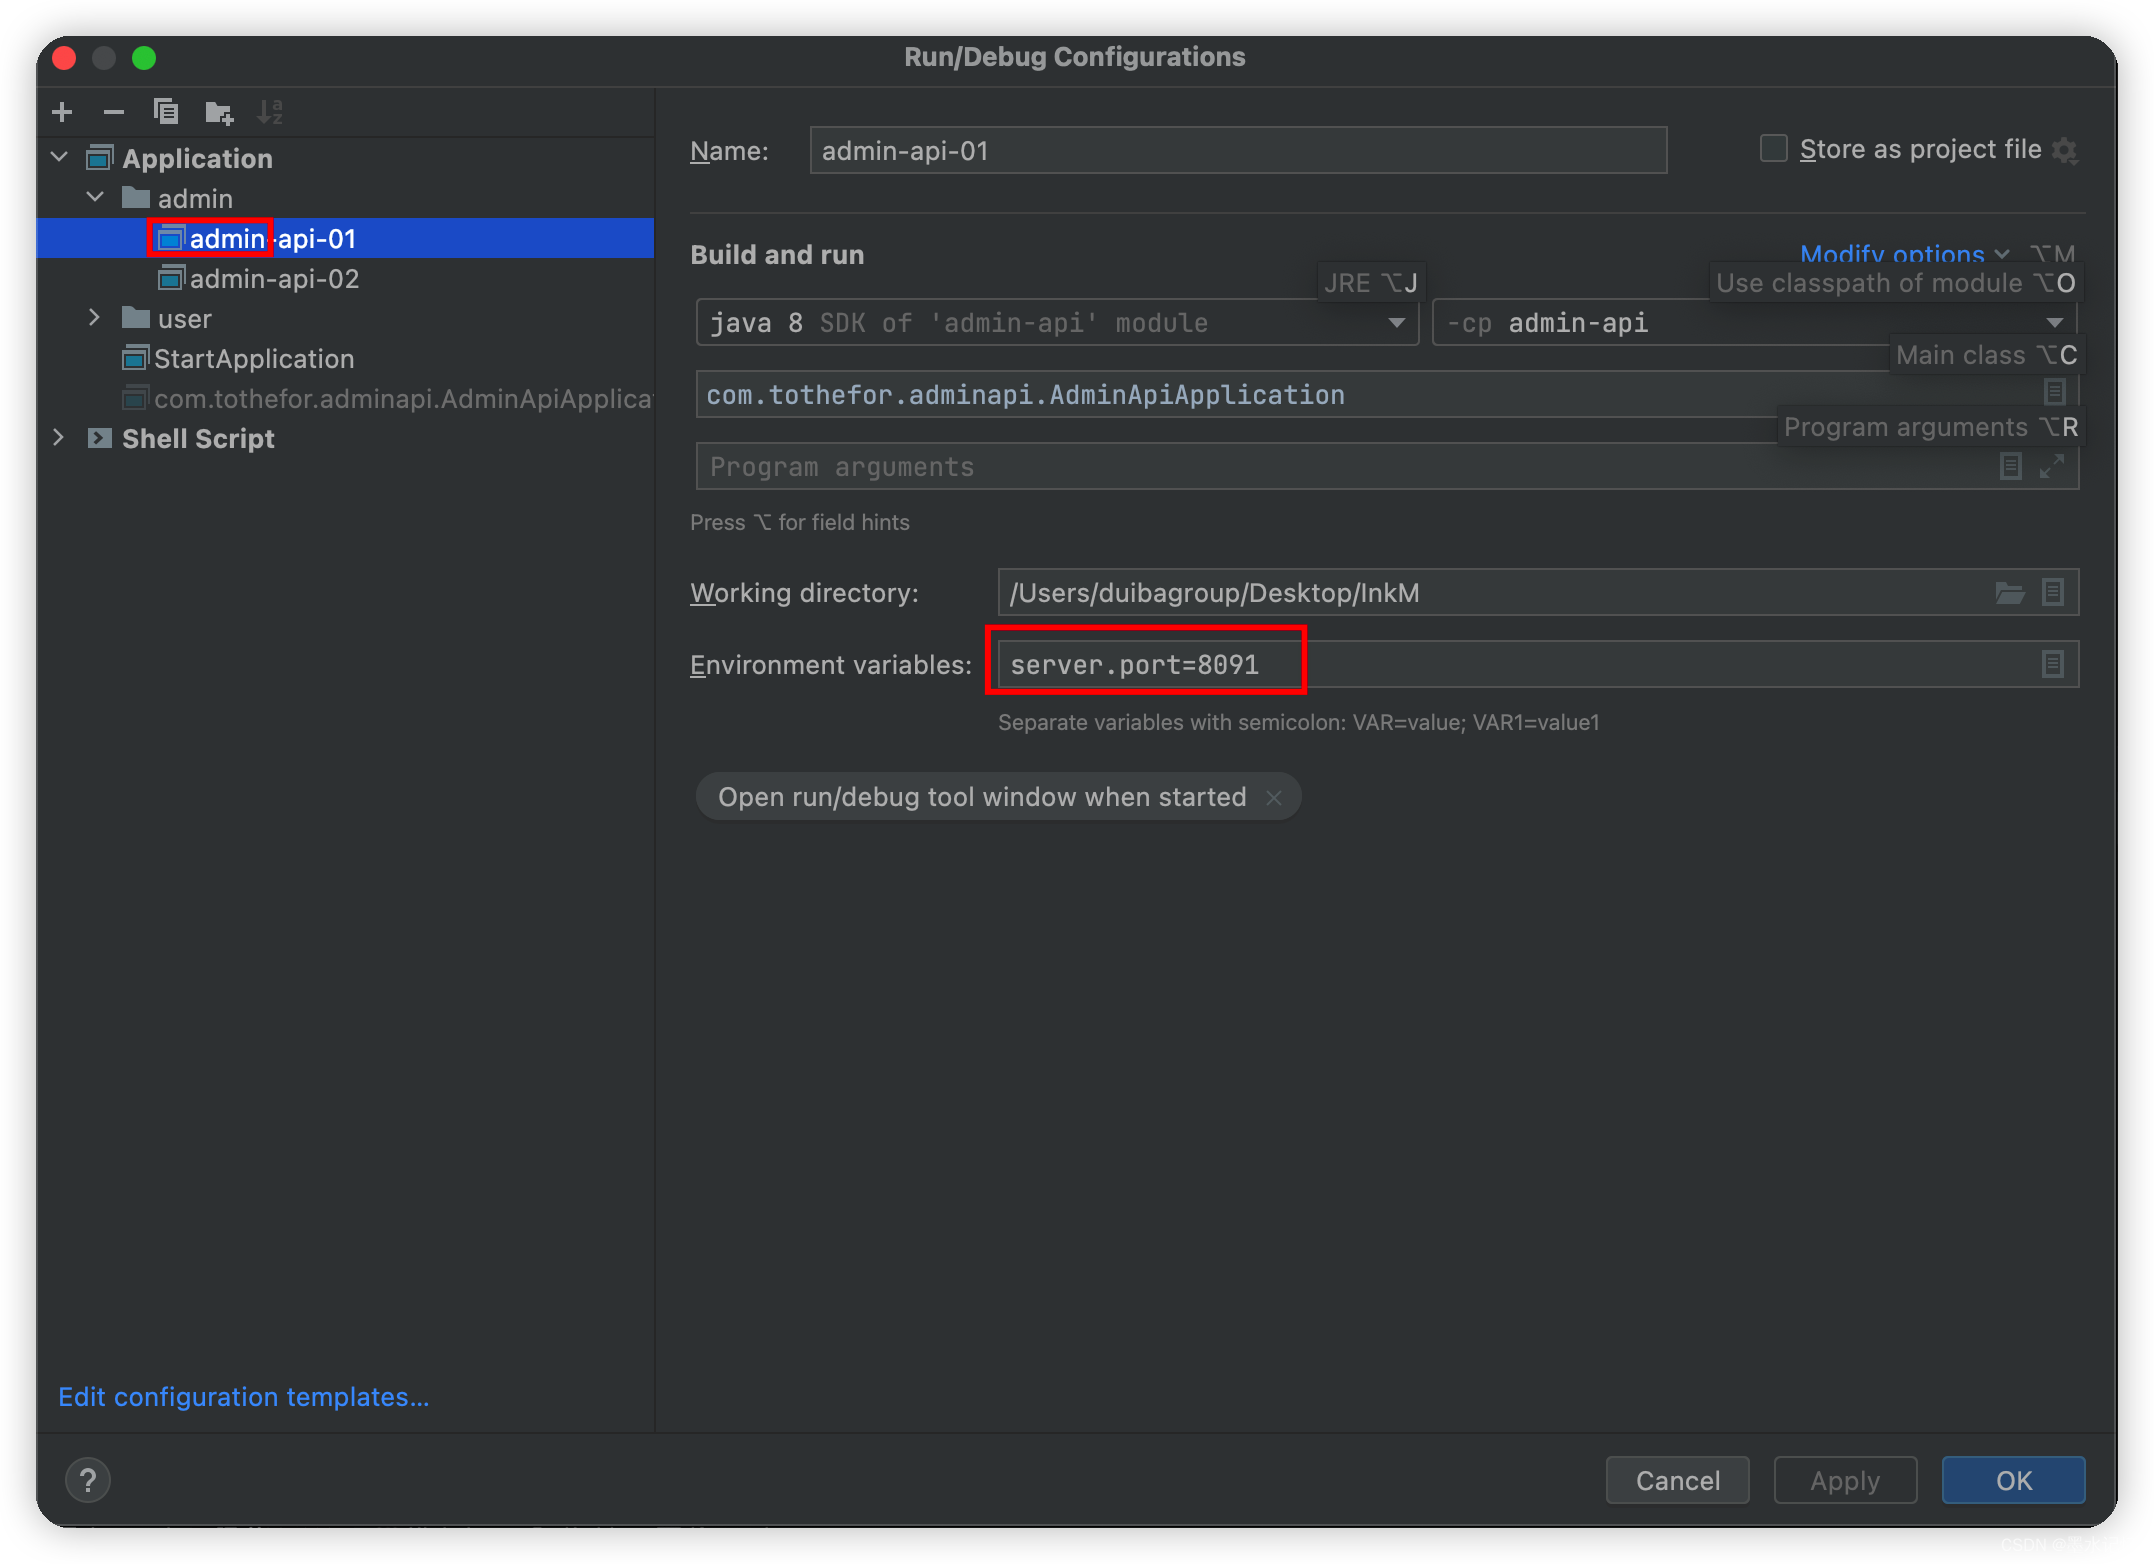
admin服务配置:

并没有配置分区,区别可见下图。
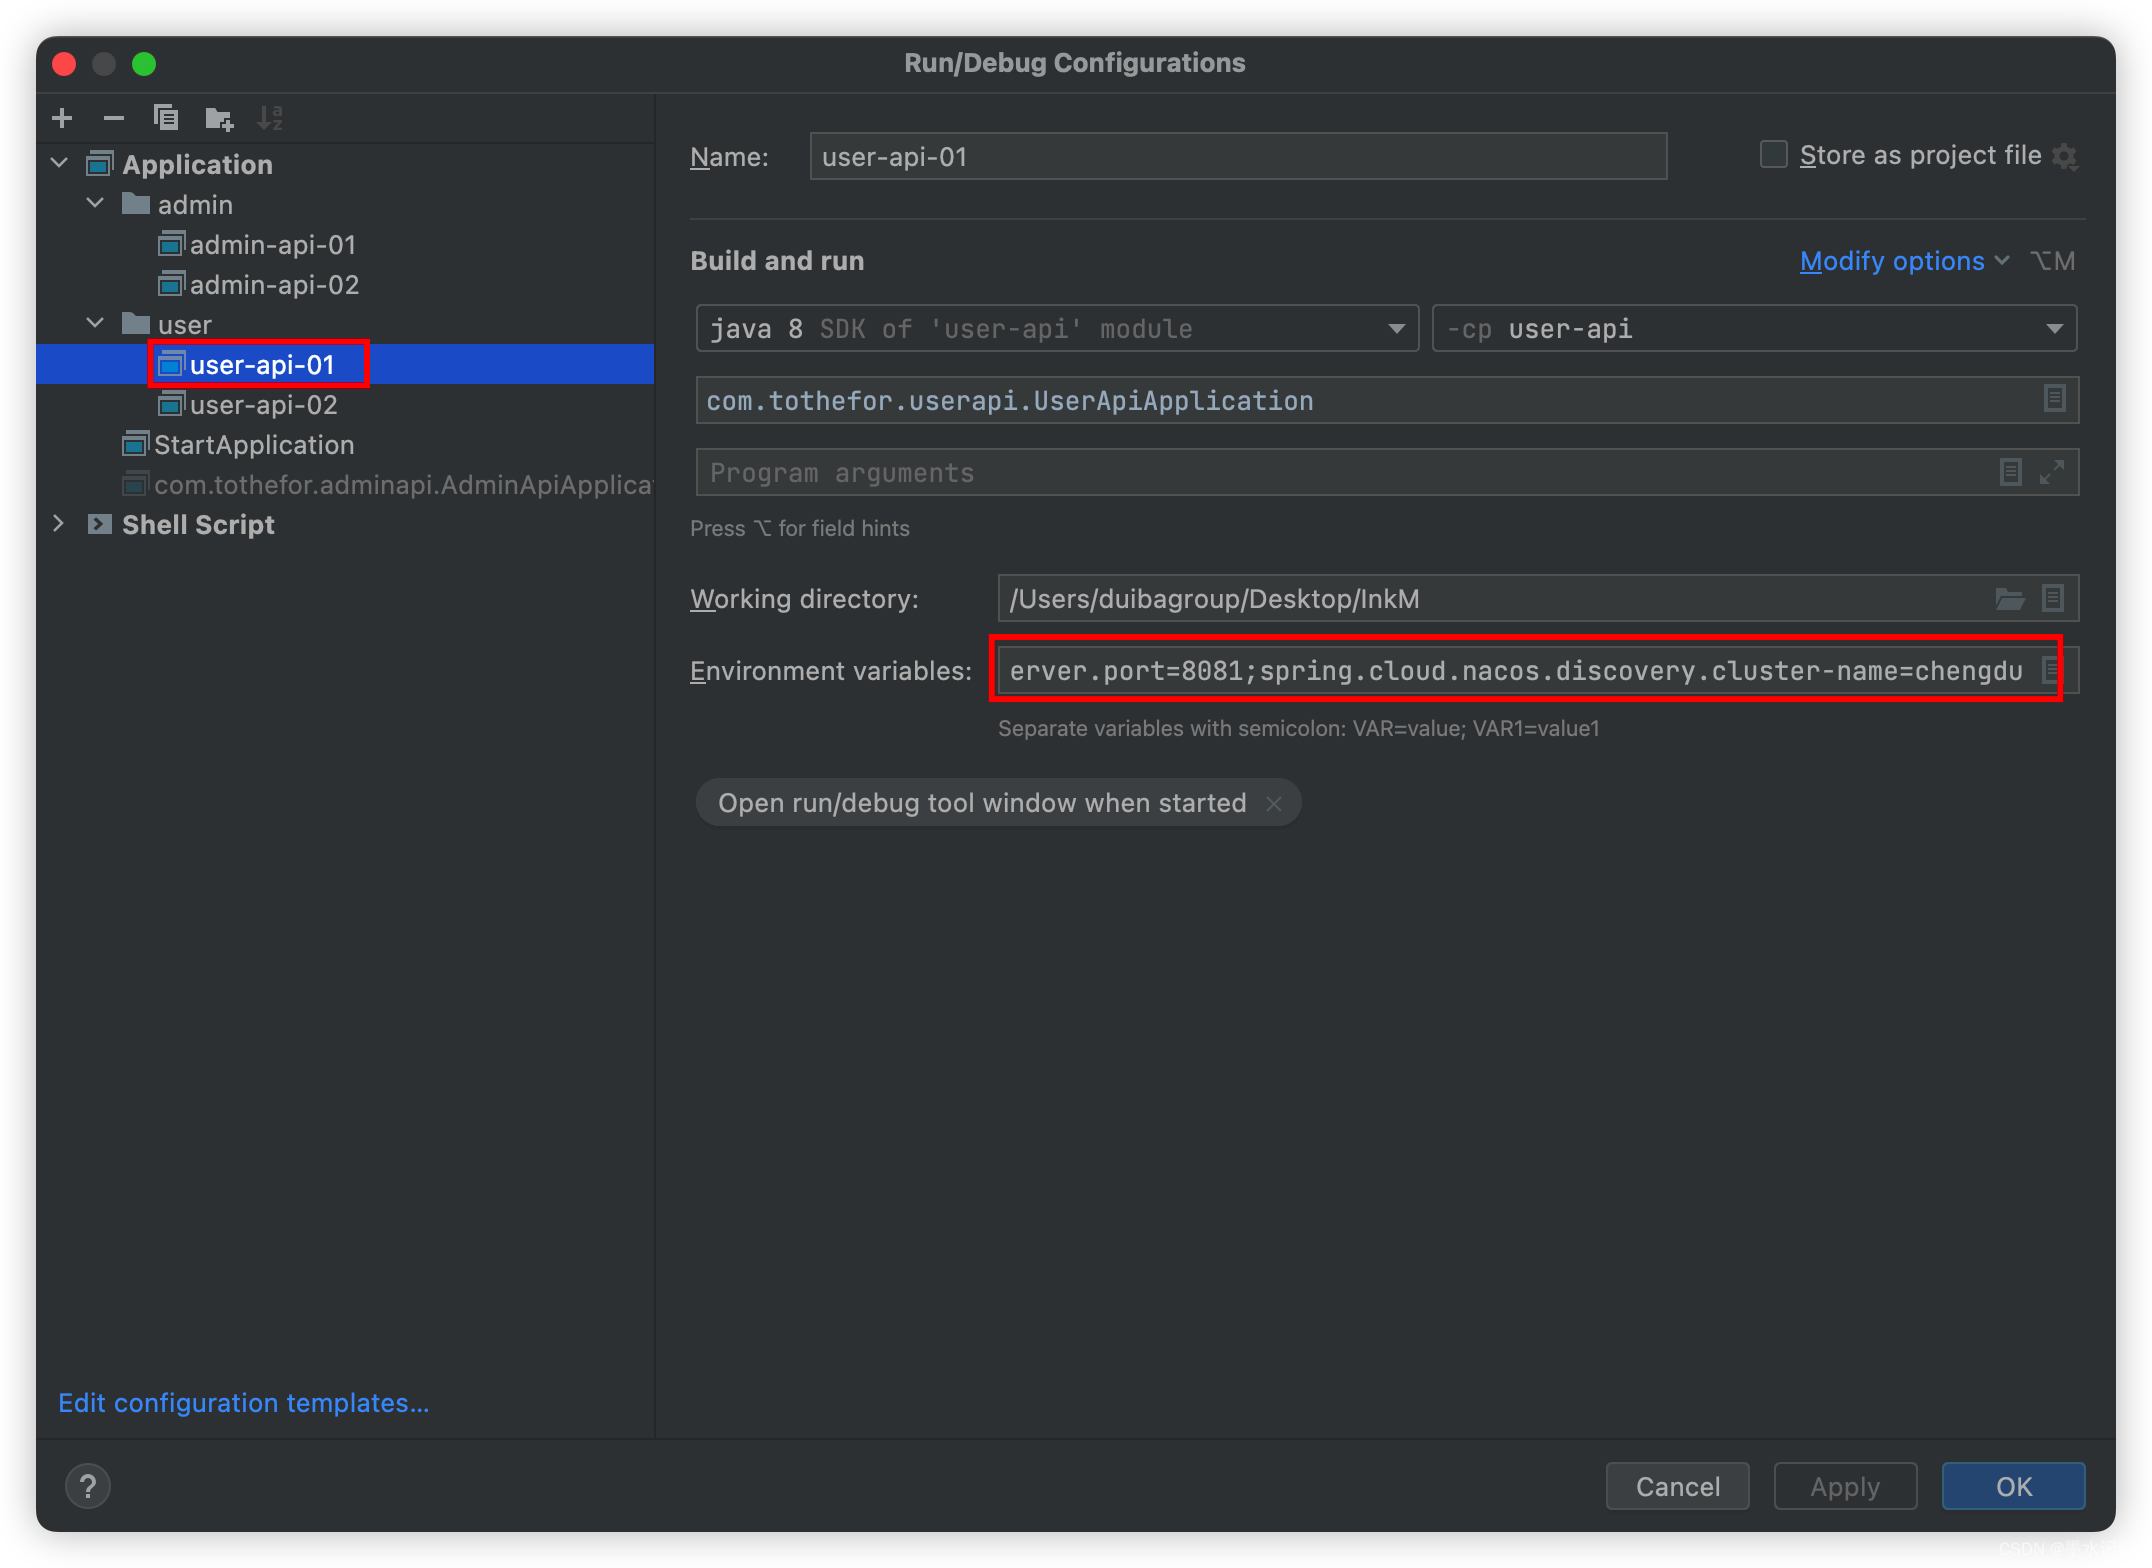
user服务配置:

命令如下:
| server.port=8081;spring.cloud.nacos.discovery.cluster-name=chengdu
|
user02也是一样的配置,只是分区为chongqing。
然后访问admin接口,会发现负载均衡算法是轮训的方式。即两个user服务是均摊的。
⚠️注意:如果admin也是chengdu或者chongqing分区,也会出现均摊访问的情况。因为我们还需要集成Nacos负载均衡。配置如下:
| spring:
cloud:
nacos:
discovery:
server-addr: localhost:8848
loadbalancer:
nacos:
enabled: true
|
这里因为是在IDEA中启动,所以分区的名称没有配置,如果你不想在启动的参数中添加(如上图红框),可以在这里写上分区名称。这里以chengdu为例。
配置好后,多次访问admin服务接口,可以发现全部请求到了分区名称为chengdu的user服务中。而且当chengdu的user服务停掉后再次访问admin接口,会发现请求到了chongqing的user中。当chengdu的user重启后,请求会全部请求到chengdu的user服务中去。
权重
除了根据分区优先调用之外,同一个分区下的实例也可以单独设置权重,Nacos会优先选择权重更大的实例进行调用。(可自行根据服务器的配置进行权重的分布配置)设置如下:
| spring:
cloud:
nacos:
discovery:
server-addr: localhost:8848
weight: 2
|
配置命令:
| server.port=8081;spring.cloud.nacos.discovery.cluster-name=chengdu;spring.cloud.nacos.discovery.weight=5
|
Nacos的配置中心
采用nacos的配置中心,这样,对于需要更改的部分,我们可以随时修改而不用重启服务。以修改admin服务模块为例。
导入依赖
| <dependency>
<groupId>org.springframework.cloud</groupId>
<artifactId>spring-cloud-starter-bootstrap</artifactId>
</dependency>
<dependency>
<groupId>com.alibaba.cloud</groupId>
<artifactId>spring-cloud-starter-alibaba-nacos-config</artifactId>
</dependency>
|
原本application.yml中的配置为:
1
2
3
4
5
6
7
8
9
10
11
12
13
14
15
16
17
18
19
20
21
22
23
24
25
26
27
28
29
30
| server:
port: 8081
servlet:
context-path: /adminT
spring:
application:
name: adminservice
cloud:
nacos:
discovery:
server-addr: localhost:8848
datasource:
druid:
username: root
password: root
url: jdbc:mysql://localhost:3306/home?serverTimezone=Asia/Shanghai&useUnicode=true&characterEncoding=UTF-8
driver-class-name: com.mysql.cj.jdbc.Driver
type: com.alibaba.druid.pool.DruidDataSource
mybatis-plus:
mapper-locations: classpath:mapper/*/*.xml
configuration:
log-impl: org.apache.ibatis.logging.stdout.StdOutImpl
|
现在我们将这些配置都使用nacos的配置中心进行配置:

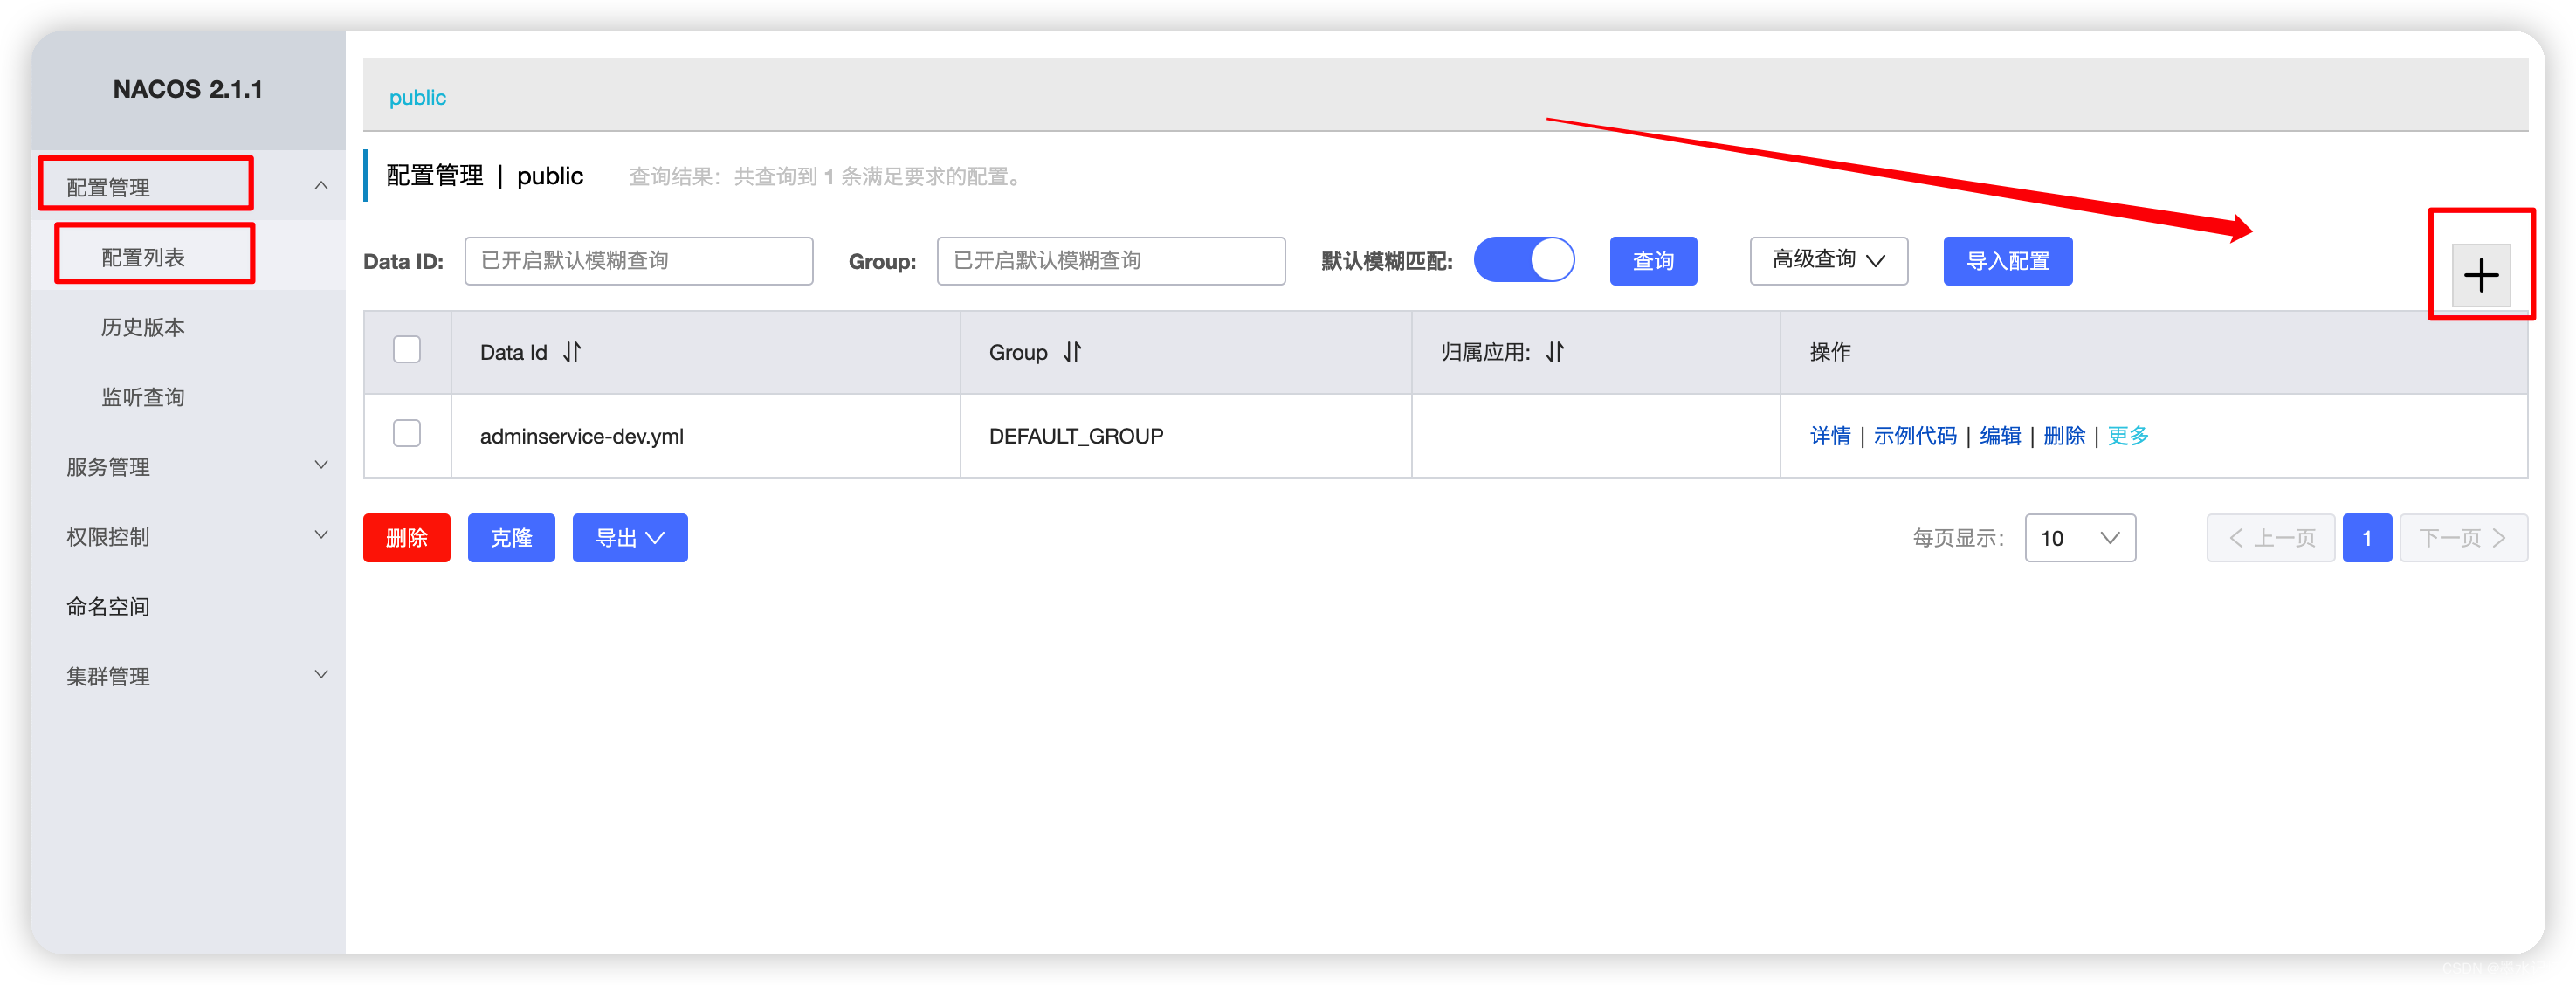
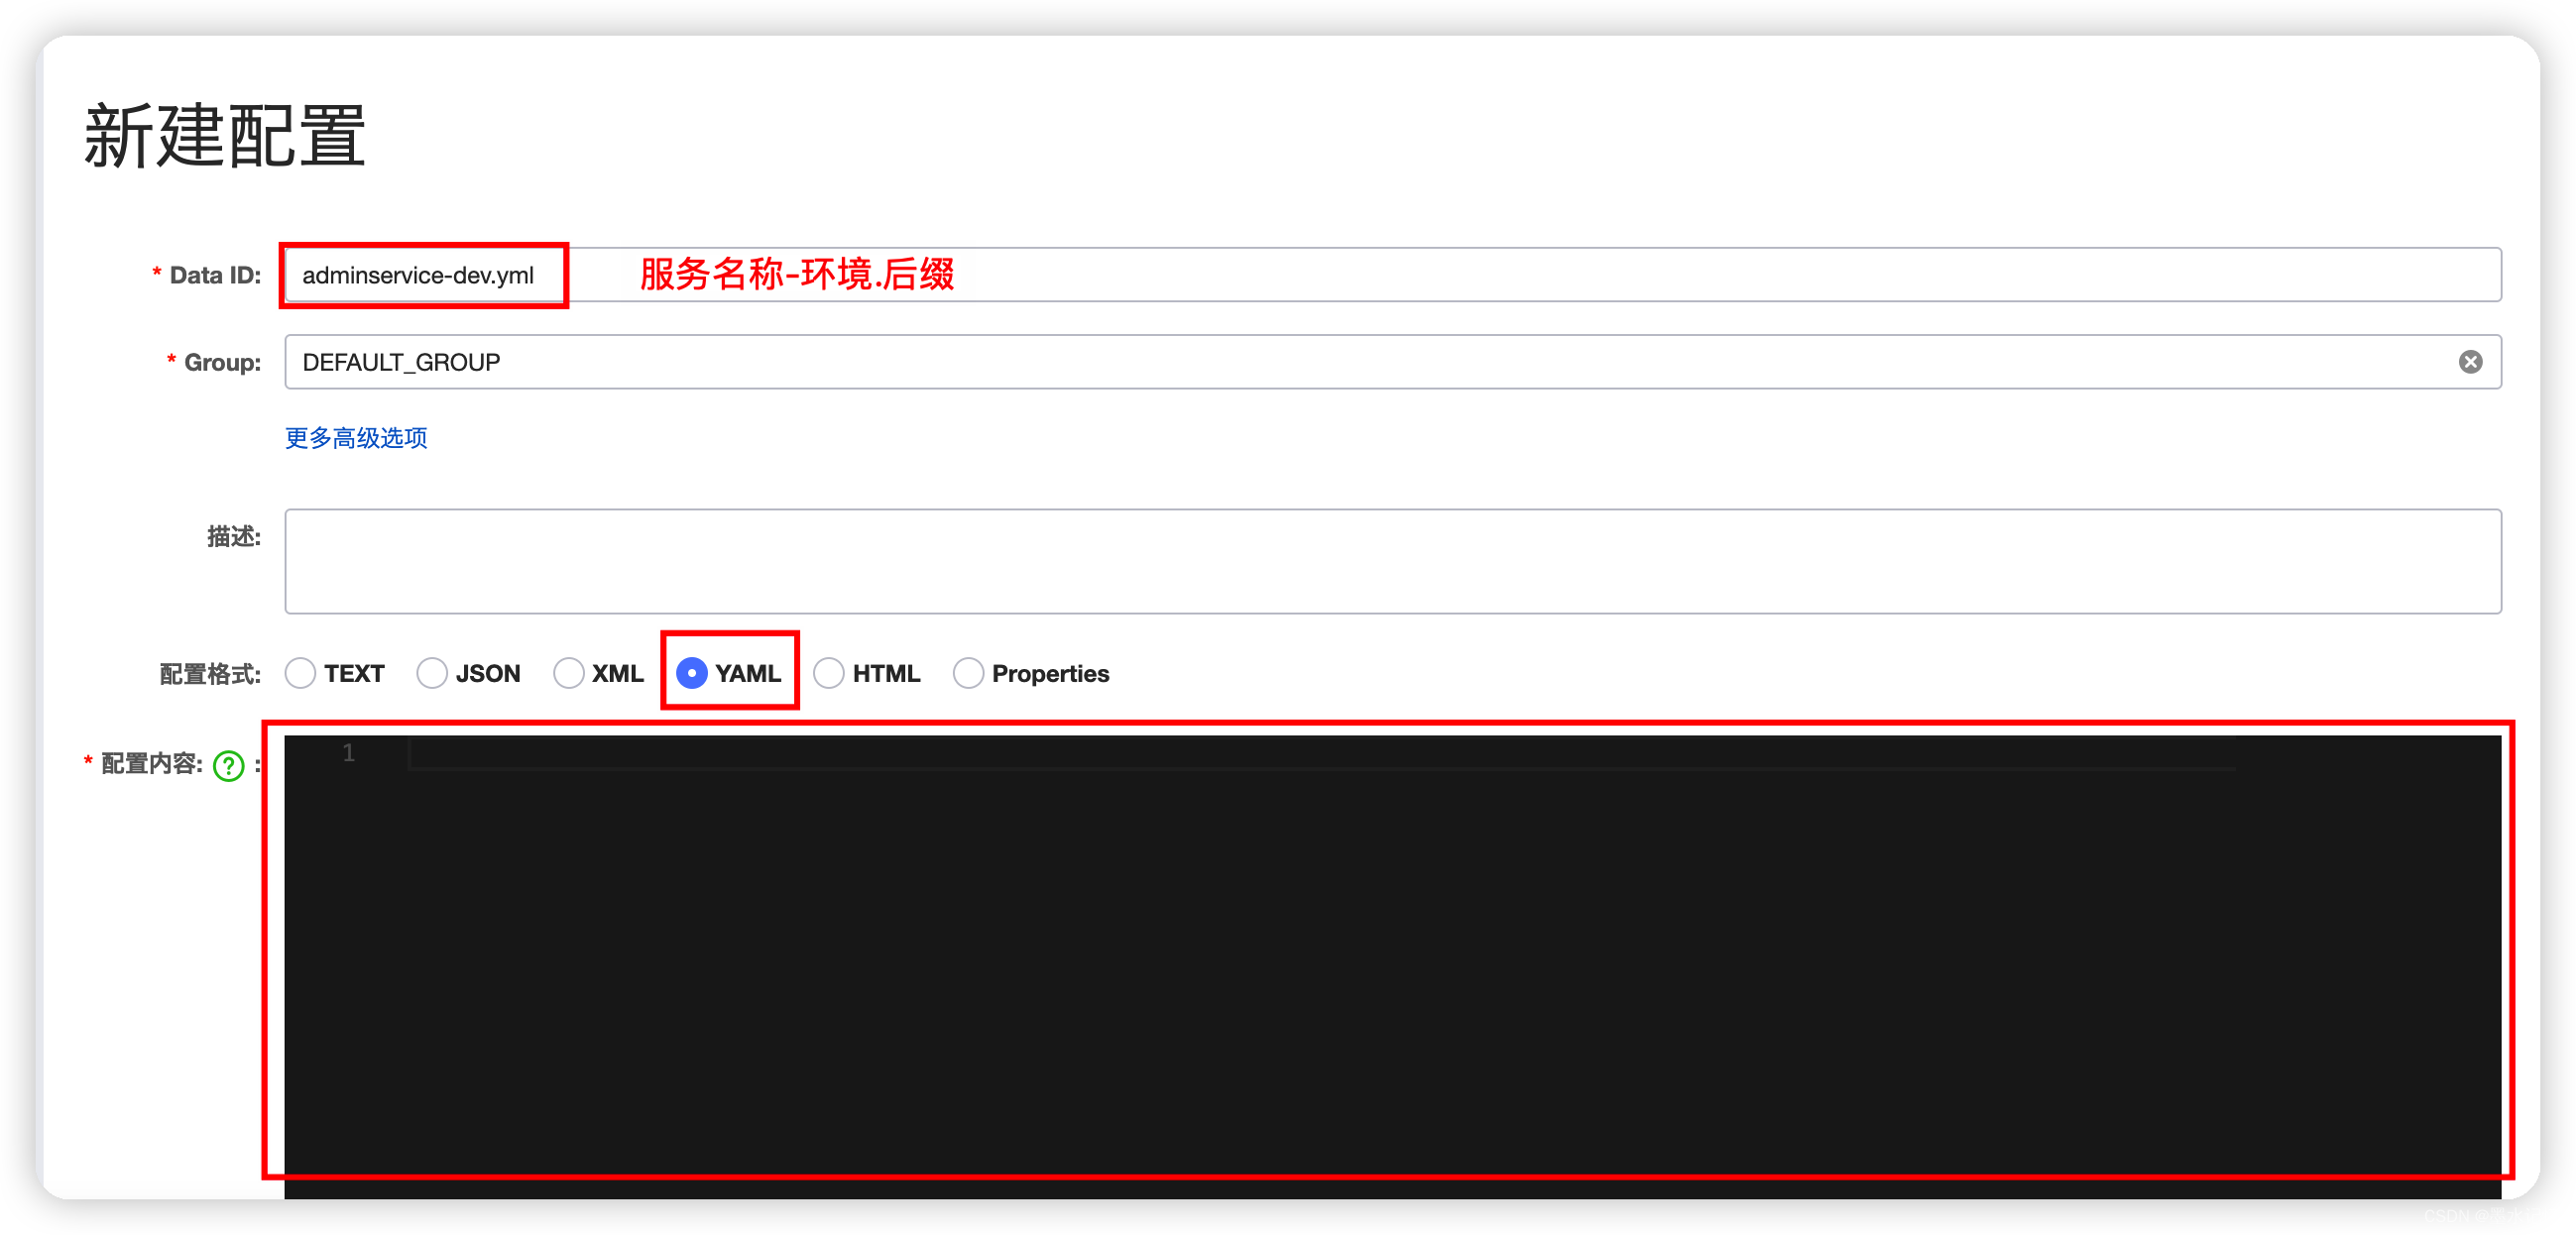
添加一个配置,将application中需要经常改动的部分配置进去:

现在再在项目resource目录下创建一个bootstrap.yml的配置文件,如下:
| spring:
application:
name: adminservice
profiles:
active: dev
cloud:
nacos:
config:
file-extension: yml
server-addr: localhost:8848
|
完成上述配置后,就可以启动项目了。
提示:application.yml和bootstrap.yml同时存在时,application.yml中的配置依然是有效的。这里测试为了方便就直接将application.yml中的内容全部进行了配置,然后将application.yml中原本的内容均进行了注释。
注意点
关于对云原生多配置文件的支持。
自从SpringCloud2020开始,SpringBoot版本就更新到了2.4+,而在SpringBoot2.4这个大版本中有一项非常重要的改动:出于对云原生多配置文件的支持,默认关闭了对bootstrap.yml的使用。所以,在SpringCloud2020以后,配置bootstrap.yml都是无效的。
- 但是,在测试过程中发现,依然有效。(不知道为什么)
官方文档地址
重启bootstrap.yml
这种方式相当于将SpringBoot降回之前的使用方式,大概分为两步:
- 启用bootstrap.yml支持:spring.cloud.bootstrap.enabled=true
- 引入bootstrap组件的依赖(注意版本):org.springframework.cloud:spring-cloud-starter-bootstrap
之后就可以按照正常流程操作了。
使用spring.config.import
直接在application.yml中进行配置,由于nacos(2.1.0)目前仍未对springboot 2.4+版本做对应优化,只能通过手动拼接dataId的方式去获取配置。所以需要我们和nacos配置中心的文件名称保持一致,如下配置:
1
2
3
4
5
6
7
8
9
10
11
12
13
14
15
16
17
18
19
20
21
| spring:
application:
name: adminservice
profiles:
active: dev
cloud:
nacos:
config:
enabled: true
file-extension: yml
discovery:
server-addr: localhost:8848
config:
import: nacos:${spring.application.name}-${spring.profiles.active}.${spring.cloud.nacos.config.file-extension}
|
spring.config.import后如果加上了optional:,则表示允许连接不成功时继续启动项目,例如:
| config:
import: optional:nacos:${spring.application.name}-${spring.profiles.active}.${spring.cloud.nacos.config.file-extension}
|
简化配置
自己测试发现,也可以这样进行配置application.yml:
| spring:
service: adminservice
envir: dev
endF: yml
config:
import: nacos:${spring.service}-${spring.envir}.${spring.endF}
|
即:只需要使用spring.config.import,然后写nacos上配置的文件名称即可。直接写死应该也可以。
参考 SpringCloud 2021 与 Nacos 配置中心集成排雷记录:bootstrap.yml
热更新
⚠️注意:如果是非public的命名空间,则必须采用bootstrap.yml的方式,且需配置好命名空间,否则无法进行获取,启动失败。 下面示例是以非public命名空间,如果是public命名空间,则可以直接采用上面的简化配置。
- 另外,如果不采用bootstrap.yml的方式进行配置,那么是无法进行热更新的。即使更新了nacos上的配置文件,但是IDEA中显示没有更新。
- 对于bootstrap的理解,可以理解为它是最顶级的,它有的配置都以它为准。如果IDEA设置了端口,nacos配置文件中也配置了端口。在本地测试时发现,bootstrap.yml能强制使用nacos配置文件里面的端口;而不使用bootstrap的话就会以IDEA的端口为准。
- 总结(个人总结)优先级:bootstrap > IDEA > 配置文件。
- 还有一个问题:如果使用bootstrap的话,那么无法实现集群效果,因为所有的都是以配置文件为准,但端口只有一个。
首先在nacos的配置中心中,随机配置一个key-value值。然后再配置bootstrap.yml。
bootstrap.yml配置:
| spring:
application:
name: adminservice
profiles:
active: dev
cloud:
nacos:
config:
namespace: e09f2398-7852-408a-9a5f-619aa7d75439
file-extension: yml
server-addr: localhost:8848
|
实现热更新:
1
2
3
4
5
6
7
8
9
10
11
12
13
14
15
16
17
18
19
20
21
22
23
24
25
26
27
28
29
30
31
32
33
34
35
36
| package com.tothefor.adminapi.T;
import com.alibaba.fastjson.JSONObject;
import com.tothefor.adminapi.client.UserApiClient;
import com.tothefor.admincore.service.AdminService;
import org.springframework.beans.factory.annotation.Autowired;
import org.springframework.beans.factory.annotation.Value;
import org.springframework.cloud.context.config.annotation.RefreshScope;
import org.springframework.web.bind.annotation.RequestMapping;
import org.springframework.web.bind.annotation.RestController;
import javax.annotation.Resource;
@RefreshScope
@RestController
@RequestMapping("/admin")
public class ATcontroller {
@Value("${ttf.name}")
private String name;
@RequestMapping("/c")
public Object getT() {
return new JSONObject()
.fluentPut("ok", "qwerqwer")
.fluentPut("name", name)
;
}
}
|
在需要注入的类中添加注解@RefreshScope,实现自动更新值。
命名空间
用于不同环境之间进行隔离。即:只有处于相同命名空间下的服务之间才能进行调用,否则不能进行调用。如下配置:
1
2
3
4
5
6
7
8
9
10
11
12
13
14
15
16
17
18
19
20
21
22
23
24
25
26
27
28
29
30
31
| server:
port: 8081
servlet:
context-path: /adminT
spring:
application:
name: adminservice
cloud:
nacos:
discovery:
server-addr: localhost:8848
namespace: 3ca6aa57-0ad4-4ffe-bdc4-7bd4fc1d1149
datasource:
druid:
username: root
password: root
url: jdbc:mysql://localhost:3306/home?serverTimezone=Asia/Shanghai&useUnicode=true&characterEncoding=UTF-8
driver-class-name: com.mysql.cj.jdbc.Driver
type: com.alibaba.druid.pool.DruidDataSource
mybatis-plus:
mapper-locations: classpath:mapper/*/*.xml
configuration:
log-impl: org.apache.ibatis.logging.stdout.StdOutImpl
|
在使用不同命名空间时,配置的文件的方式是不一样的。如果是public,则可以安装上吗的简化配置,但如果需要其他的命名空间,则需要采用bootstrap.yml的配置方式。


